
Many of us who have been working in FileMaker for some time have solutions built on the Classic Theme. “Classic” sounds good, doesn’t it? Who wouldn’t want to build something “Classic?” Well, fellow FileMaker developers, in this case we do want to clear out that old classic, Classic Theme. In this article, find out about a 2-step process to update the meat of your layouts to something leaner, faster, and better-looking than the good old Classic solution you have today.
*****************
The concept of a theme was introduced in FileMaker 12, providing developers with a coordinated set of layout objects. Each theme is a collection of styles that can be applied to objects, specifying the fill, line, font, padding, and other attributes for each type of object on a layout, including its various potential states (active, inactive, hover, pressed, in focus, etc). Some objects are more complex and have more attributes than others. Lines are fairly simple, while button bars have many different components you can customize. (You can read a previous article about themes and styles here.) Styles, once defined, can be reused for similar objects across layouts in a solution that share the same theme. This saves both space in the solution and developer effort in specifying attributes for objects.
FileMaker 13 added the ability to save your own custom styles and themes based on an existing theme, as well as some theme management tools, such as the ability to import a theme into another file. It also increased the number of attributes exposed in the Inspector, such as inner/outer shadows and text padding.
There were some minor updates to themes in FileMaker 14, such as the new Minimalist themes. A number of FileMaker 13 themes were deprecated (although any layouts built on those themes will continue to work), and some new ones were added. Finally, the Classic theme was removed as an option for new layouts, although any layouts created in Classic from previous versions remain.
What’s up with Classic?
Once themes were introduced, any layouts that were created in FileMaker 11 or earlier were labeled “Classic,” to differentiate them from the new, optimized themes provided by FileMaker. This doesn’t sound too bad, except that Classic comes with a number of inherent drawbacks, which are only magnified with each new version of FileMaker.
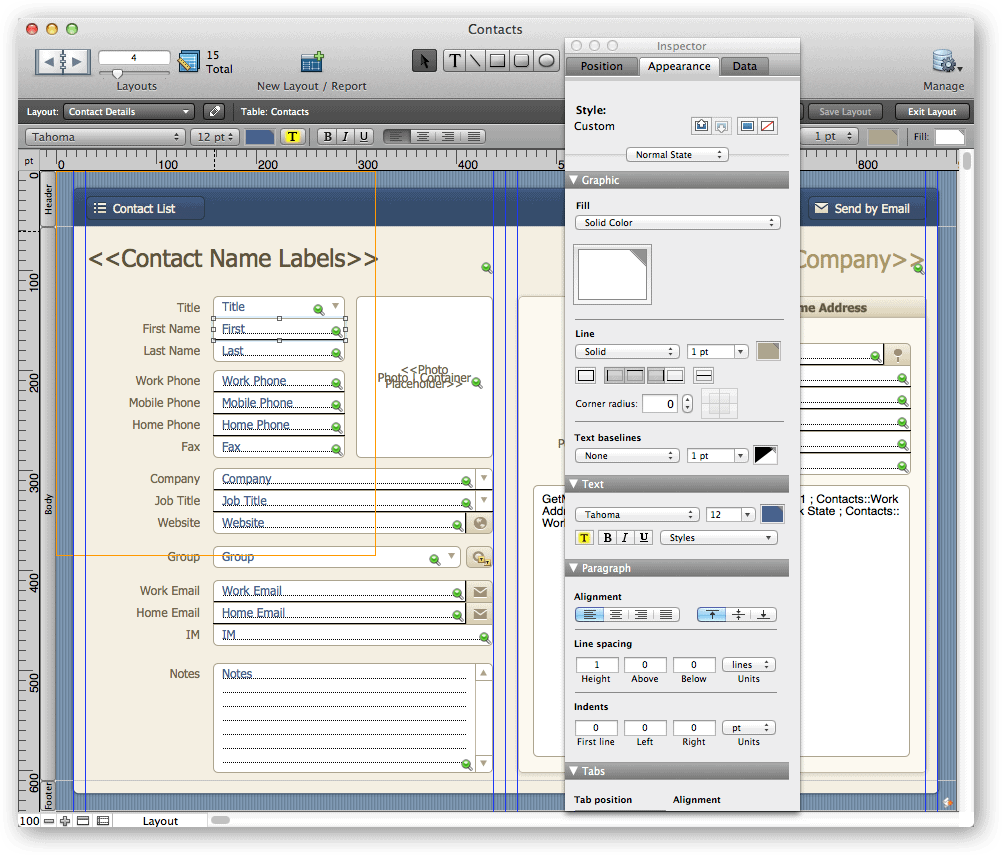
Because the Classic theme predated FileMaker’s current themes and styles feature, the only styles it contains are “default.” Chances are that you changed line attributes, fonts and colours in your layouts from the defaults in Classic, so those objects are likely to have lots of local styling (meaning that objects don’t share any styles, so attributes are defined and stored behind the scenes on an object-by-object basis). This can exact a significant performance penalty, especially in WebDirect.
Speaking of WebDirect, the Classic theme is strongly discouraged as it will not render properly in WebDirect. Some built-in Classic behaviours are simply not supported on the web, and are likely to cause visual or functional problems. Even in FileMaker, Classic has a number of undesirable behaviours you can’t control, such as dimming inactive tab controls and the inactive tab size change.
You can save changes to a style on a Classic-themed layout, but FileMaker will not allow you to save any changes to the Classic theme itself, nor will you find it listed as one of the choices for a theme. It will persist in the file if it already exists from a previous version, but you can’t choose it for a new layout. You could customize the Classic layout and save it as a new theme, but because of its inherent drawbacks, that is not recommended either. (FileMaker remembers your base theme in the CSS that runs behind the scenes.)
In short, the Classic theme is meant as a way for you, the developer, to transition to one of the newer, more modern themes.
Choose a new theme
So now that we know why Classic needs to go, what do we do? We may have legacy solutions built entirely on this theme. Personally, I have invested significant time and effort making Classic themed-layouts look good in solutions originally built in FileMaker 12 or earlier. (See below.)
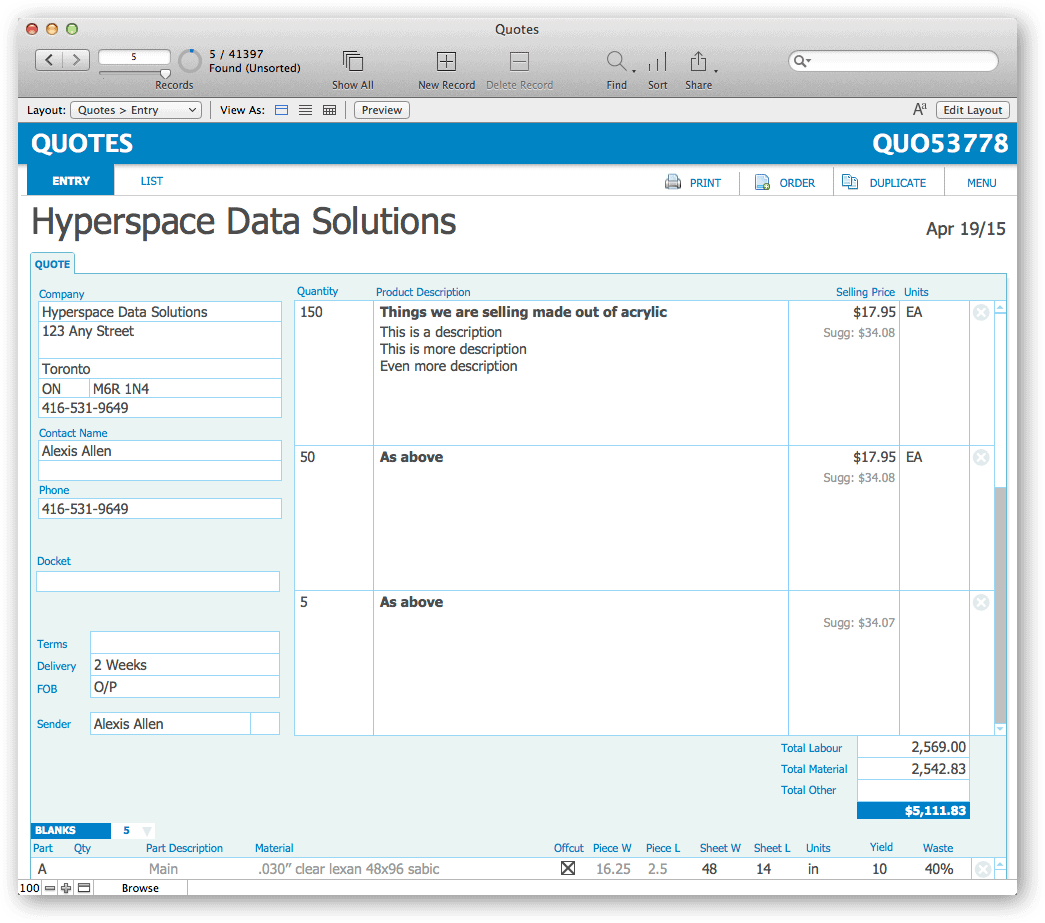
In any case, it’s time to roll up our sleeves and get to work. Don’t worry, though. Here’s a strategy for converting an existing solution away from the Classic Theme, so that you can make the most of what FileMaker has to offer. Once you’re done, you’ll be rewarded with smaller files, faster layouts, and a much easier, organized and more efficient way to build new layouts in the future.
First off, you have a decision to make. You can:
A) keep the sizing the same as what was used in Classic (best if you want to do as little revision as possible to the design of your layouts),
or
B) choose to do a little more work and change to a new theme that has different default field height, scrollbar width, and other size differences.
You should select option A if you want to do as little work as possible to transition away from Classic. In this case, choose one of the Classic Refined themes as your base theme. The default object sizes are the same as those in the Classic theme, so your layouts will undergo minimal changes when you switch themes.
You may, however, want to take the opportunity to redesign and update the look of your solution at the same time as converting, in which case choose one of the other available themes. If you are touching every layout anyway, now is a good time to do a facelift. If you’re planning to do a lot of heavy customization, choose the Minimalist theme. It contains no styles other than the defaults, freeing you from having to remove a lot of stuff you don’t want from the theme later.
When choosing a new theme, pay special attention to the style of the theme’s scrollbar and drop down menu, as these aren’t exposed in the inspector and can’t be changed in FileMaker. Make sure to choose one you like, including the colour of the scrollbar.
Controversy alert: Note that you may be able to tweak the CSS using a tool such as Theme Studio, however this approach is not recommended by FileMaker, as their CSS interpretation could (and likely will) change without notice in the future.
It’s unlikely you’d lose any data as a result, but you could potentially experience FileMaker overwriting, changing, or ignoring your CSS tweaks and ruining your carefully-crafted design. On the other hand, I have heard the argument that CSS is a standard outside of FileMaker’s control so whatever changes they make must comply with CSS rules. Consider yourself warned and proceed at your own risk, knowing that any tweaks you make directly to the CSS are unsupported and not recommended.
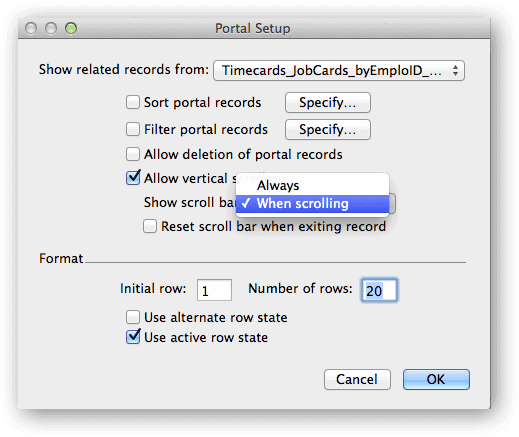
One last note about scrollbars: There is an option to use inline scrollbars. This only shows a scrollbar slider on a portal when the user is actually scrolling, which looks very slick and frees you from the issue of how the scrollbars look in a given theme. It does require a scroll wheel or scrolling capability on the user’s mouse, so make sure that your users are equipped appropriately if you choose this option.
Do the work
Step 1. Create a custom theme layout
- Navigate to an existing Classic layout that has most or all of the objects you plan to style on it. Select all the objects on the layout and copy them to the clipboard.
- Create a new layout (name it “Theme” or something similar) with the new theme of your choice. I like to delete the header and footer and enlarge the body part so that I have enough space for everything. Paste the copied objects onto the layout.
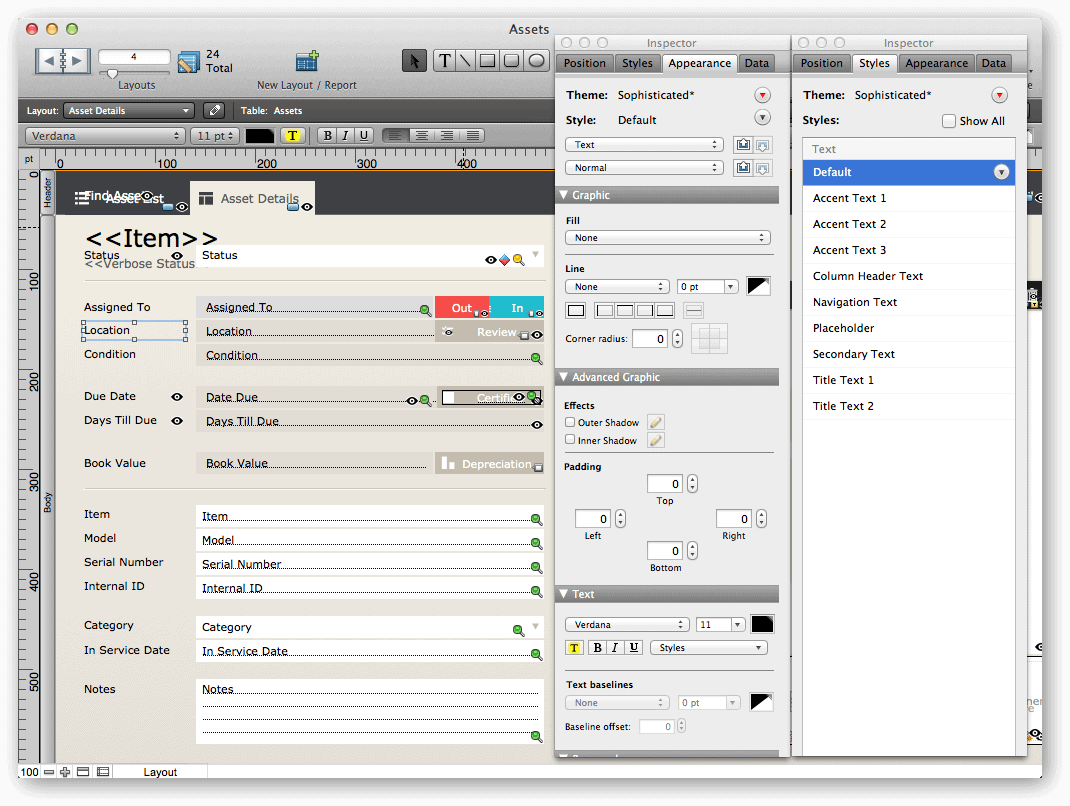
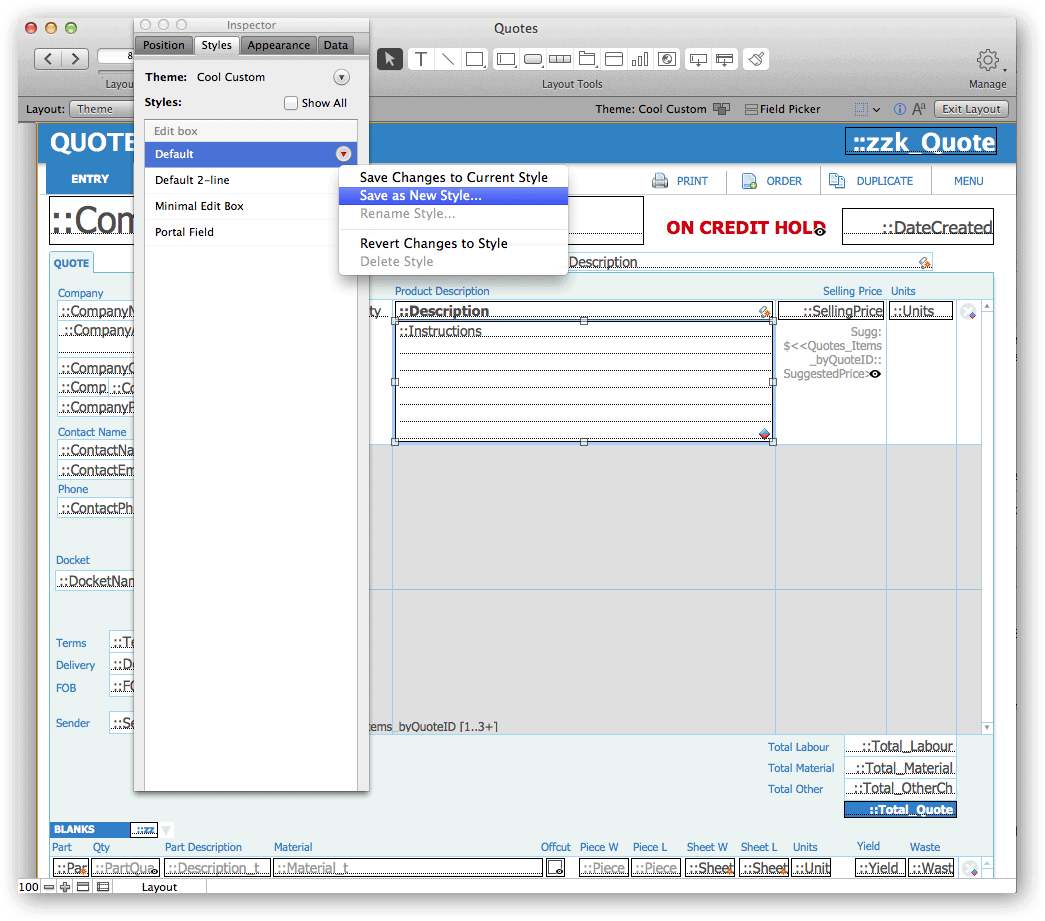
- Select an object and save the changes back to the style, or create a new style (see below) where appropriate. You actually only need to save one object type for each separate style you have, e.g. one main header text, one secondary header text, one default text field, one 2-line text field, one default portal, one default tab, etc. You can delete other copies of similarly-styled objects from the layout. Make sure to specify a “default” for each object type, since that is the style all your Classic objects will inherit. This will lessen the amount of work you’ll have later in selecting objects when you convert your Classic layouts.
- Save the changes to the theme, or save it as a new custom theme (I recommend saving it as a new theme so you know definitively that it’s the one you customized).
Step 2. Change your existing layouts
- Navigate to an existing Classic layout.
- Change the theme to your new custom theme. All the objects will now have the theme’s default attributes for their type. This will be perfect for the majority of objects on the layout, but some others will require you to assign them a style.
- Before doing anything else, immediately select Edit > Undo Style to preserve any local styling you may have on the layout. Anything that was changed by the theme will change back as a result of this step.
- Select each object and make sure it is assigned one of the theme’s styles. If you missed an object and need to create a new style (and you very likely will), then make sure to copy and paste it afterwards to your Theme layout for future reference. You may want to delete any styles that were part of the original theme, that you aren’t using. (In BaseElements, you can find these as an Alert on the Style.)
Watch-outs
- Name your styles by function, never by colour. It will make it easier to keep track of what is used where, especially if you decide to change colour schemes in the future.
- Beware of using the Format Painter. Even if the original object has a style, it paints the target object with local styling, which is to be avoided. [Update: Apparently the Format Painter will paste the style to the target object, but you must still save the object to the style after pasting, or it’s considered locally styled. An extra step, but it works.]
- Make sure you have every object assigned to a Style. You can find locally styled objects using BaseElements or Inspector Pro. In BaseElements, it’s found as a Performance Alert on the object.
- FileMaker 12 can read but not edit custom themes. So don’t make a custom theme in FileMaker 13 or later and then try and edit those layouts in layout mode in FileMaker 12. Because it’s a feature that it doesn’t understand, FileMaker 12 will revert all your changes and your hard work will be lost, even if you reopen it in FileMaker 13 or higher. Ideally, migrate away from FileMaker 12 completely if possible.
One last wish
The only desirable thing that the Classic theme has that the others don’t, is the ability to change the line and fill colour of the scrollbars. I fervently wish for this attribute to be customizable in a future version of FileMaker! (Scrollbars are a big issue for me, clearly.)
Conclusion
Transitioning from Classic to another theme is definitely an investment in time, but you can be confident it’s worth it. Being able to use themes and styles is a huge advantage in any development you do going forward, and you’ll be rewarded by quicker performance and more efficient use of resources for the continuing life of the system. Put on your favourite music to help you push through all the copying, pasting and selecting, and go for it with gusto!
Read Part 2 of this article: Converting from the Classic Theme – The Glory
Great article Alexis, thanks.
One thing to keep in mind is that although we were warned about using format painter in FM13 (because of added CSS code), it has been said that in FM14 style optimization was introduced and we are safe to use it again (:
Thanks Dan. Yes, there is this article that says that you can use the Format Painter to copy/paste a style: https://www.filemaker.com/help/14/fmp/en/html/edit_layout.10.33.html#1147978
However, when I tried it, even though it did change the style, it gave the object a red triangle, indicating local styling. I suppose you could then re-save the style to the object.
Possibly. I just repeated what someone at FMI said when I asked about it.
I guess the only real way to find out is to compare the CSS code before and after.
When I get some free time (:
On Facebook, developer Lisette Wilson suggests using fmXRaySpecs http://workflowdata.com/fmxrayspecs.html to help find locally-styled objects.
“Copy all layout objects in layout mode, then refresh from clipboard in fmXRaySpecs to find out which objects are not styled. It’s faster than running a DDR and you are working layout by layout anyway.”
Apparently, the DevCon video links are not available to TechNet members. Perhaps they are FBA only?
I’m not presently FBA and am able to see them. I think TechNet is now the FileMaker Community so perhaps the logins are different?
I believe that access to some of the FM DevCon videos is restricted to having attended and that others have been placed outside the firewall.
Alexis, nice job on this blog post!
Tony White
Thanks for this article!
I am updating a database that was originally created in FMP7 updated to FMP10. We have recently updated to 14.
There is one behavior that is making layout work challenging, that I can’t seem to find a work around.
The background in Layout Mode stubbornly remains grey. I can add a fill color or even an image, but I won’t see it in Layout Mode. Browse, Find and Preview Modes the background take on the attribute and are viewed as expected. Layout mode I get a medium grey. After reading your article, I am suspecting that if I want WYSIWYG in layout mode I need to start over and create a new database.
Looking for a solution I have learned how to change the background, set layout size, change and add styles.
Any words of wisdom?
Thanks,
Dawn
change and edit themes
I haven’t seen this particular issue before, so I don’t have any specific advice. Have you tried changing the base theme?