

Have you ever needed a specific icon, but it’s not included in the icon set you’re using? Well, one solution is to create an SVG icon yourself! In this post, I show you how to create an SVG icon in Sketch, from scratch.
*****************
It can be hard to find an icon set that has every symbol you need. Sometimes I need one that isn’t included in the default set. Since I want all my icons to blend in with each other, I’m left scouring the web to find something that fits in well with my chosen icon style. (There’s nothing that says “sloppy design” quicker than mis-matched icons…but maybe that’s just me.)
Finding icons
There are a few resources you can use to find icons. First, there’s always a Google search for the name of the symbol, plus the word “icon.” Or you can try searching an icon website such as Icon Finder, Icon Scout, SVG Repo, or The Noun Project for your specific symbol. (These search results will also let you know if you’re onto the correct symbol for what you’re trying to represent.)
Be sure to check the licensing terms before you use any icon from the Web in your own work. Some icons are free or open-source (such as those from Material Design Icons), but others are for sale and/or have attribution requirements.
It might be easiest for you to simply pay to get the icons you want. Given the skill, time, and effort that goes into creating an icon—and especially a comprehensive set of icons in a style you like—it can certainly save you oodles of time (read: money). You can try Streamline icons which are well worth the modest price. When you buy a set, you can be totally confident that they’ll blend seamlessly in your app.
Even so, you still might not find an icon in the exact style you want. Or you might not want to pay for a whole set just to get the one icon you need. Something I’ve been doing lately is drawing my own in SVG format. And, for some simple but perhaps hard-to-find icons, you can too.
SVG what?
SVG stands for Scalable Vector Graphics format. It’s different from other graphics formats because instead of an image file, an SVG file consists of XML text that describes how to draw the icon at any size or screen resolution. It means you can resize an icon in this format without losing any crispness on screen. And because it’s XML, SVG files are also considerably smaller than other graphics formats.
SVG format also gives you the added ability to set the colour of an icon based on the results of a calculation in FileMaker, using Conditional Formatting. This is incredibly useful if you’d like to show a different icon colour for an “active” vs. “disabled” button, for instance, based on certain data or conditions.
To make this work, you need to modify the text of the SVG file slightly, and add the “class” attribute wherever you see the fill colour specified. (Instructions below.)
Creating your own icon
So, back to creating your own icon. I’m far from an SVG expert, but I have learned enough about it to successfully create an SVG icon, and I’m sure you can, too. I’m only going to focus on the practical steps for this post, and skip all the theory.
I’m using Sketch 72.4 (Mac only) for this demo. (Windows users, you may be able to adapt these instructions to Inkscape.) The end goal is to create an SVG file you can import as an icon in FileMaker.
As an example, I’m going to show you how to draw a simple flag icon in Sketch. At the end, I’ll also show you how to convert it for use in FileMaker. It consists of two shapes, the “flagpole” and the “flag.”
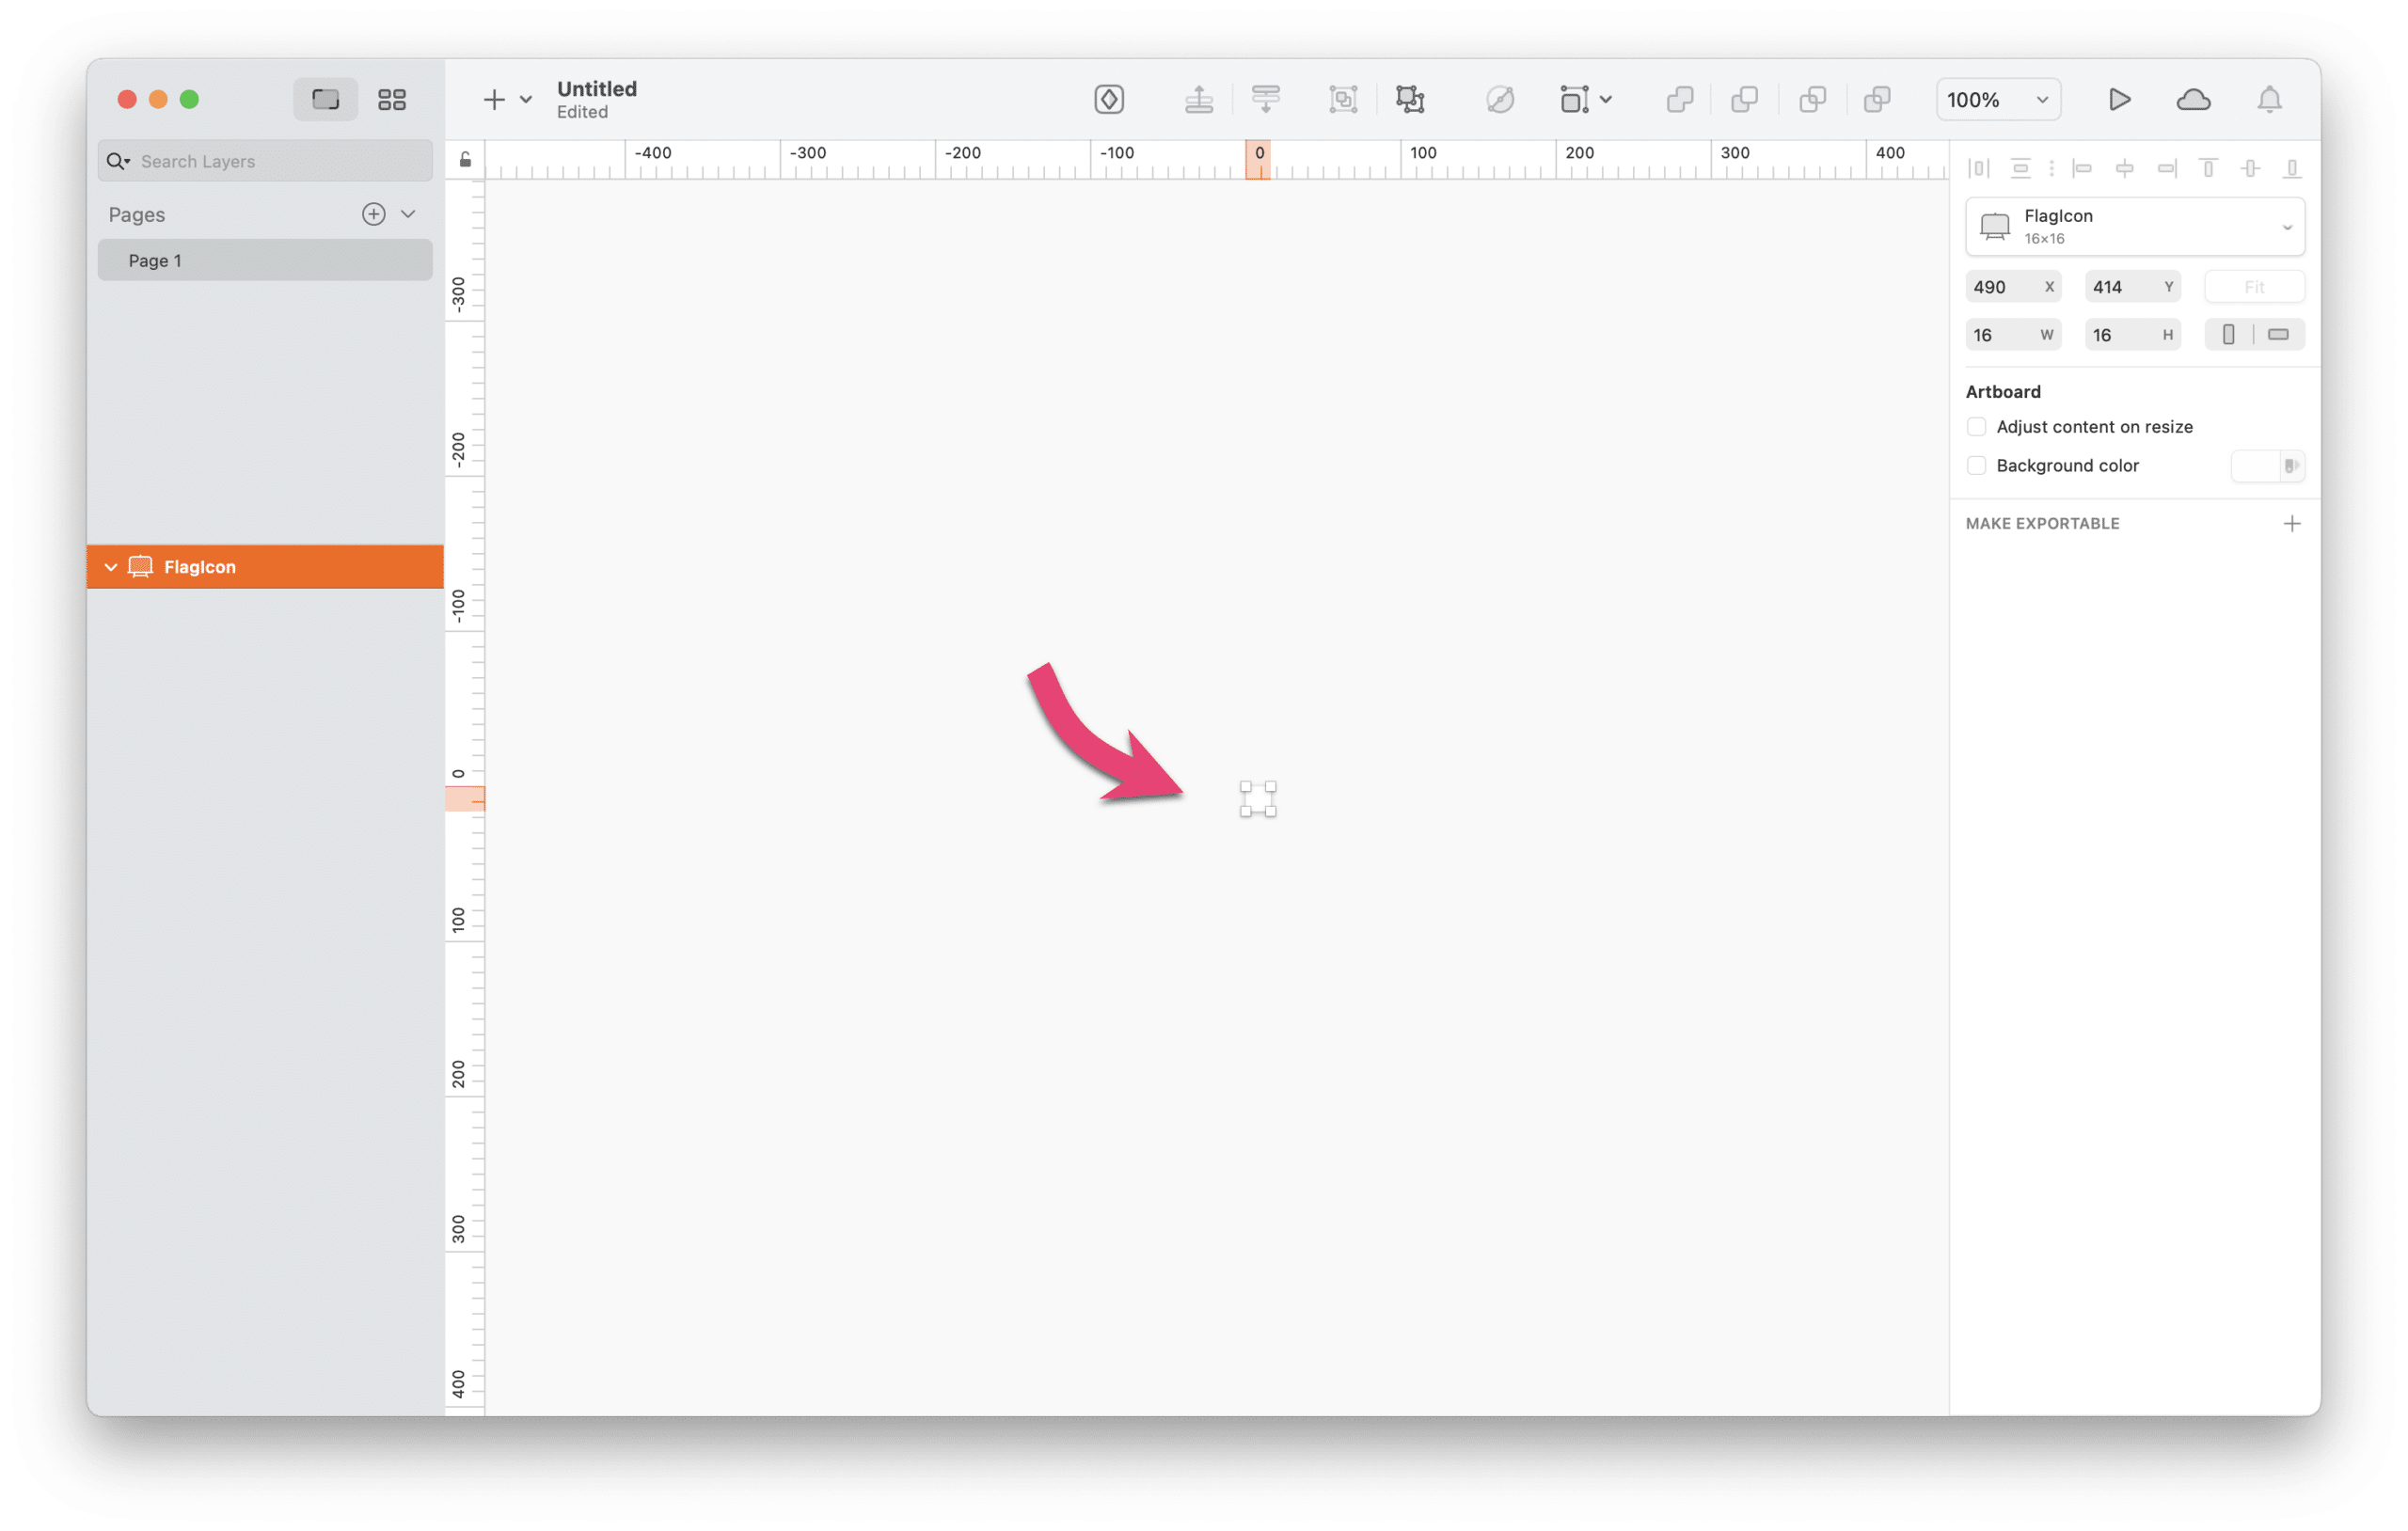
A note about Sketch: You can begin drawing directly on the canvas without creating an Artboard, but it’s easier to judge the scale of what you’re drawing by creating an Artboard first. Especially if you end up drawing a series of icons, it’s easier to compare them if they are on their own individual Artboards.
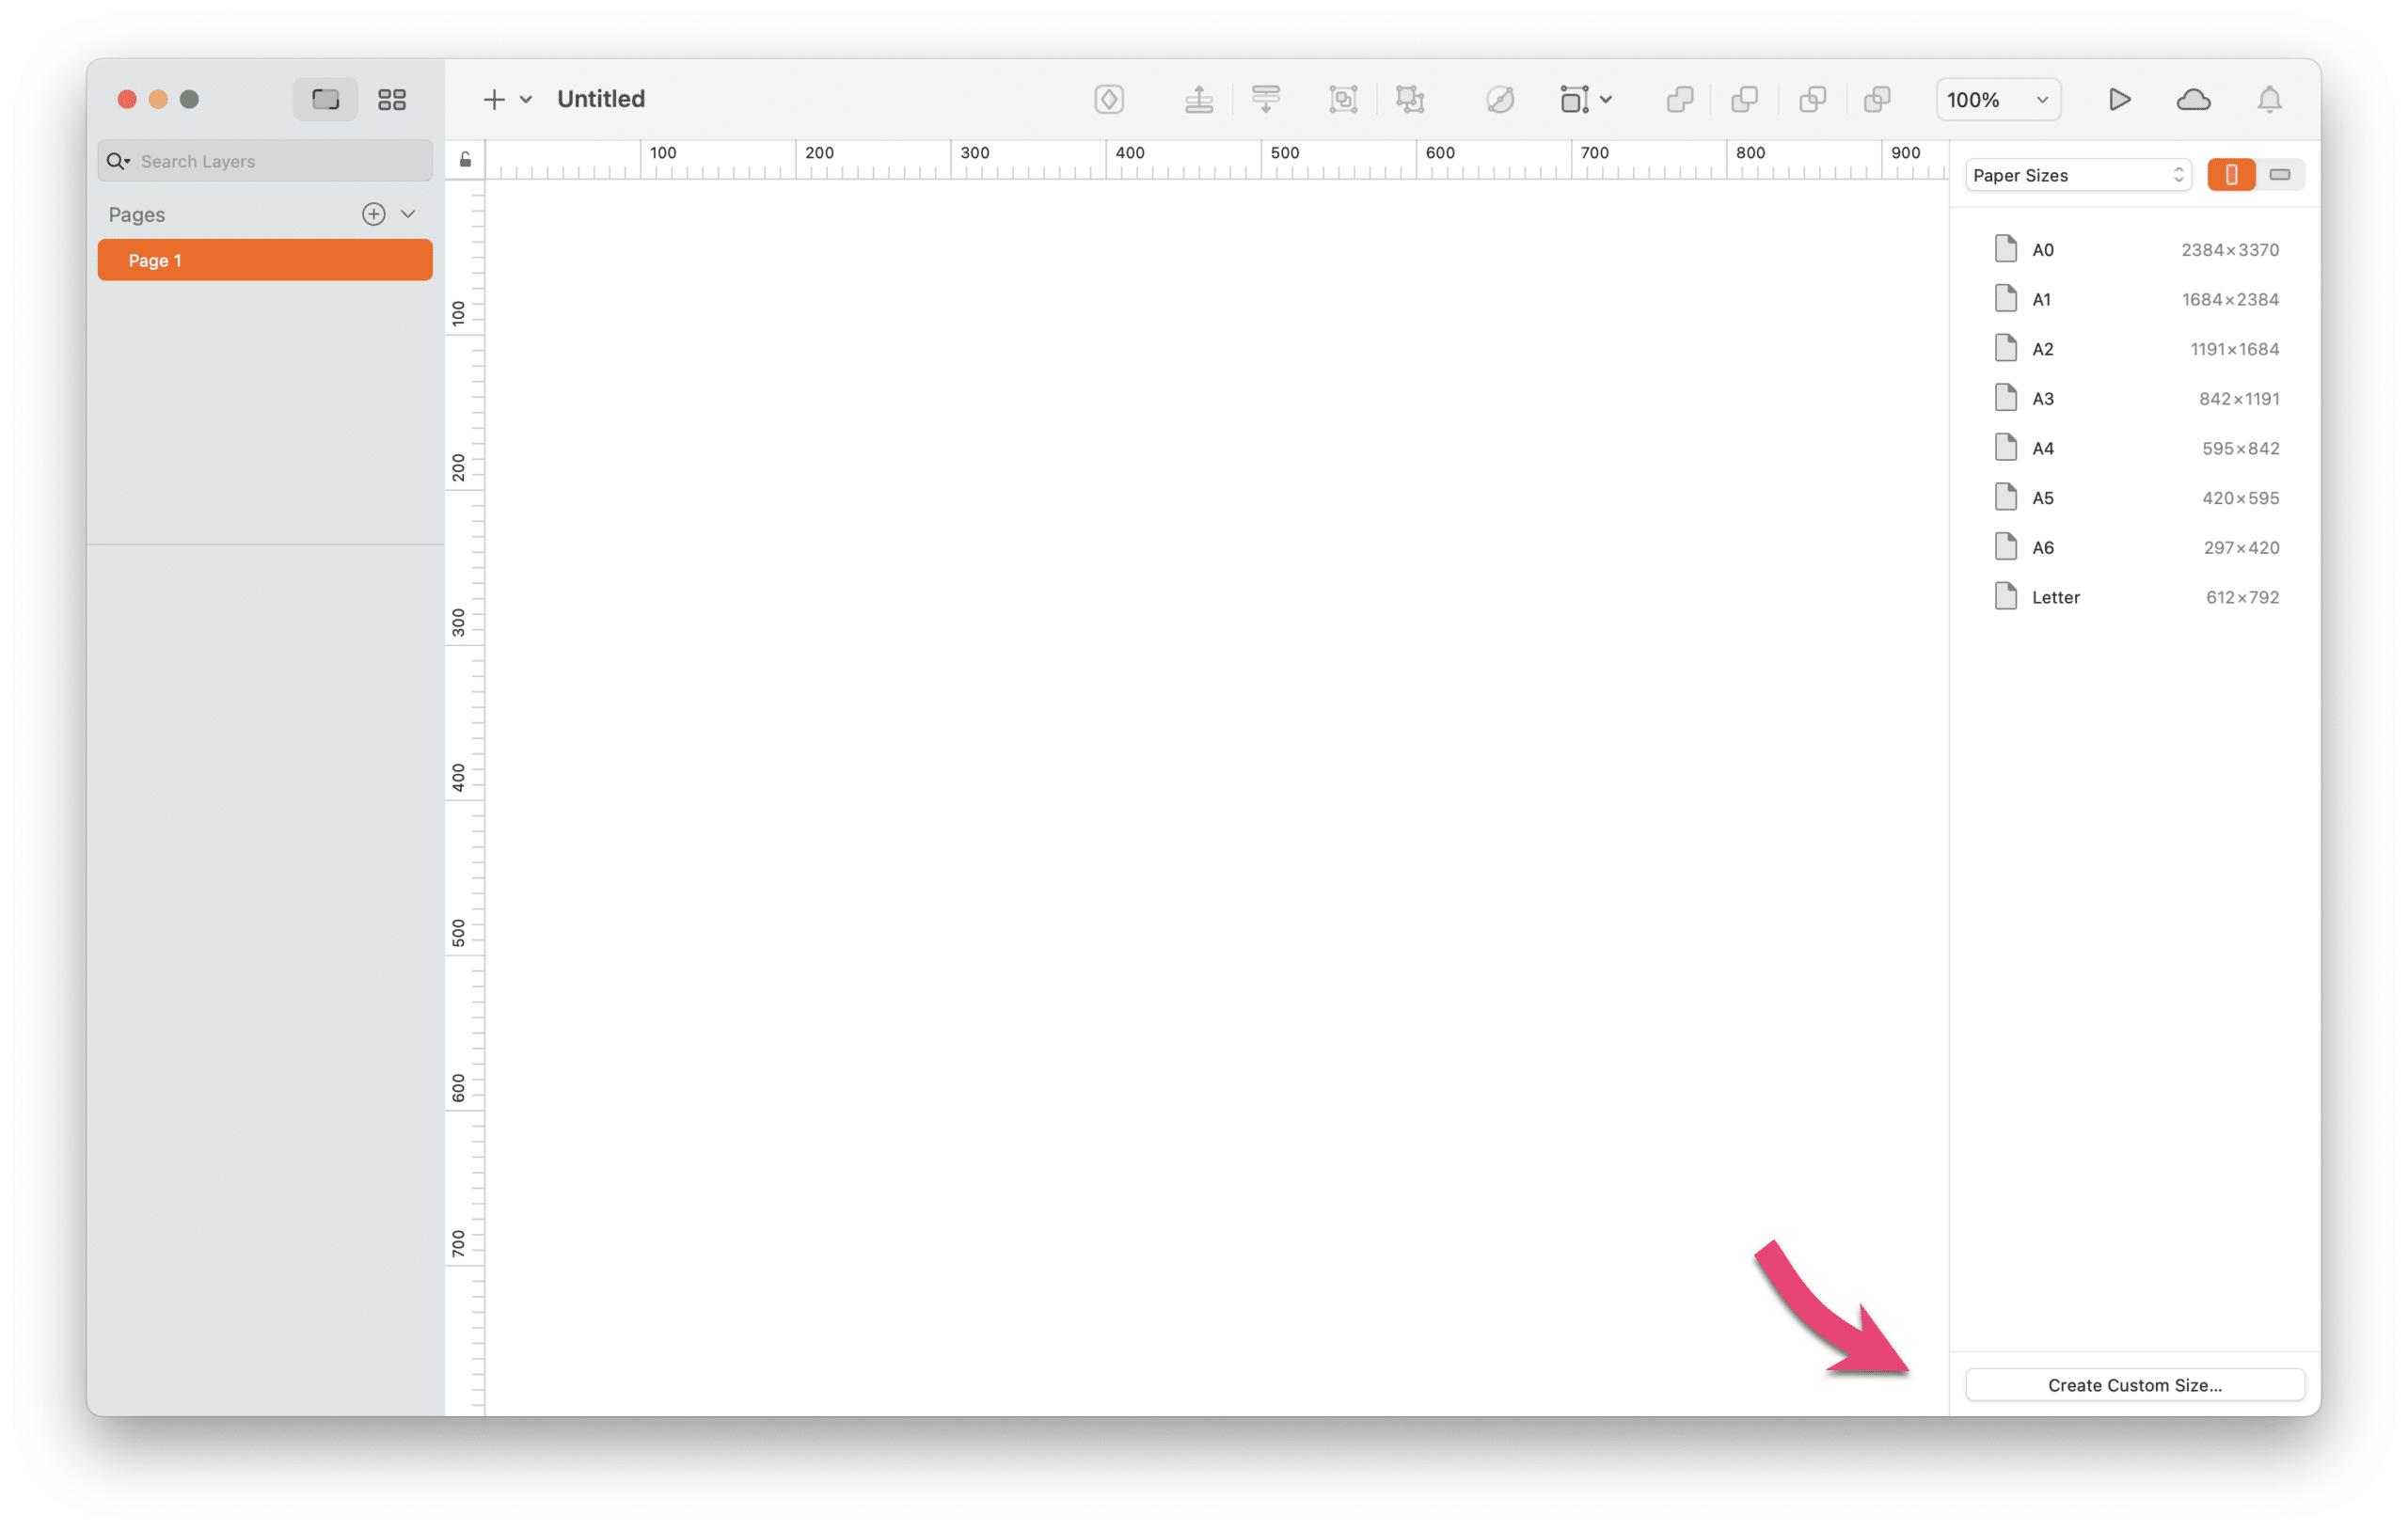
1. Setting up the Artboard
- Create a new document in Sketch and select Insert > Artboard.

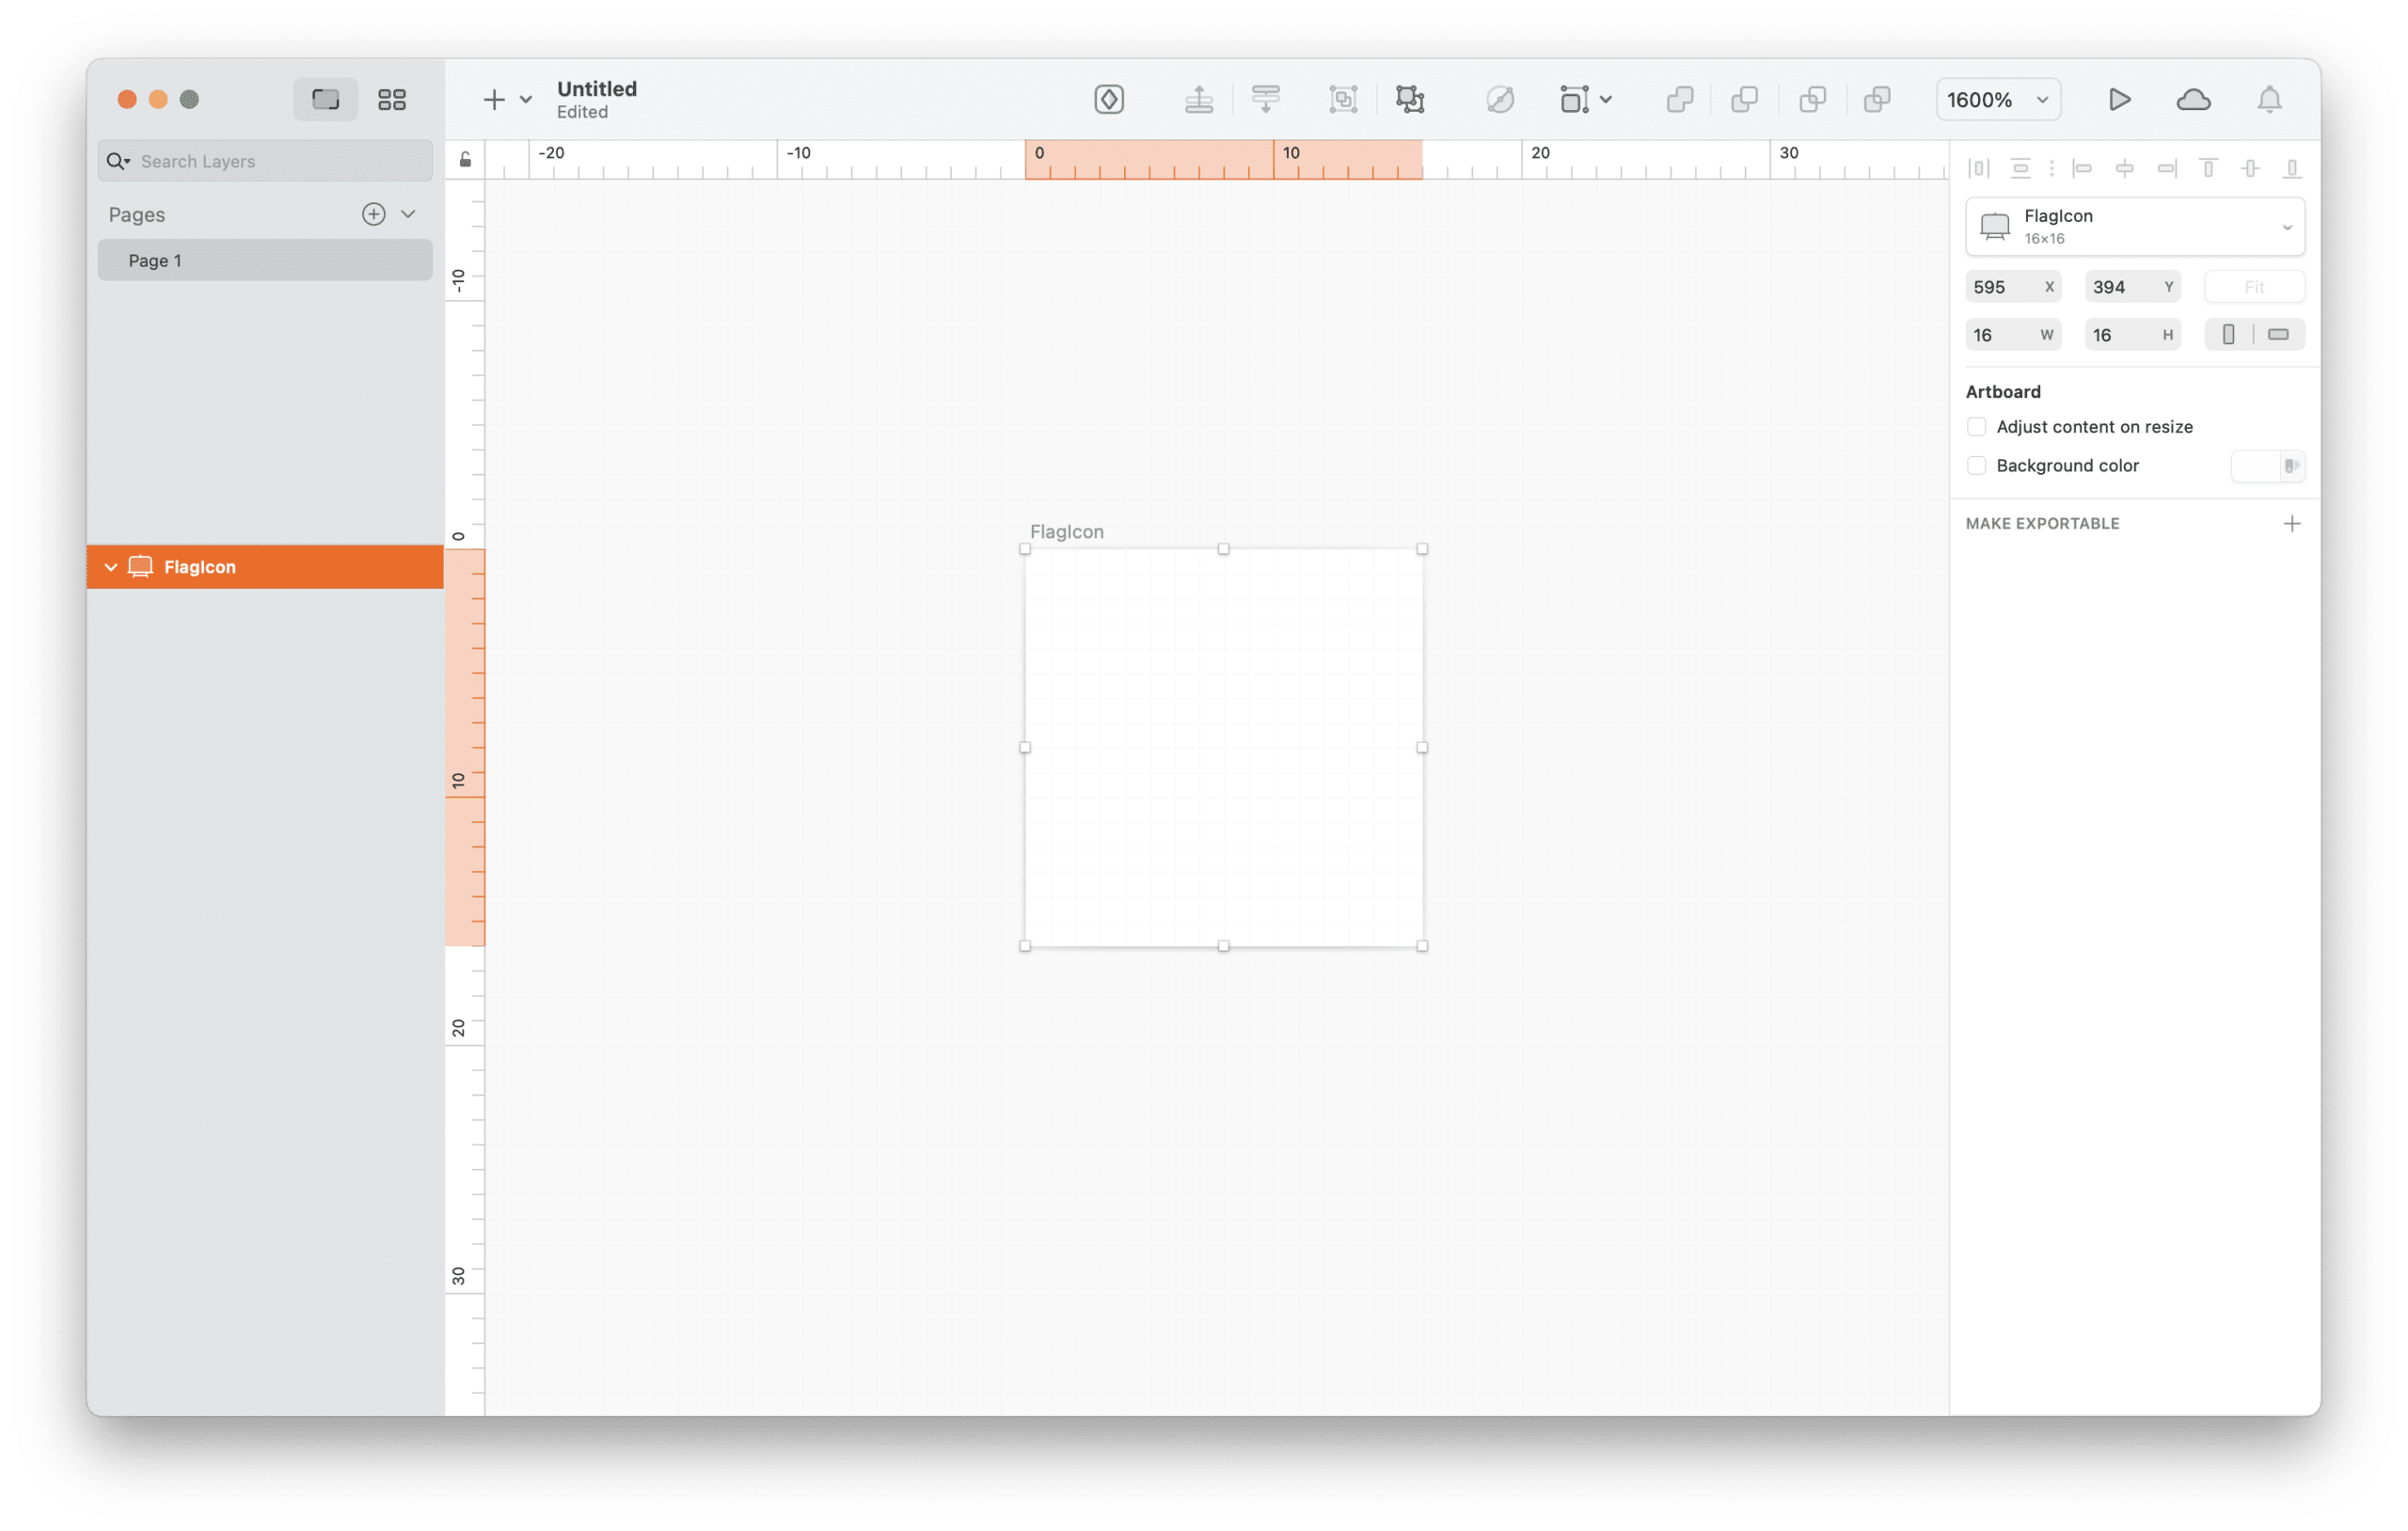
2. Click “Create Custom Size,” found at the bottom of the Inspector panel on the right.
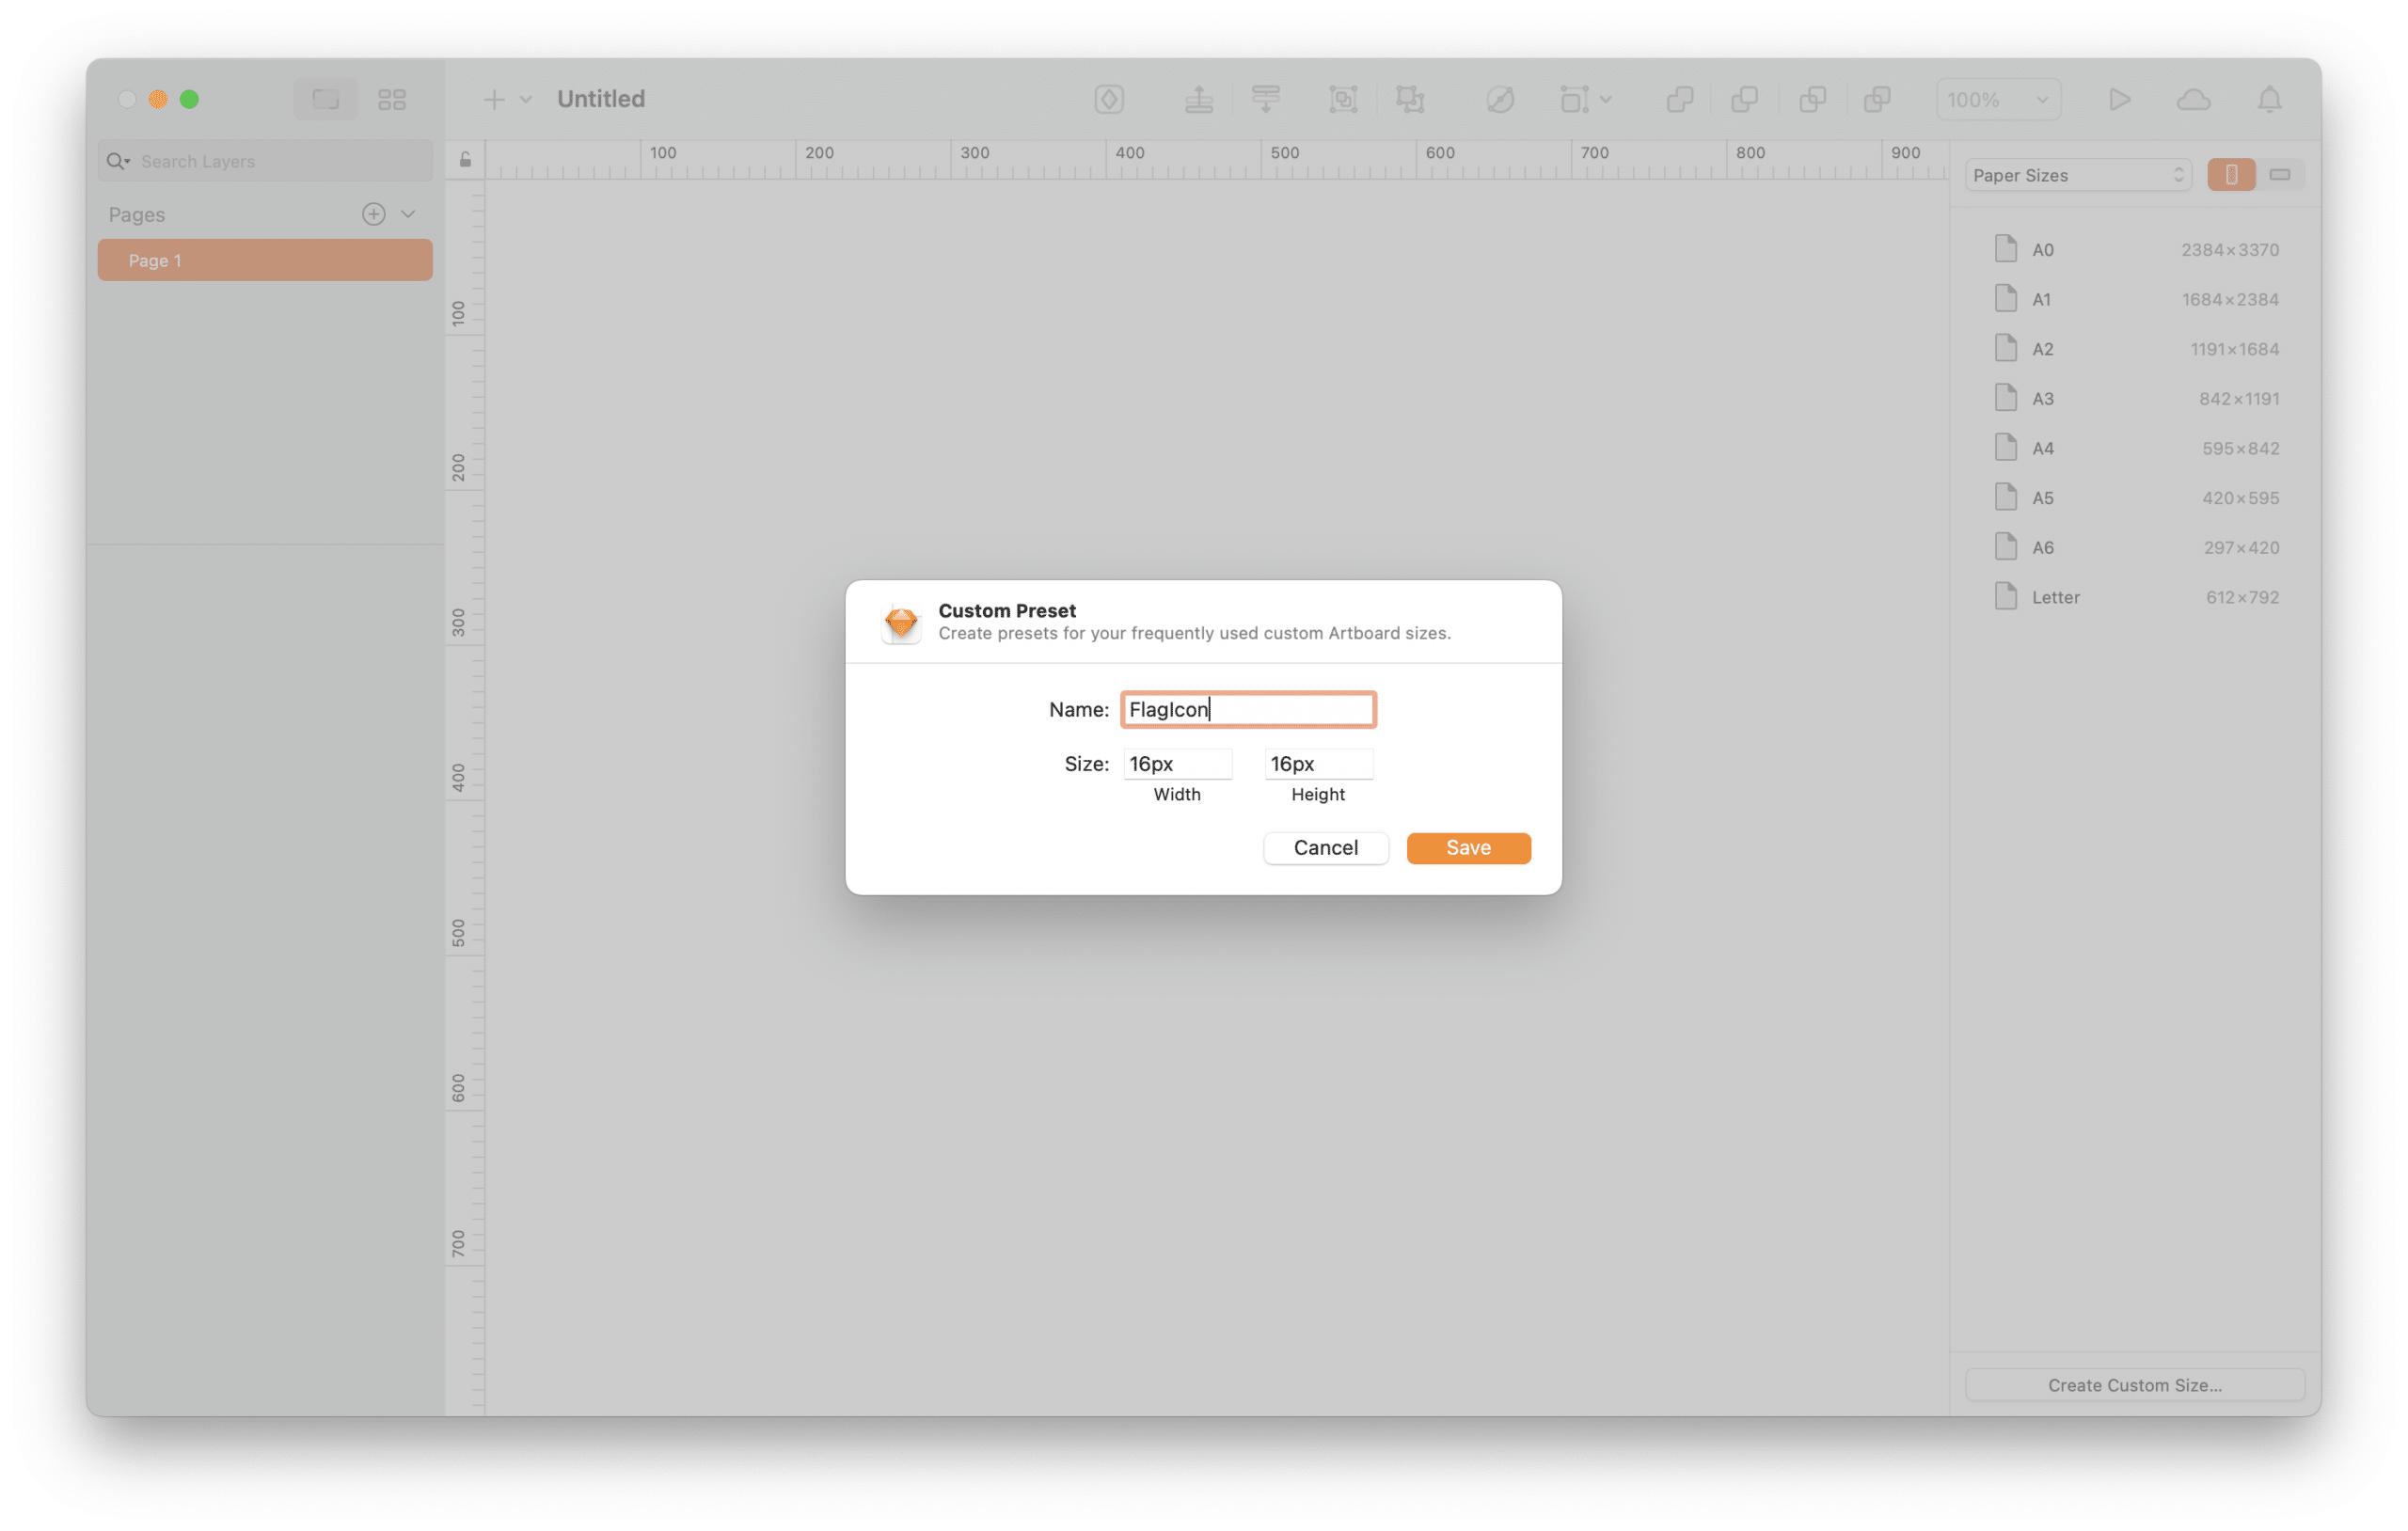
3. Name the Custom Preset and enter 16px x 16px for the size. Click Save.
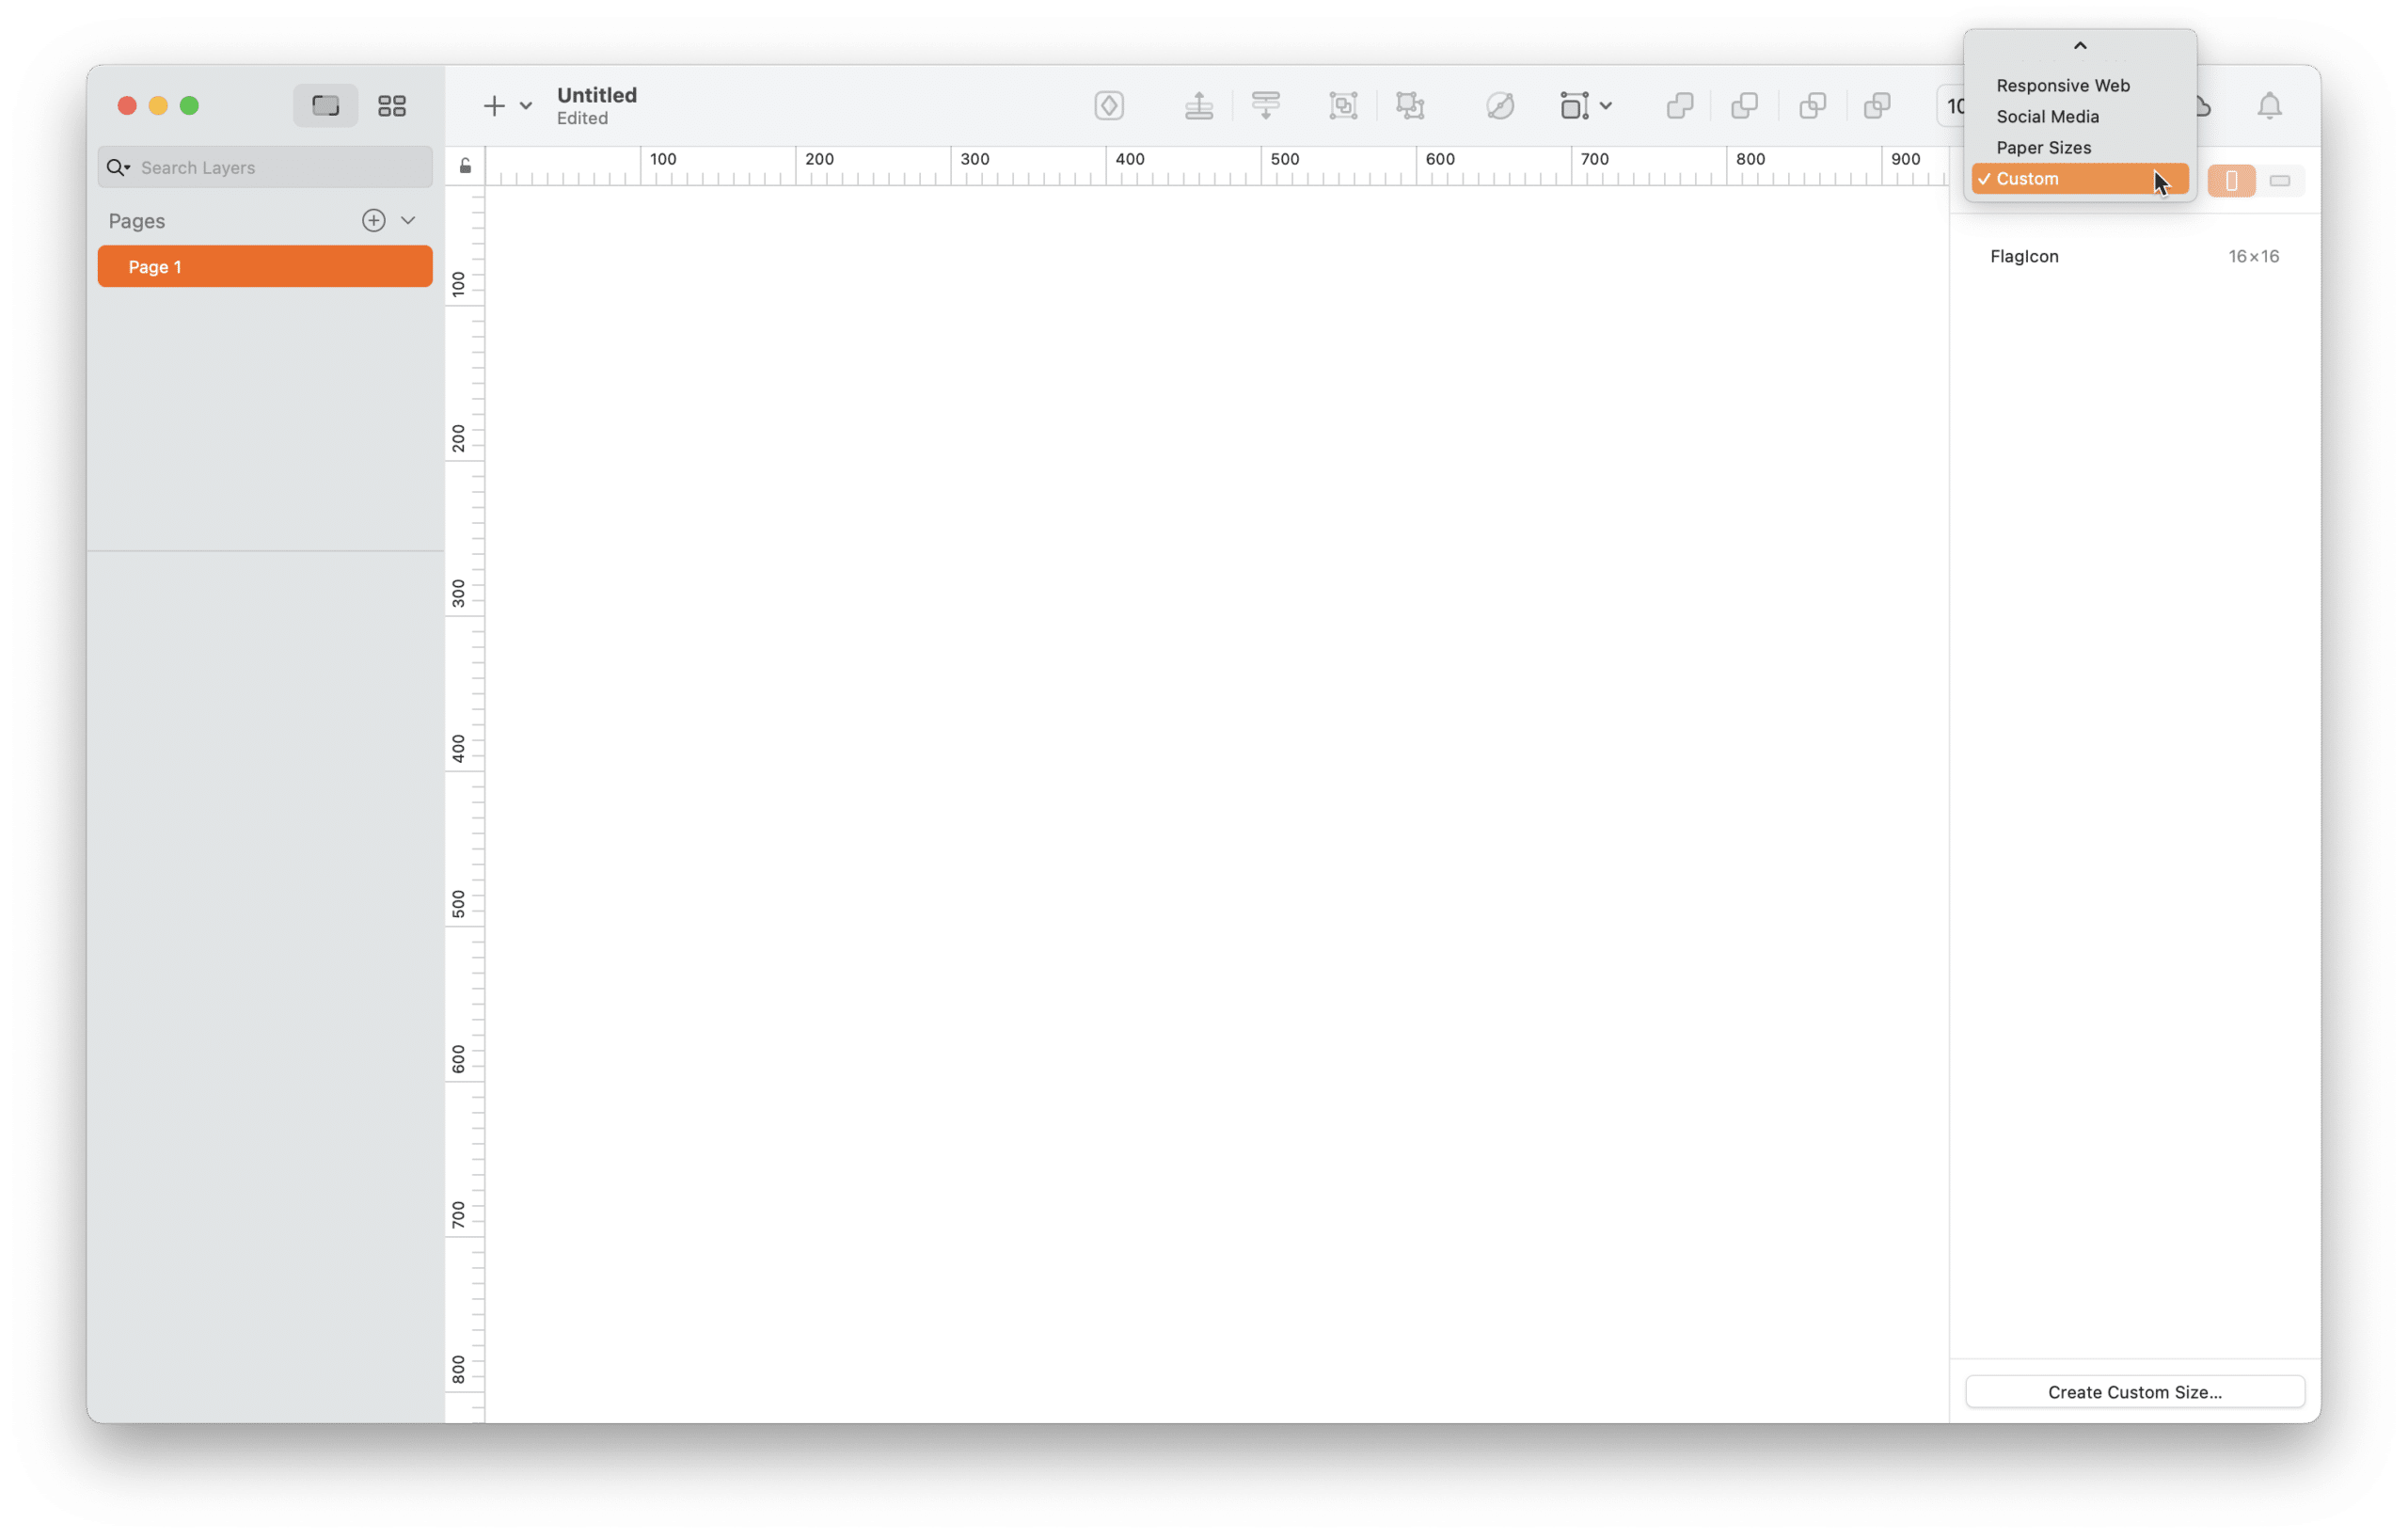
4. In the Inspector panel, make sure “Custom” from the dropdown selector of Artboard sizes is selected.
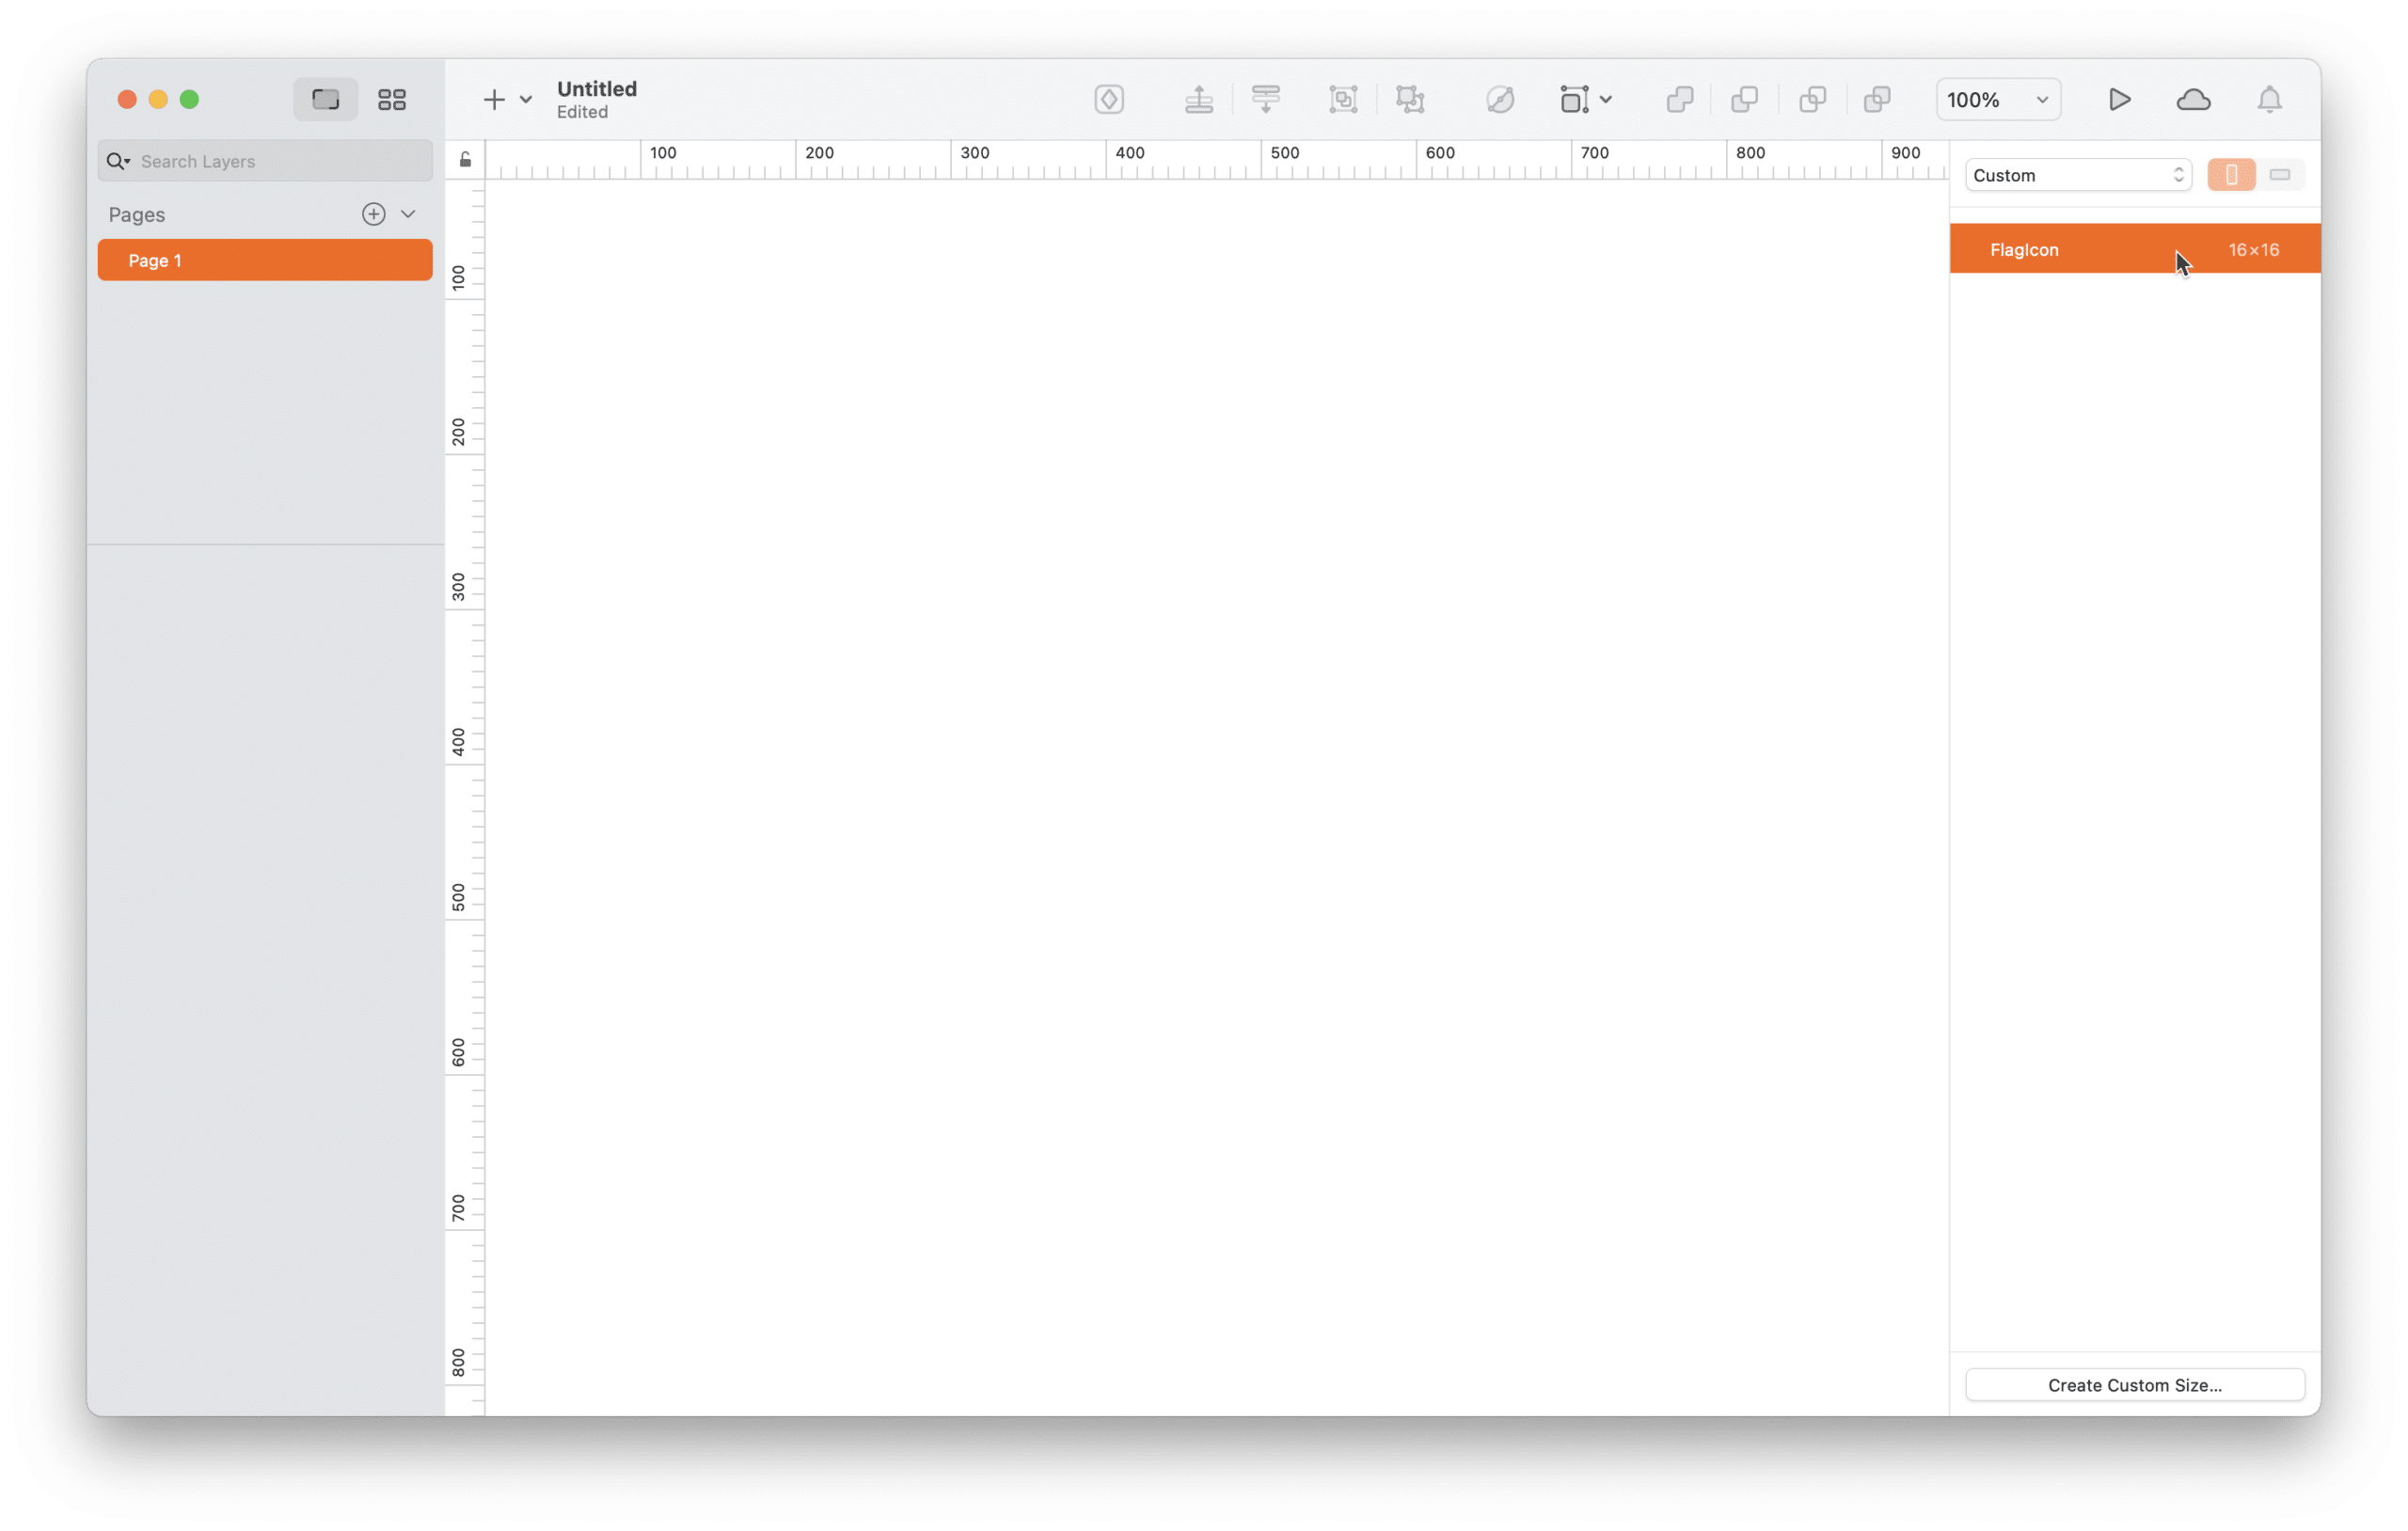
5. Select your custom preset as the size for the Artboard.
6. Sketch creates the Artboard where you can now draw your icon.
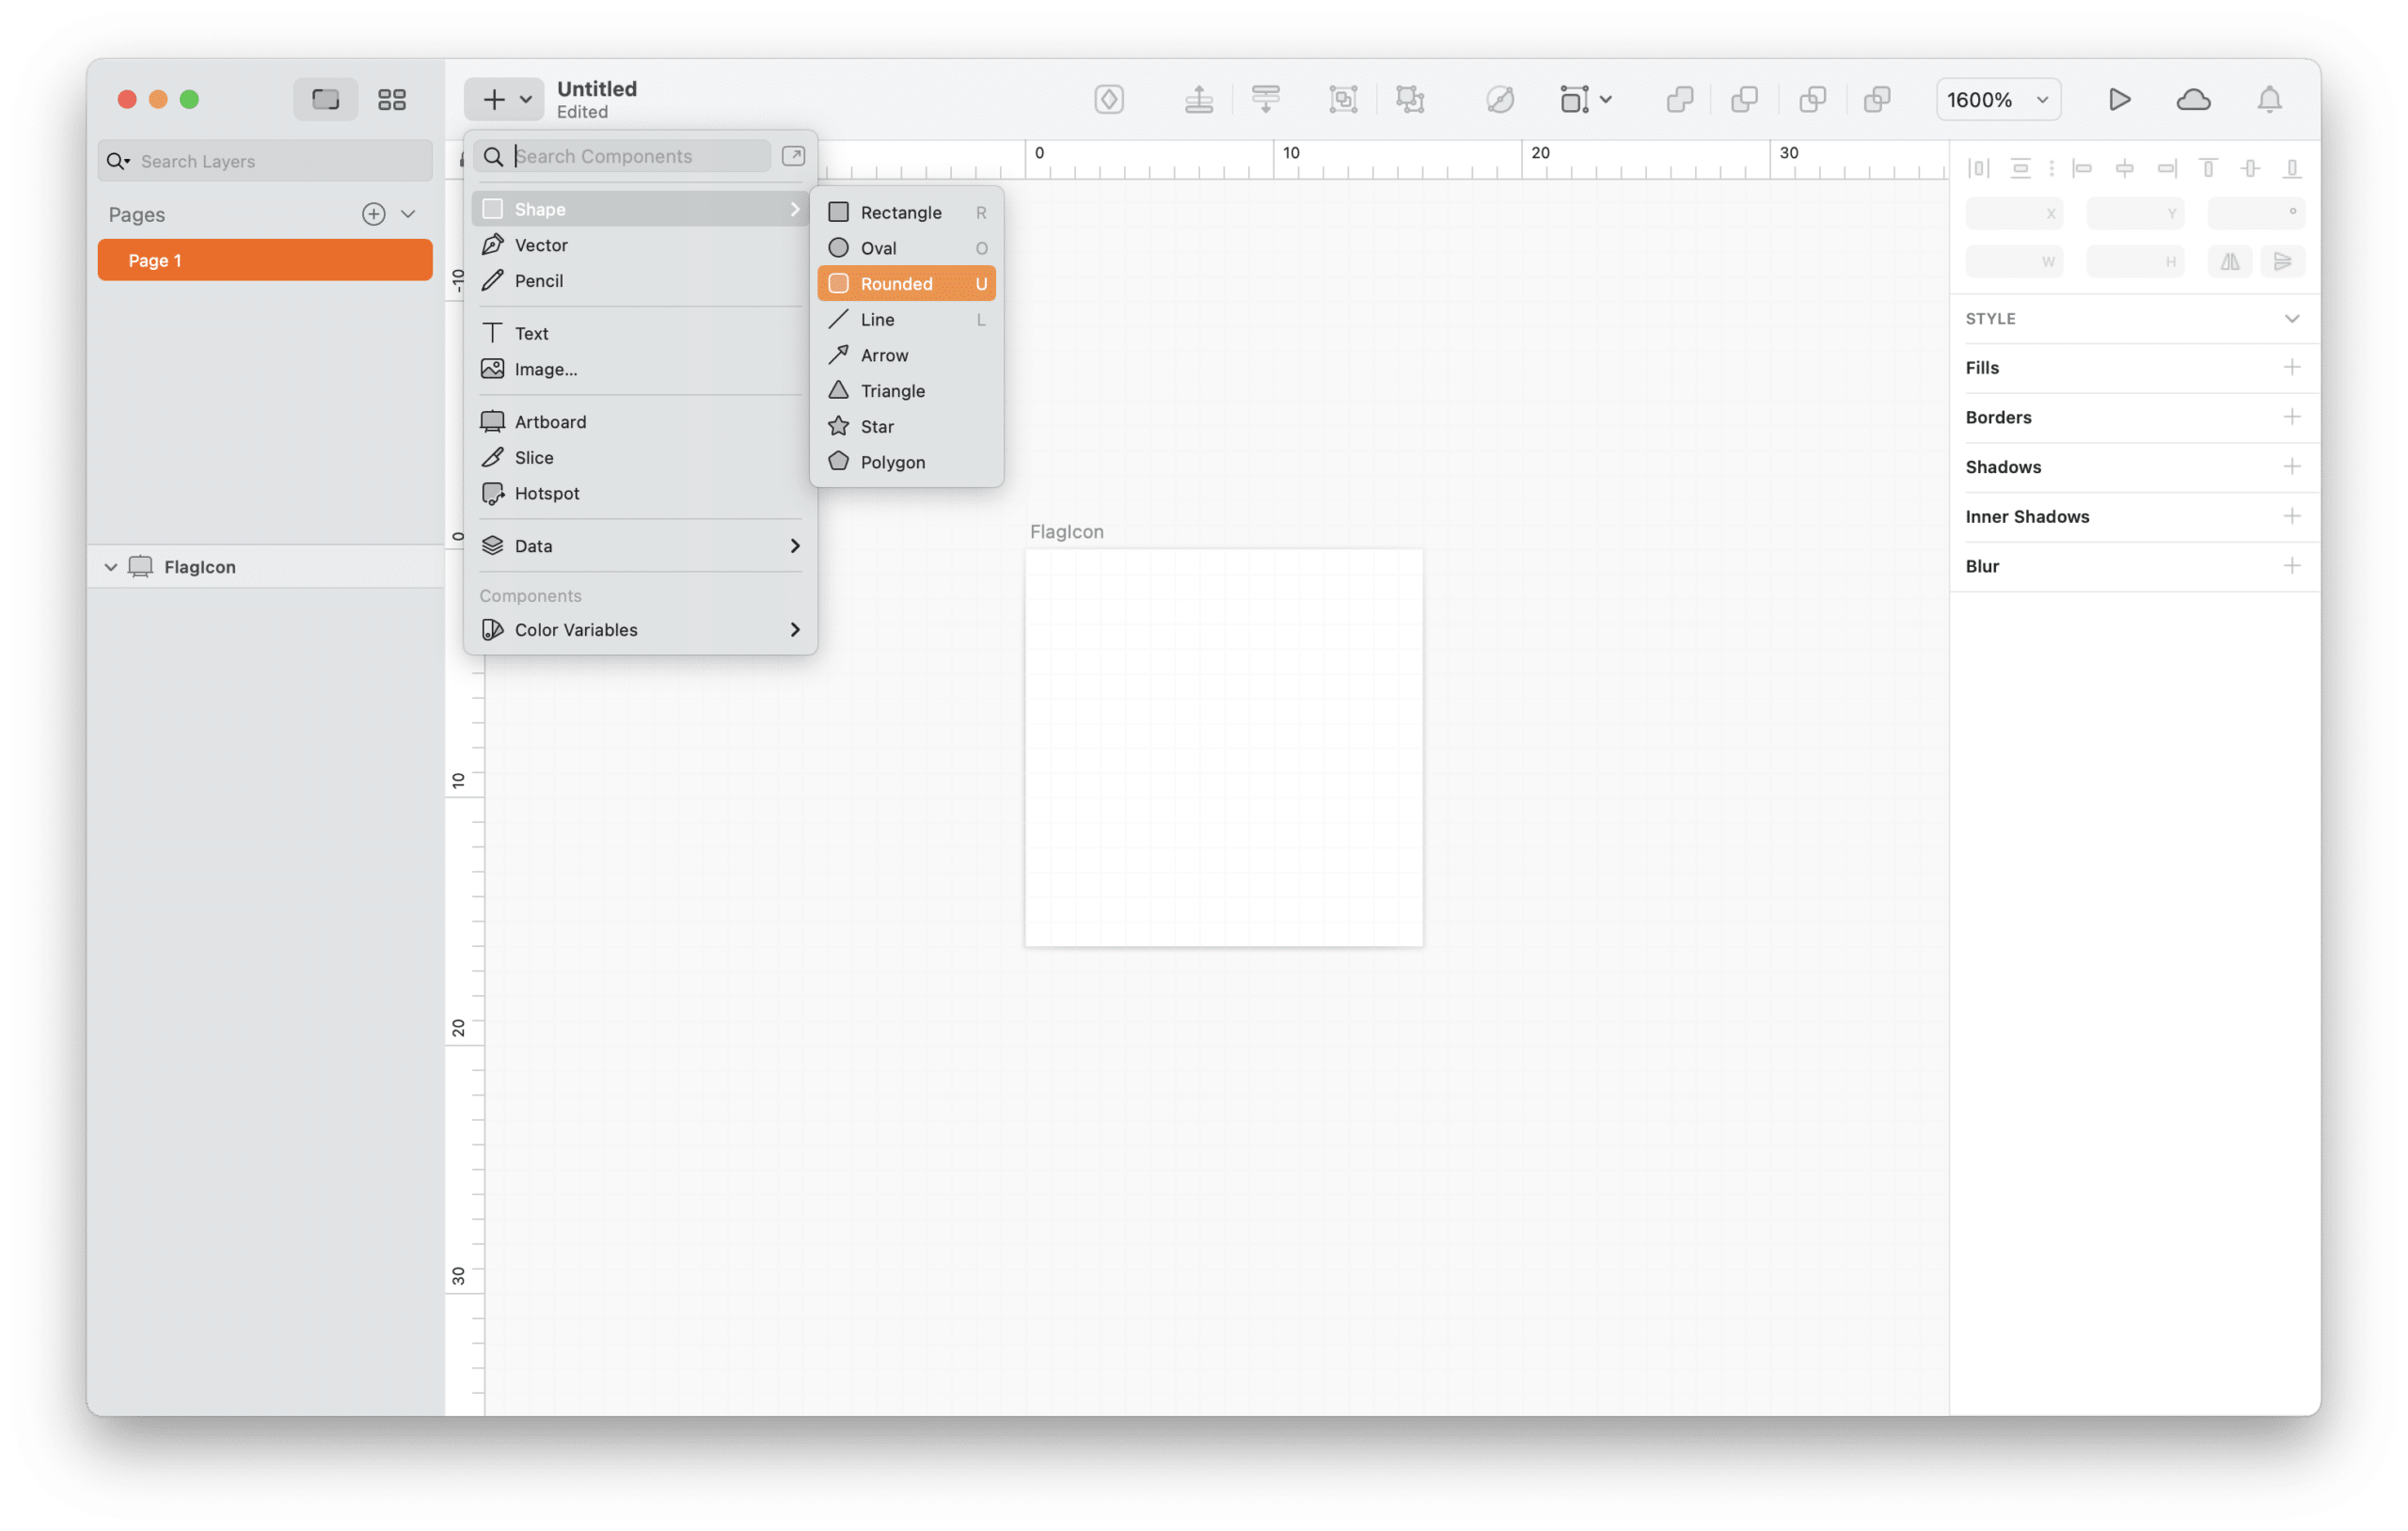
2. Drawing the icon
- Zoom in on the Artboard so you can see it better.
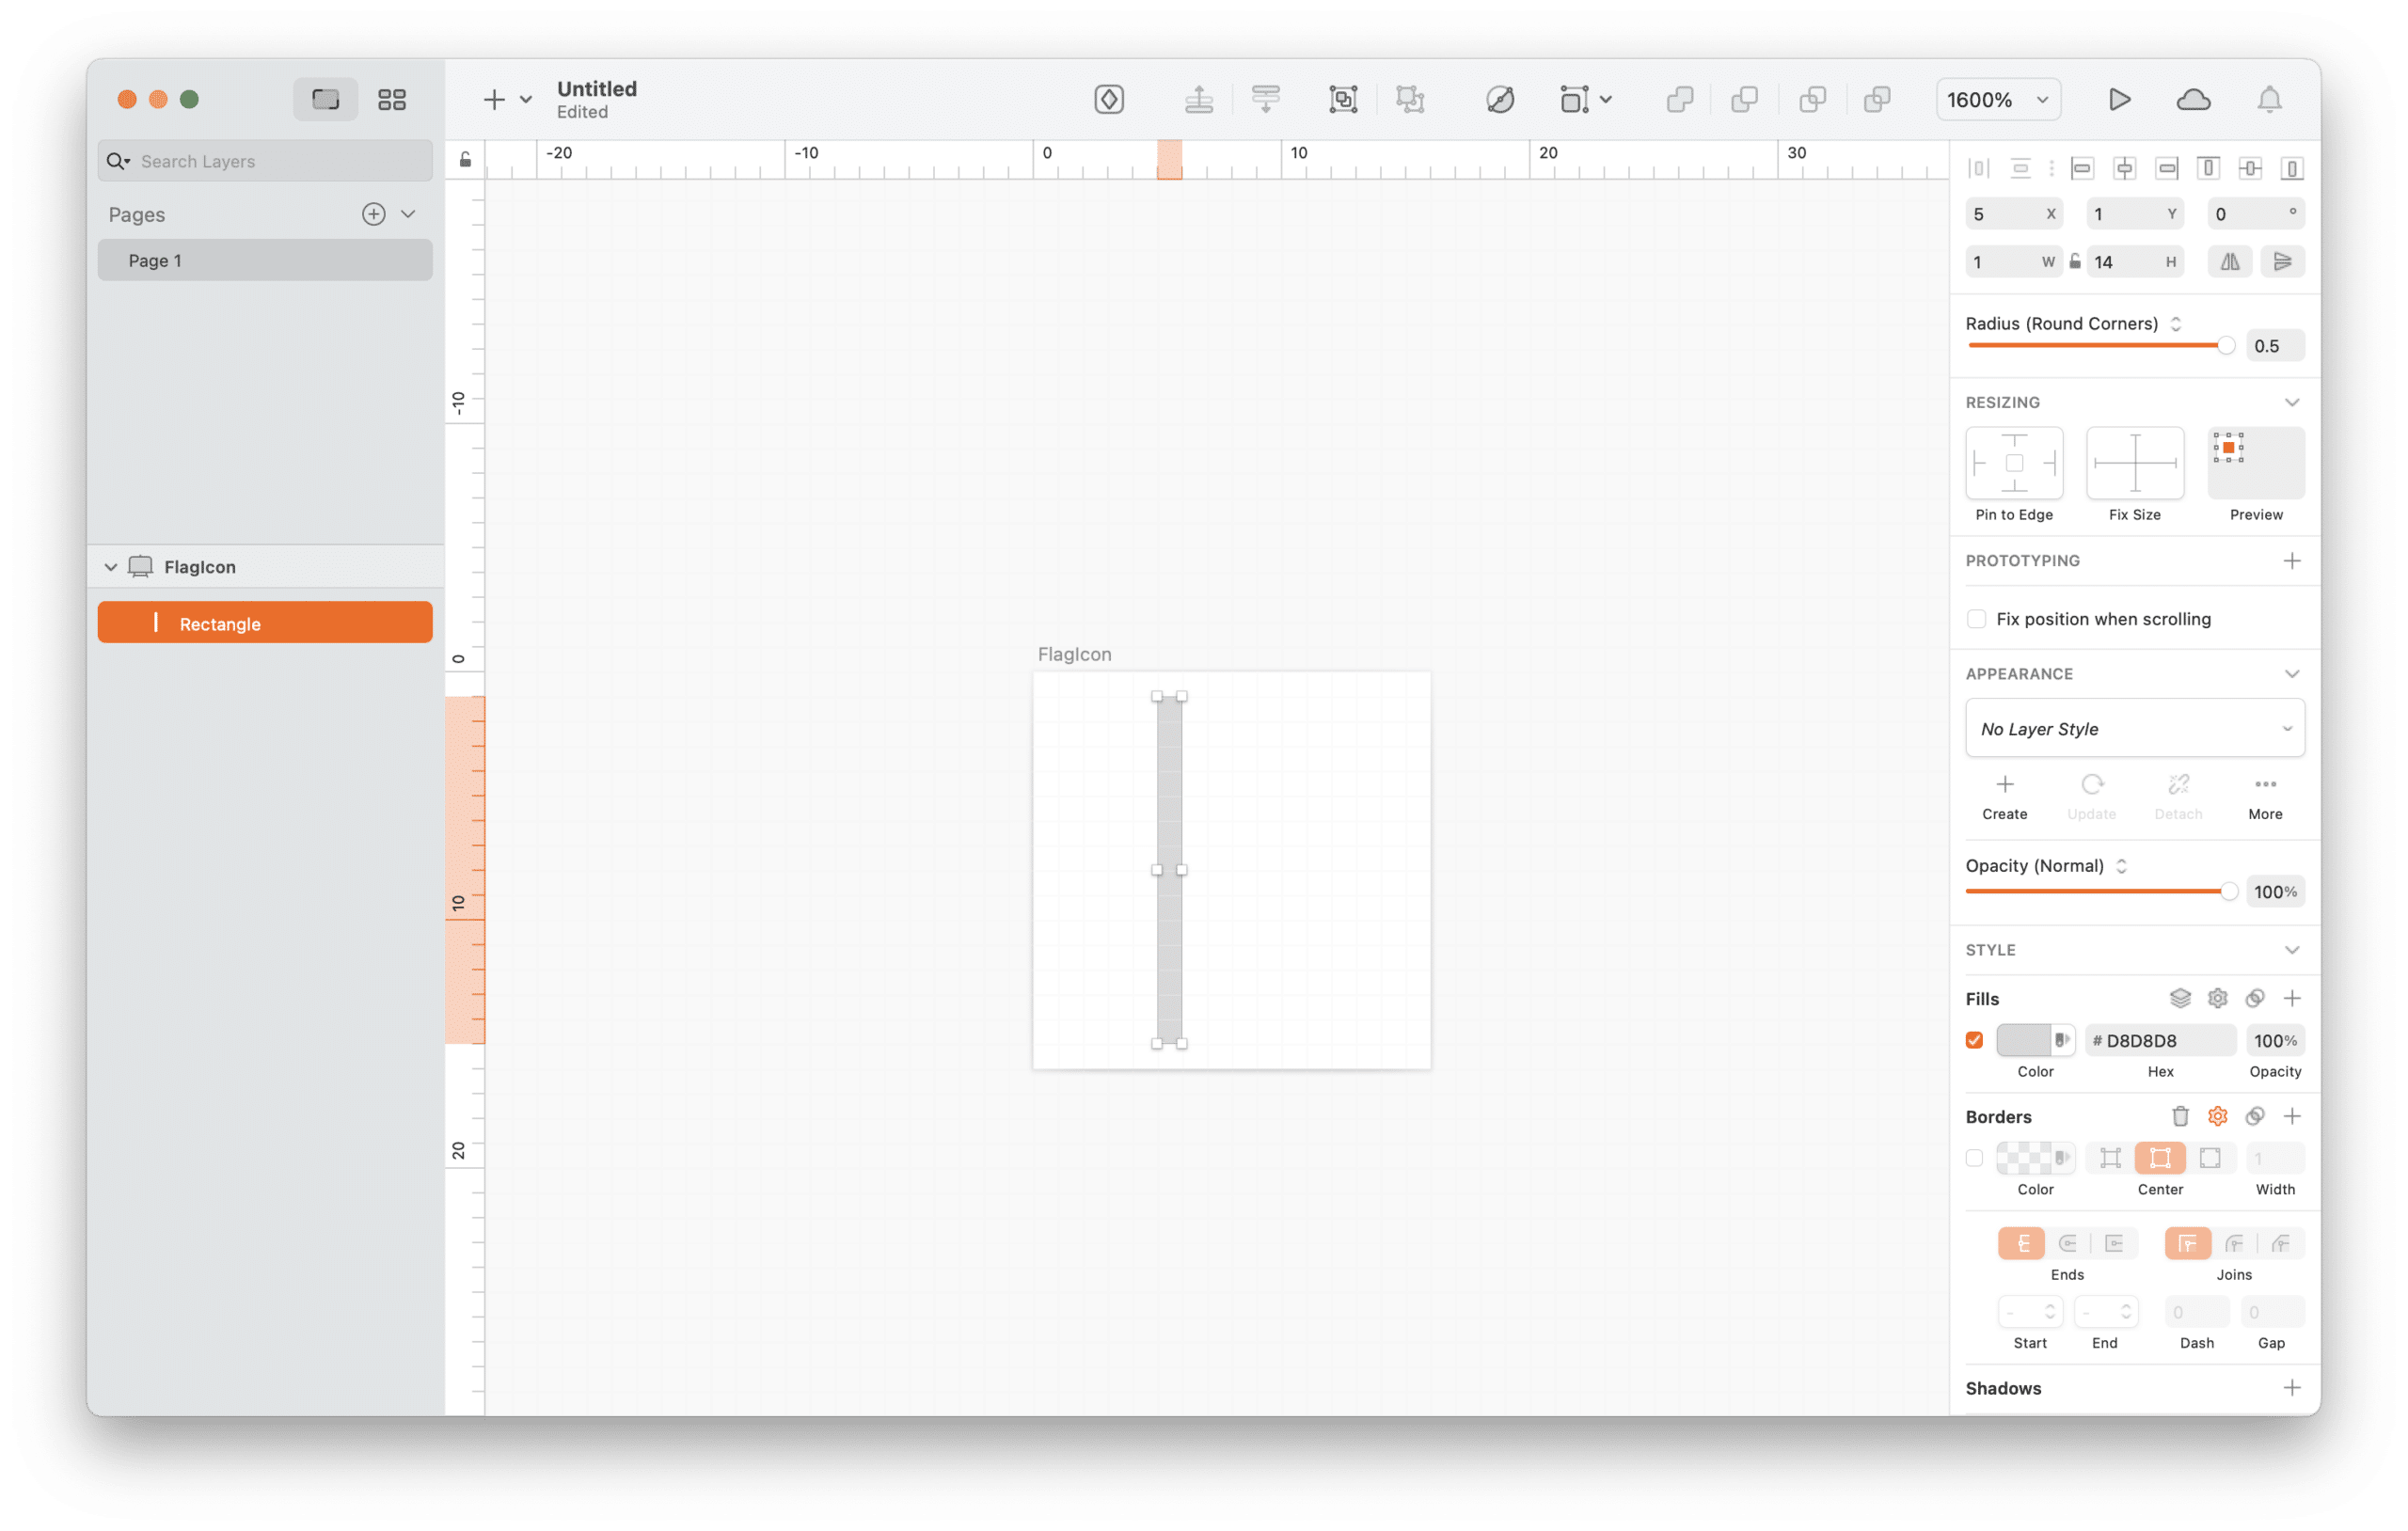
2. Insert a rounded rectangle Shape to create the “flagpole”.
3. Make the size 1px x 14px.
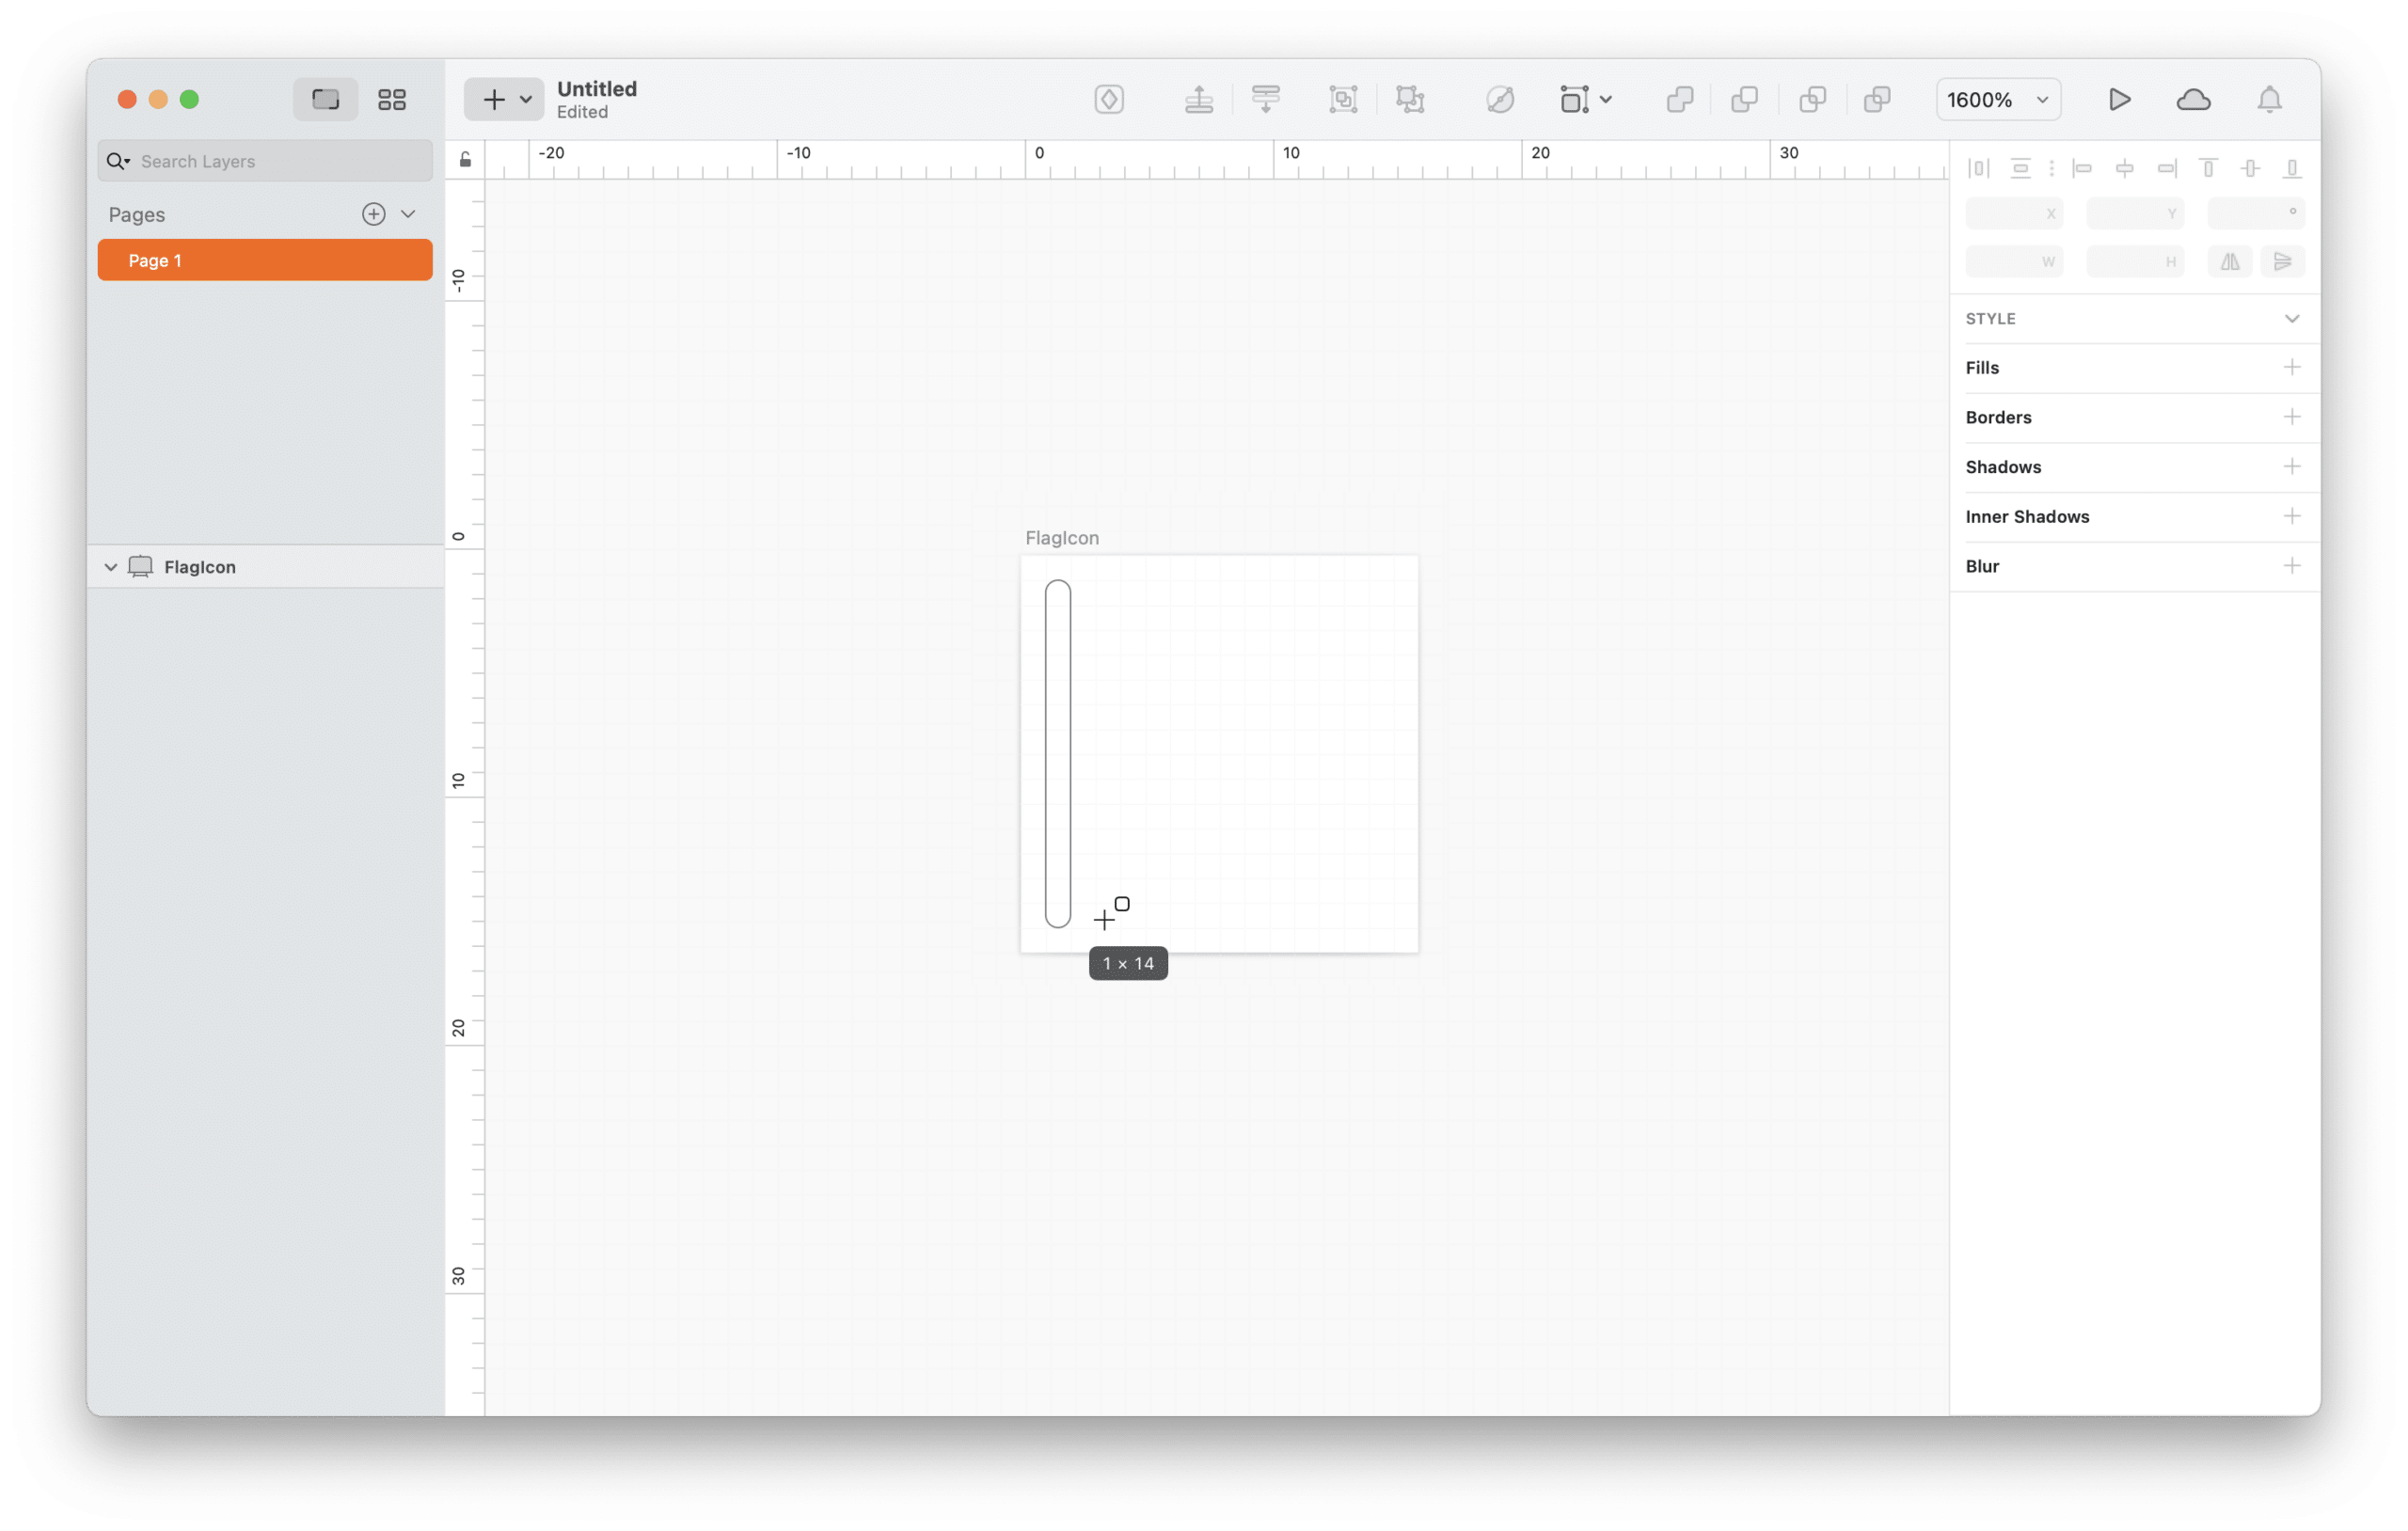
4. Remove the border attribute and make sure there is a fill attribute. Move the shape closer to the middle of the Artboard.
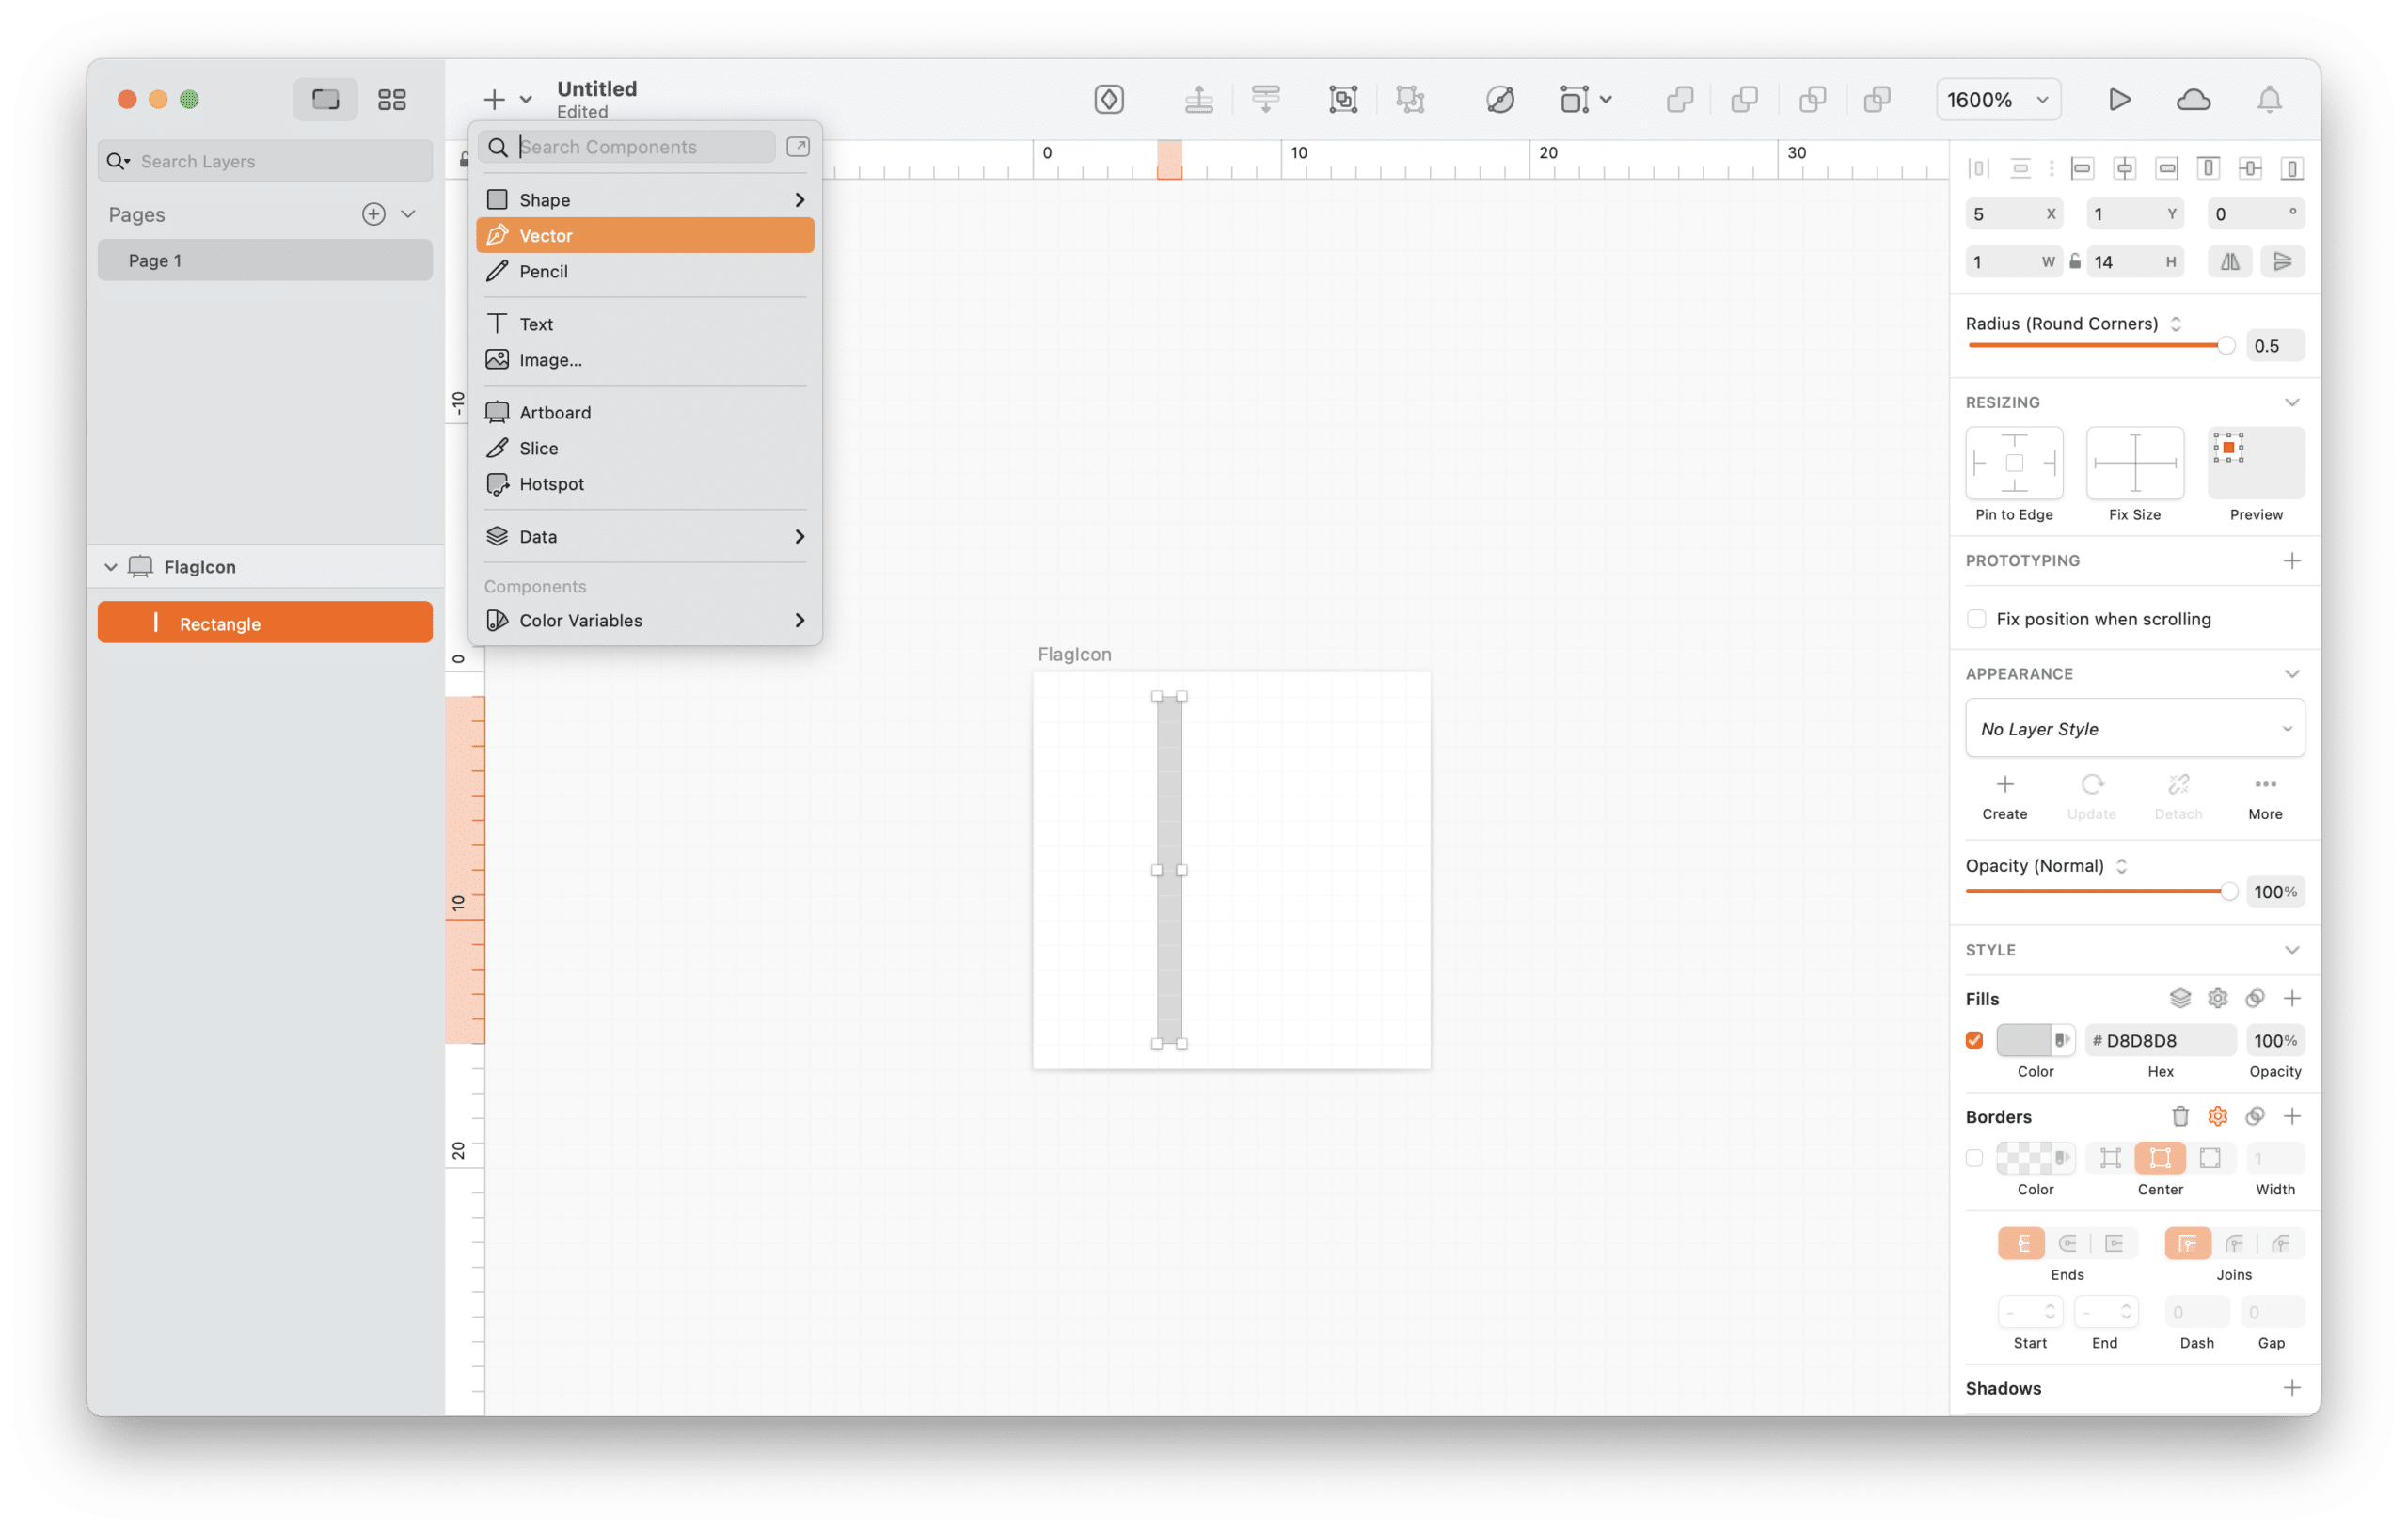
5. Insert a Vector.
6. Create the first point of your triangle “flag” by clicking on the empty Artboard to the right of the first shape. While holding down the shift key, click again just above the horizontal midpoint of the first shape. (The shift key constrains your line, making sure to draw it straight.)
Click once more, up and to the right, to form the apex of the triangle. Sketch will display a guideline when your cursor is aligned with the midpoint of the line.
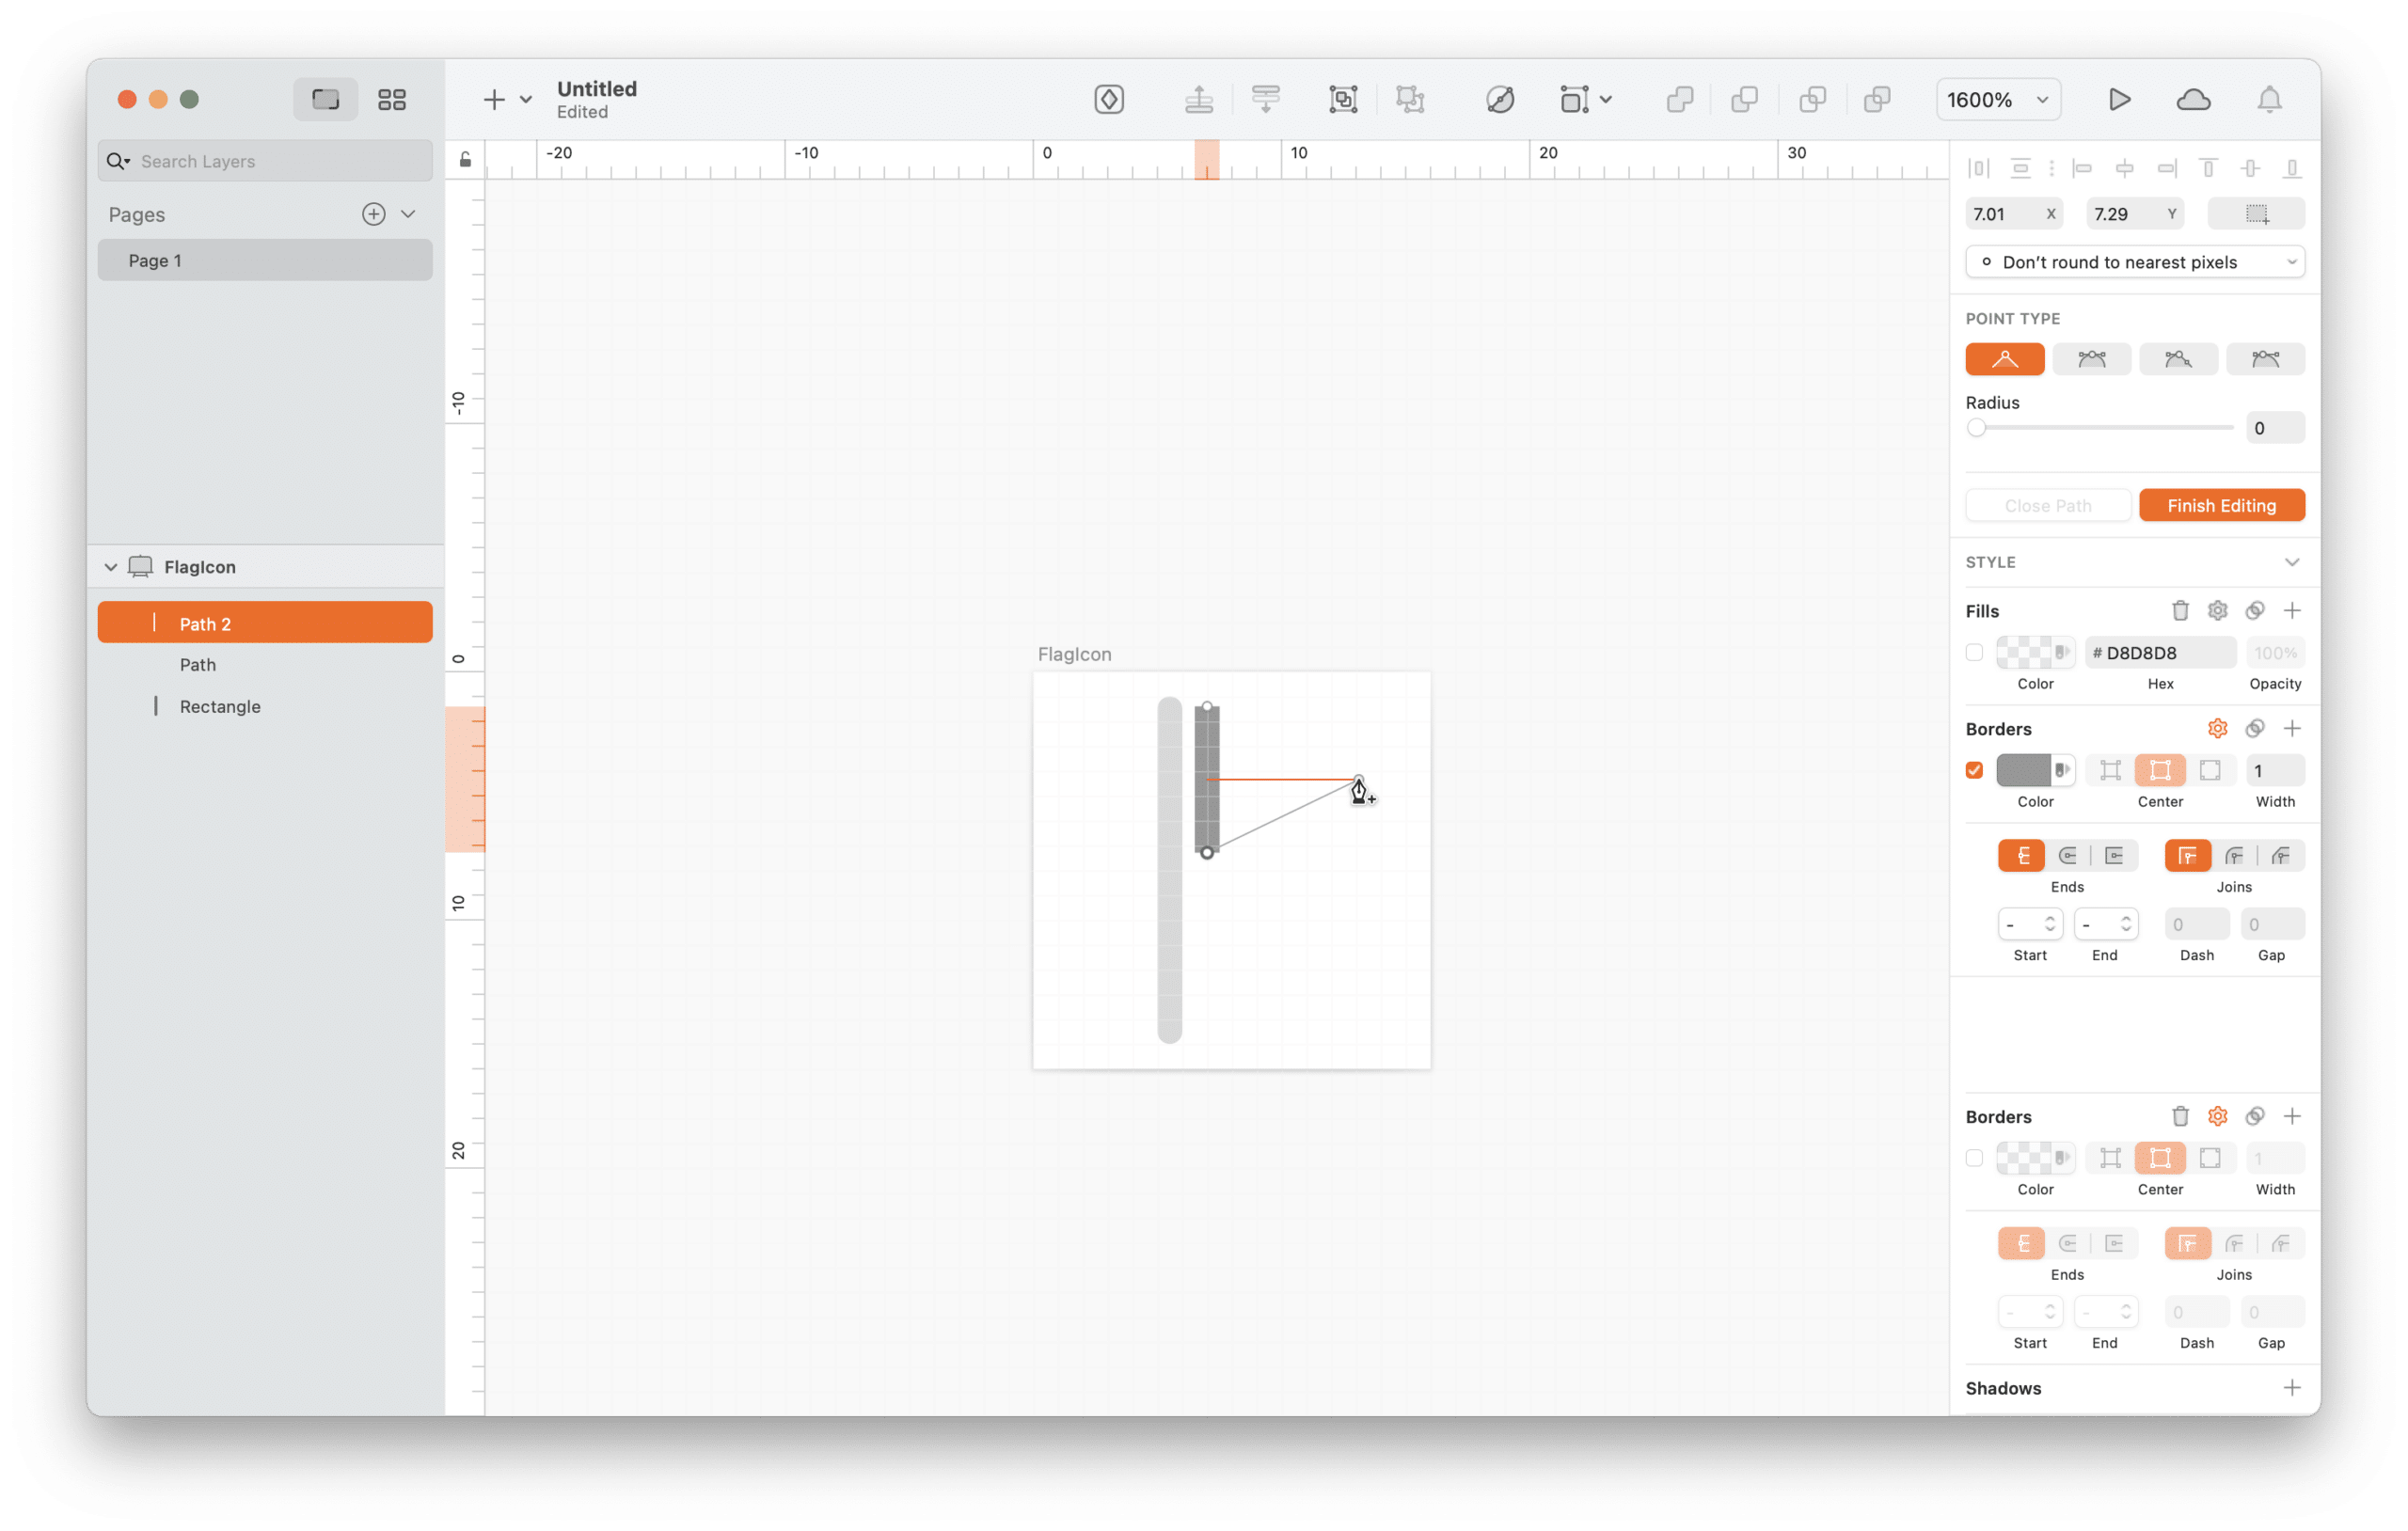
7. Click your starting point again to close the shape.
8. With the triangle selected, remove any border attributes and make sure there is a fill attribute.
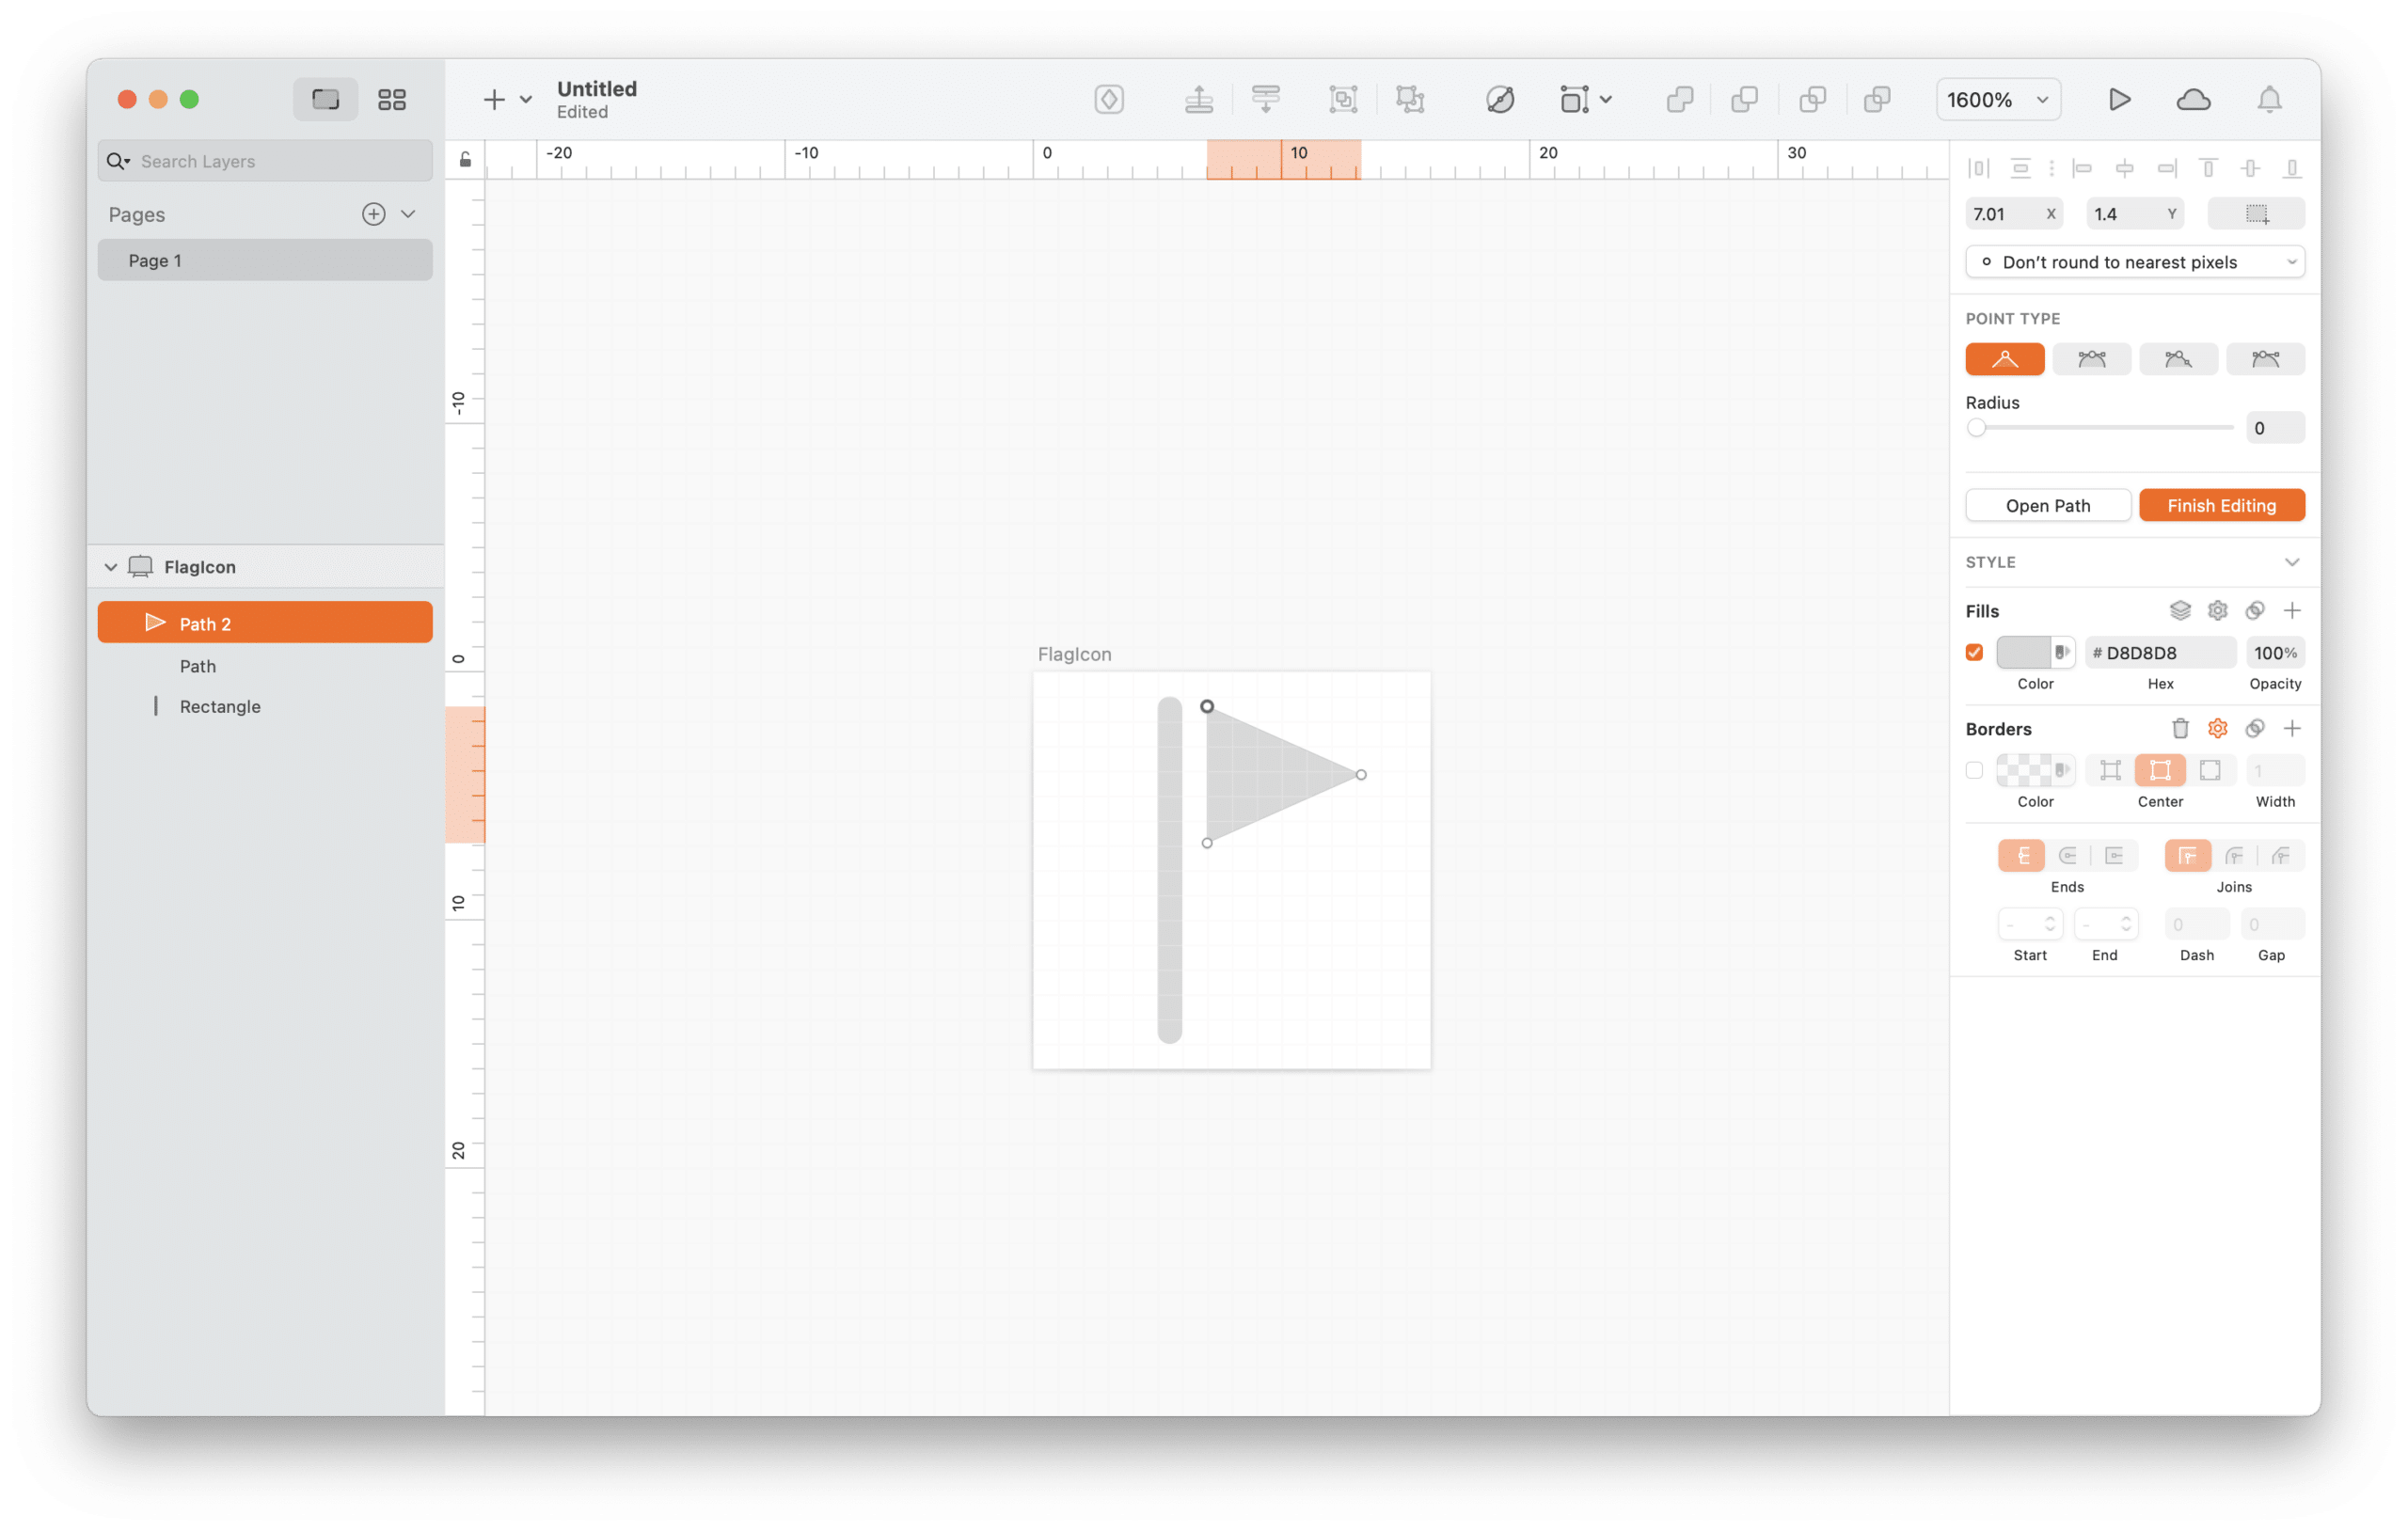
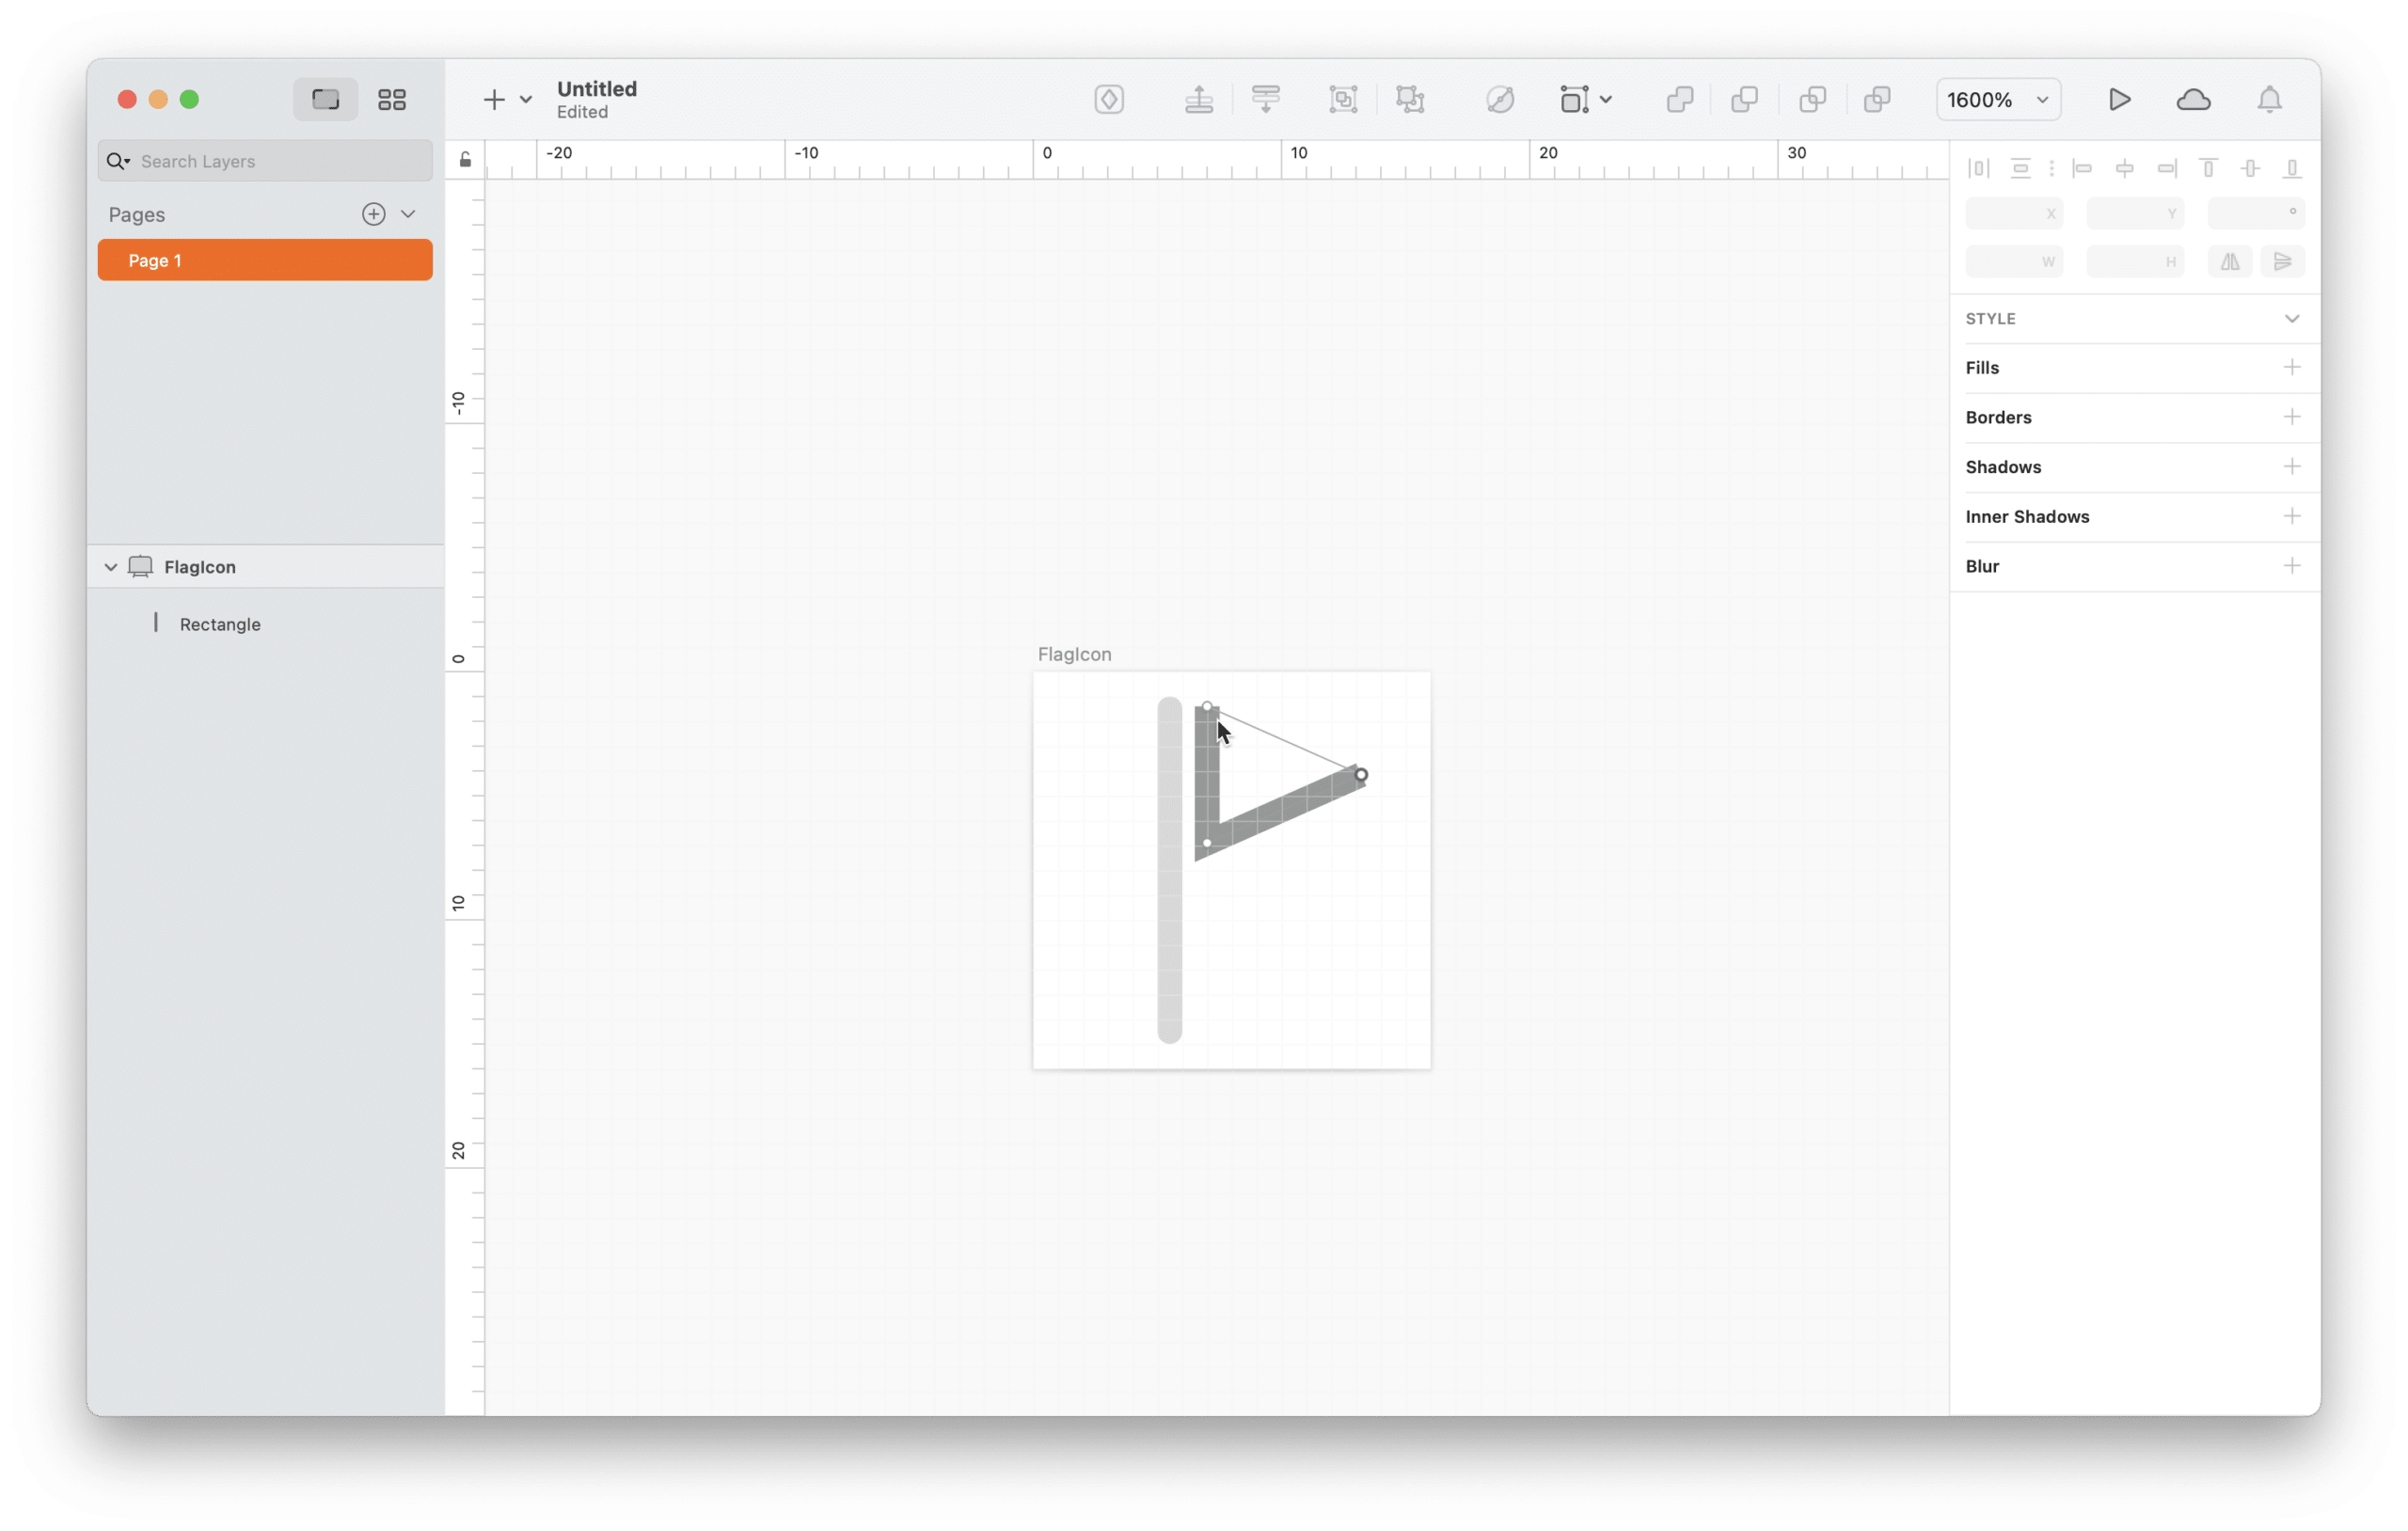
9. Using the Inspector, move the flagpole .5px closer to the flag. Adjust the size of the triangle to make it look more like a flag, if necessary.
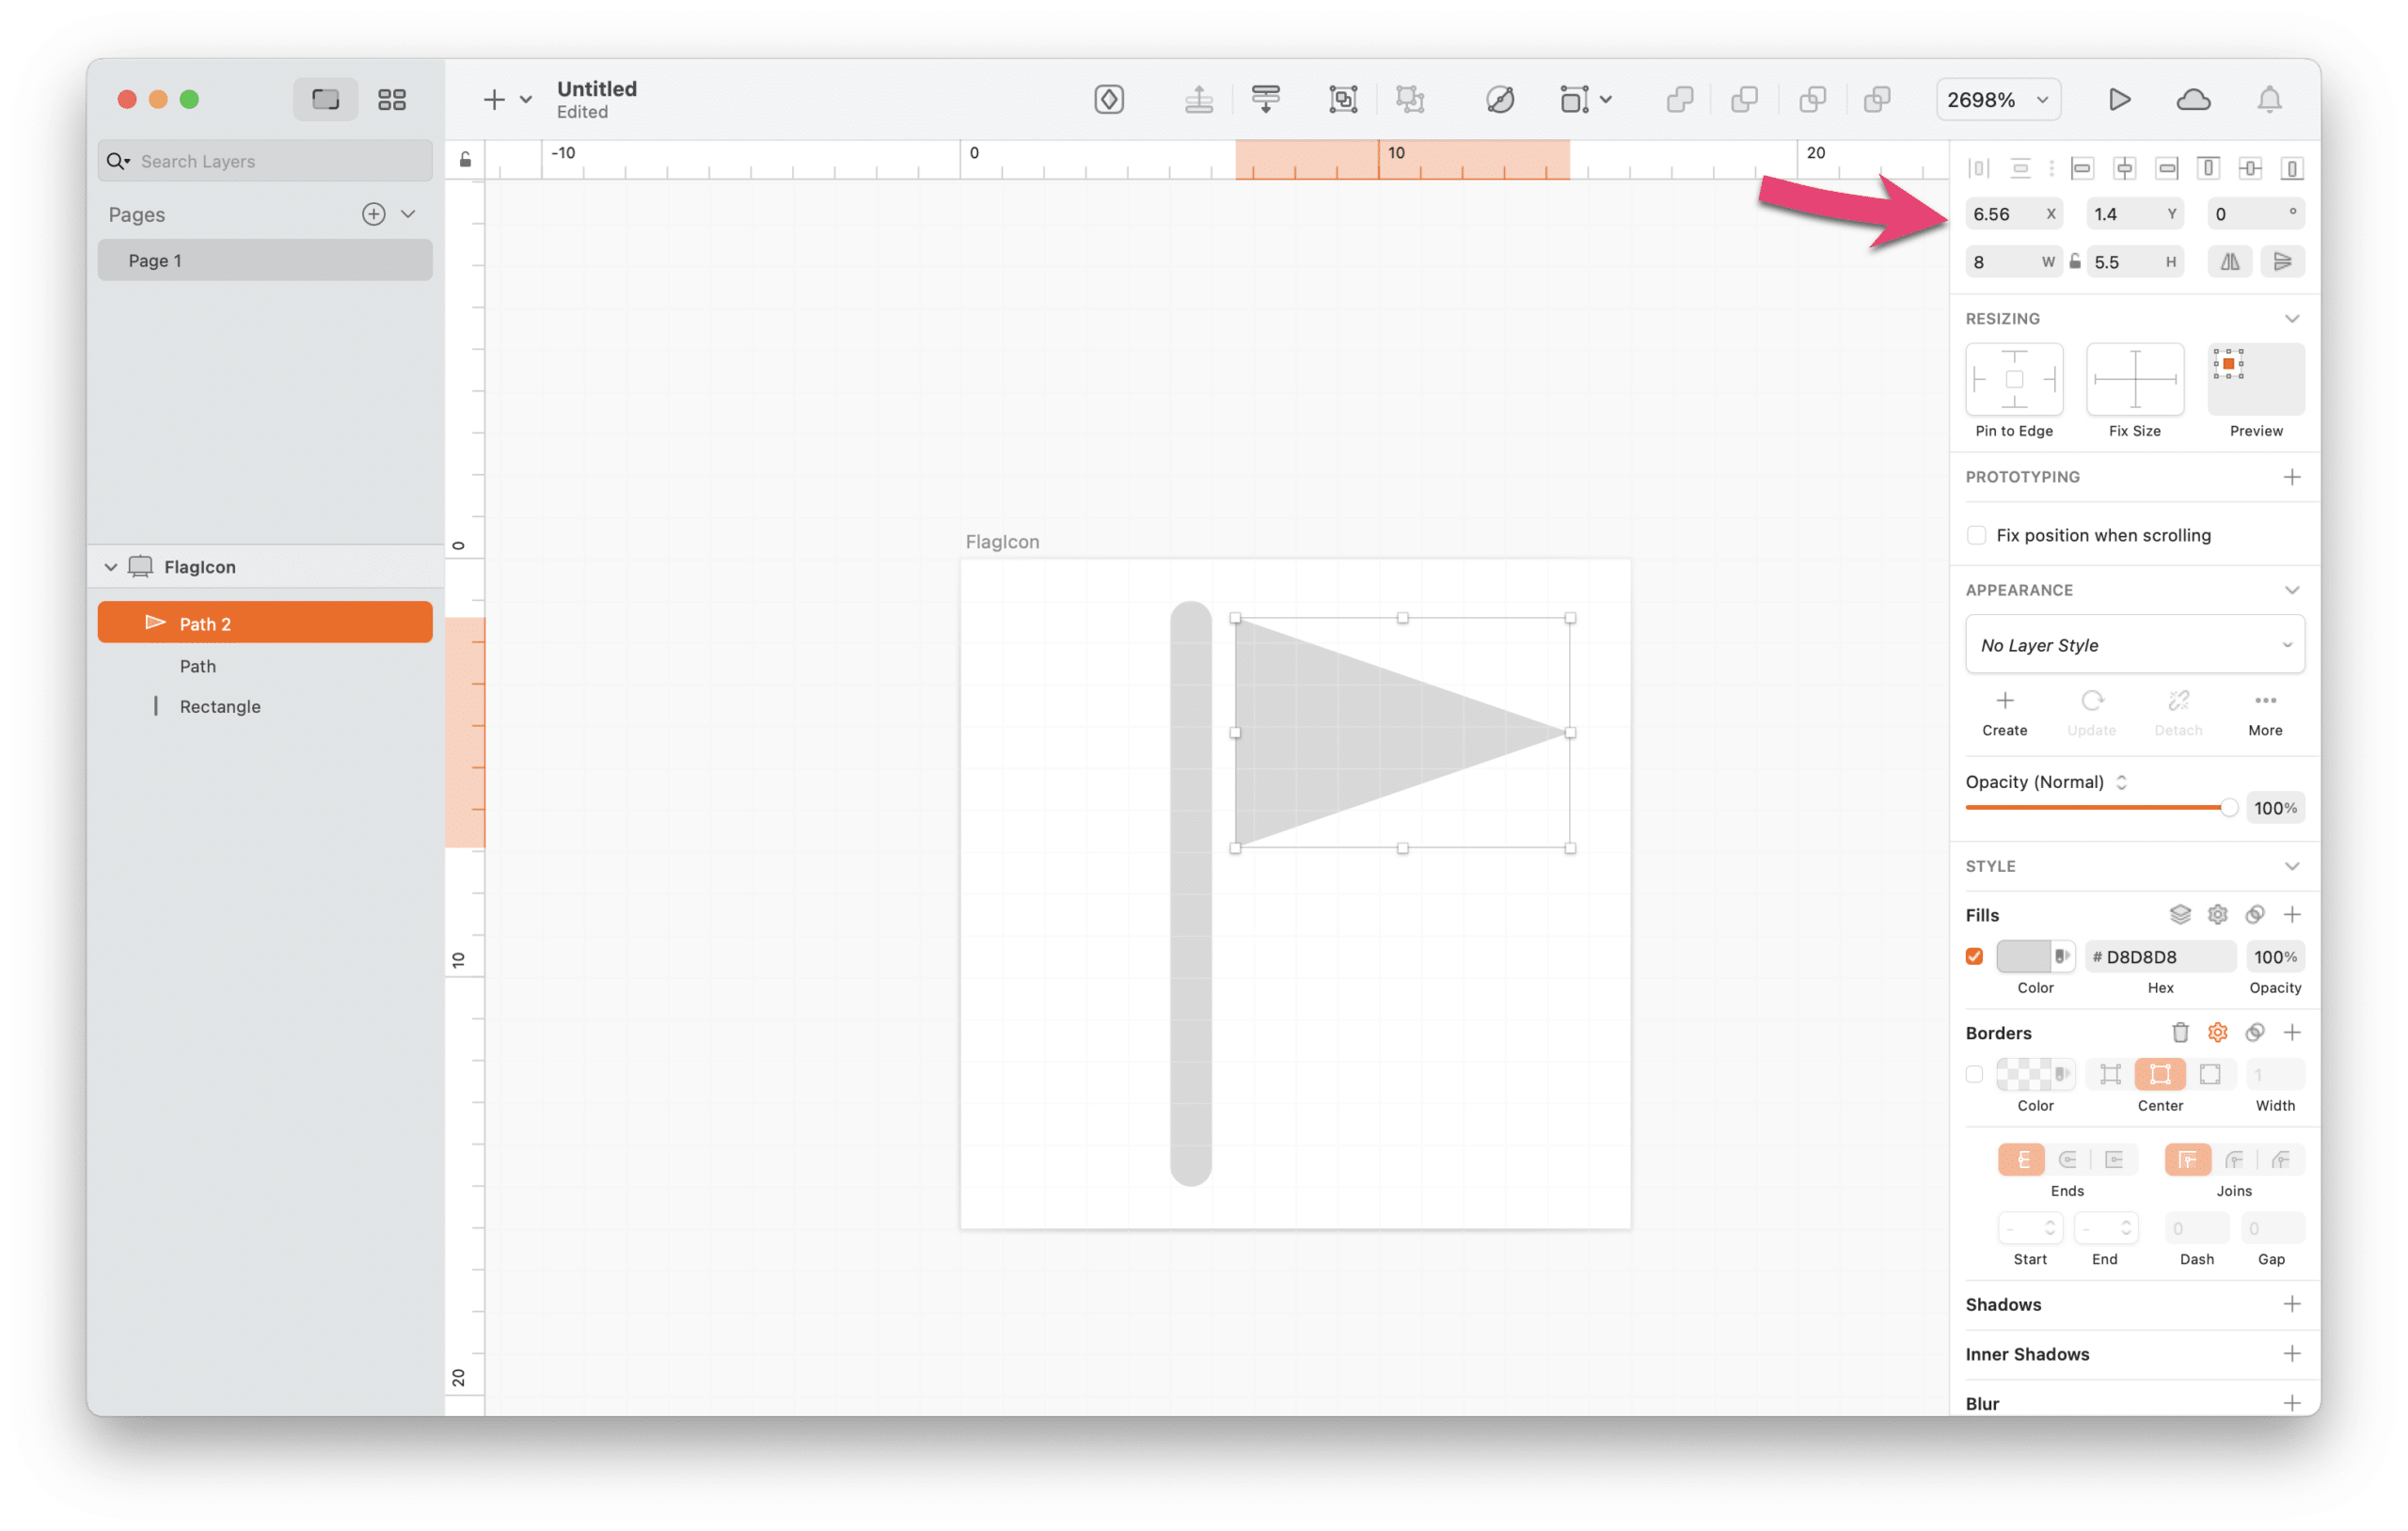
You now have an icon ready to be saved as an SVG file. You can save the Sketch file at this point if you like, and continue to add Artboards and icons to it as many times as you like.
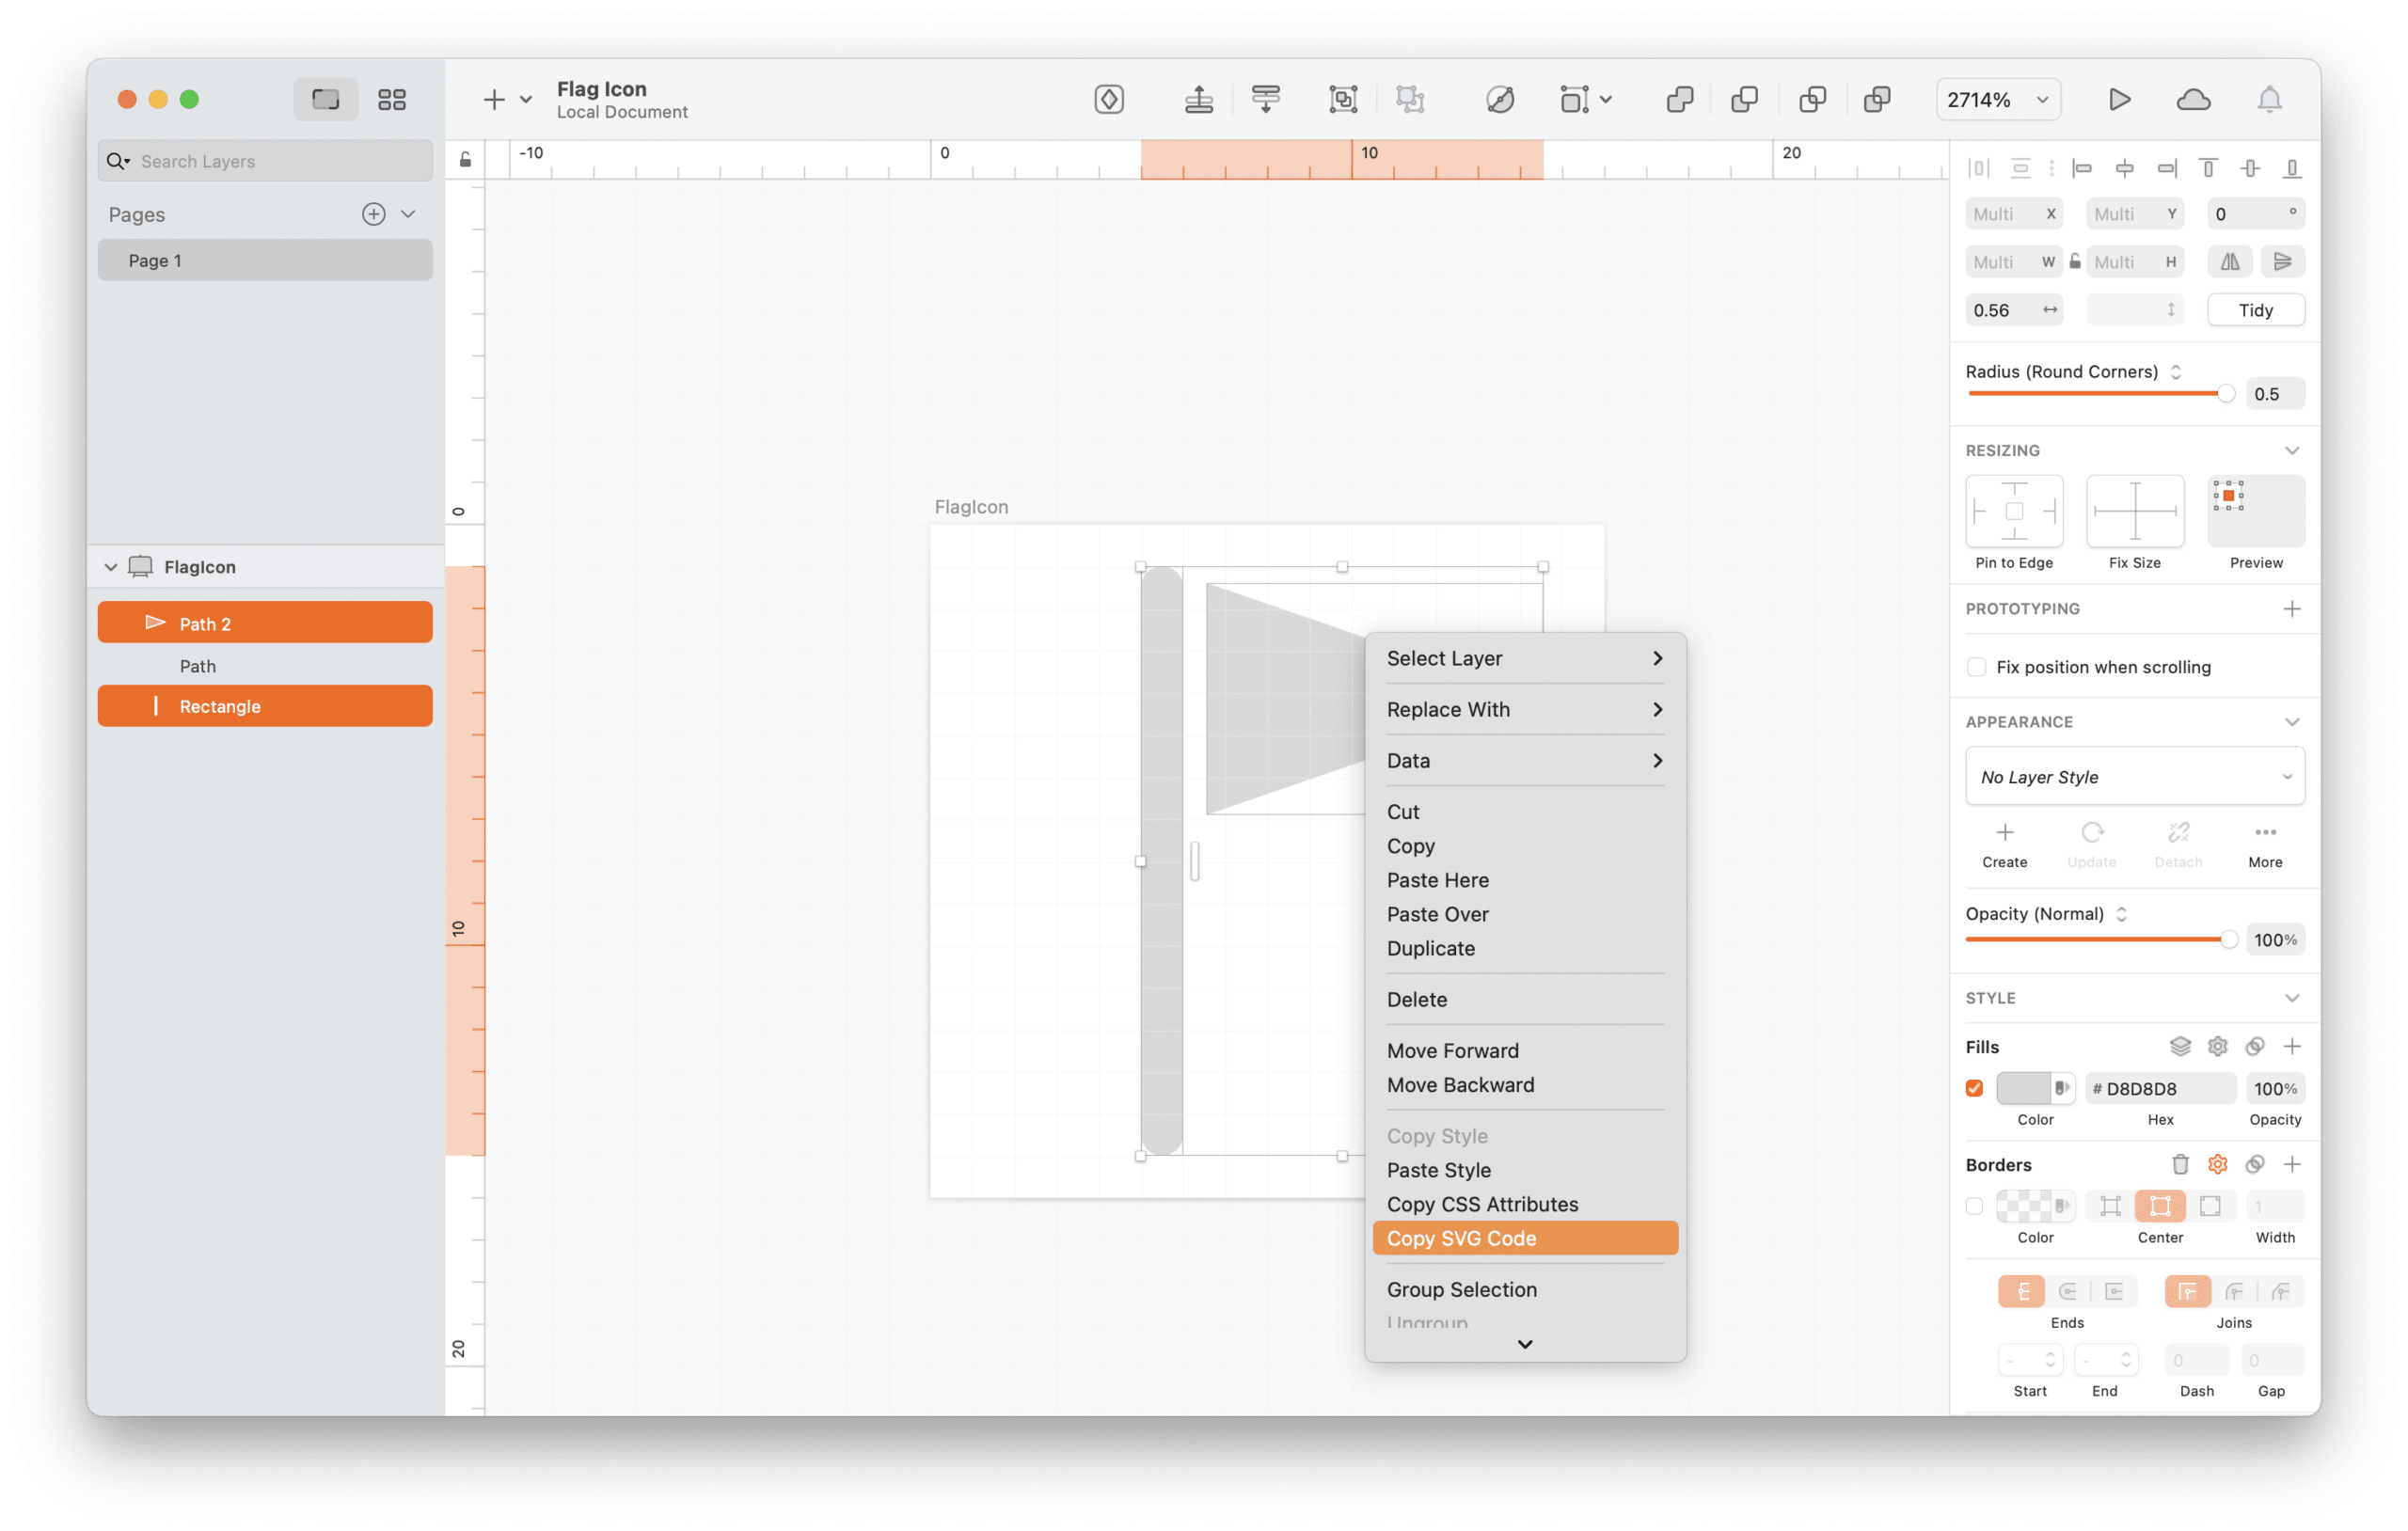
3. Creating the SVG file
The process to make an SVG icon fully compatible with FileMaker features is the same whether you draw the icon in Sketch yourself, or purchase an icon set that you open in Sketch. (I was able to open an EPS file containing a set of icons in Sketch, and then create SVG icons for use in FileMaker using this method.)
- Select both shapes and right-click or Control-click to select “Copy SVG Code”.
2. Create a new Text Edit document and paste the copied text into it.

3. Locate the “fill” attribute containing the hex code for the fill colour. You’ll notice this is inside the “g” element of the XML, having the id=<<your_icon_name>>.

4. Next to this, insert a space, and then paste the following text:
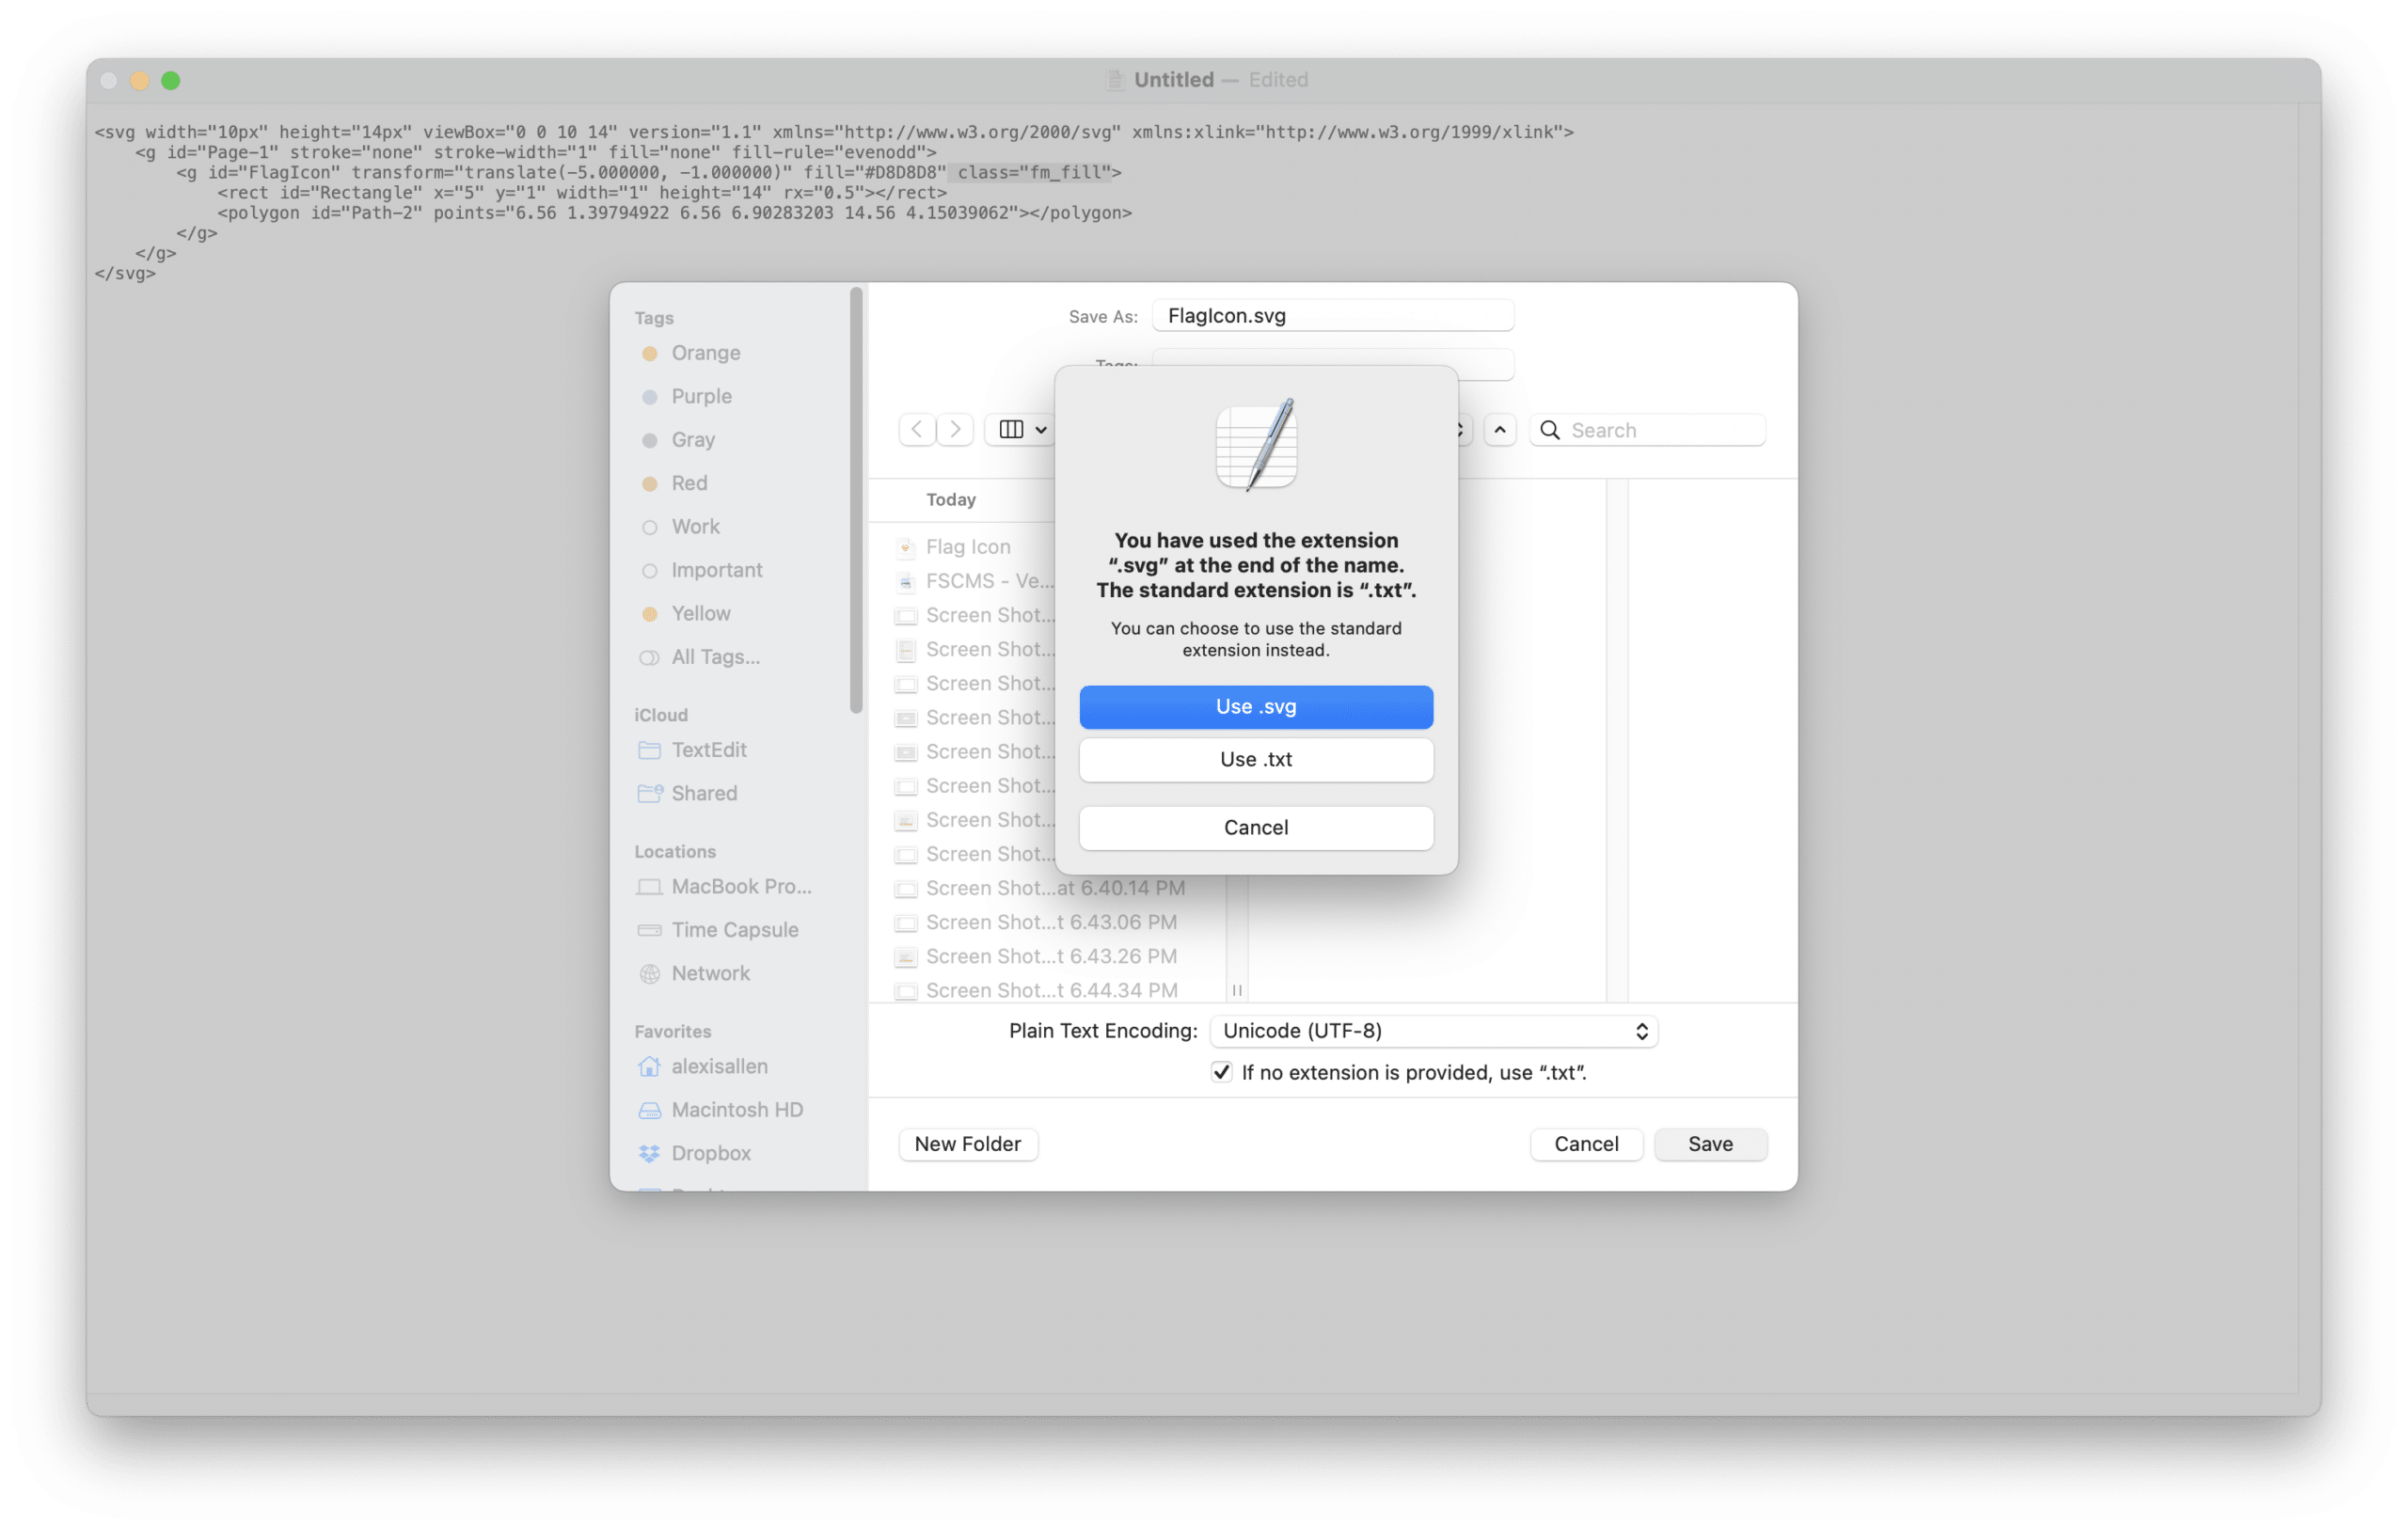
class="fm_fill"(If you don’t type a space before adding the “class” attribute, your document won’t save properly.)
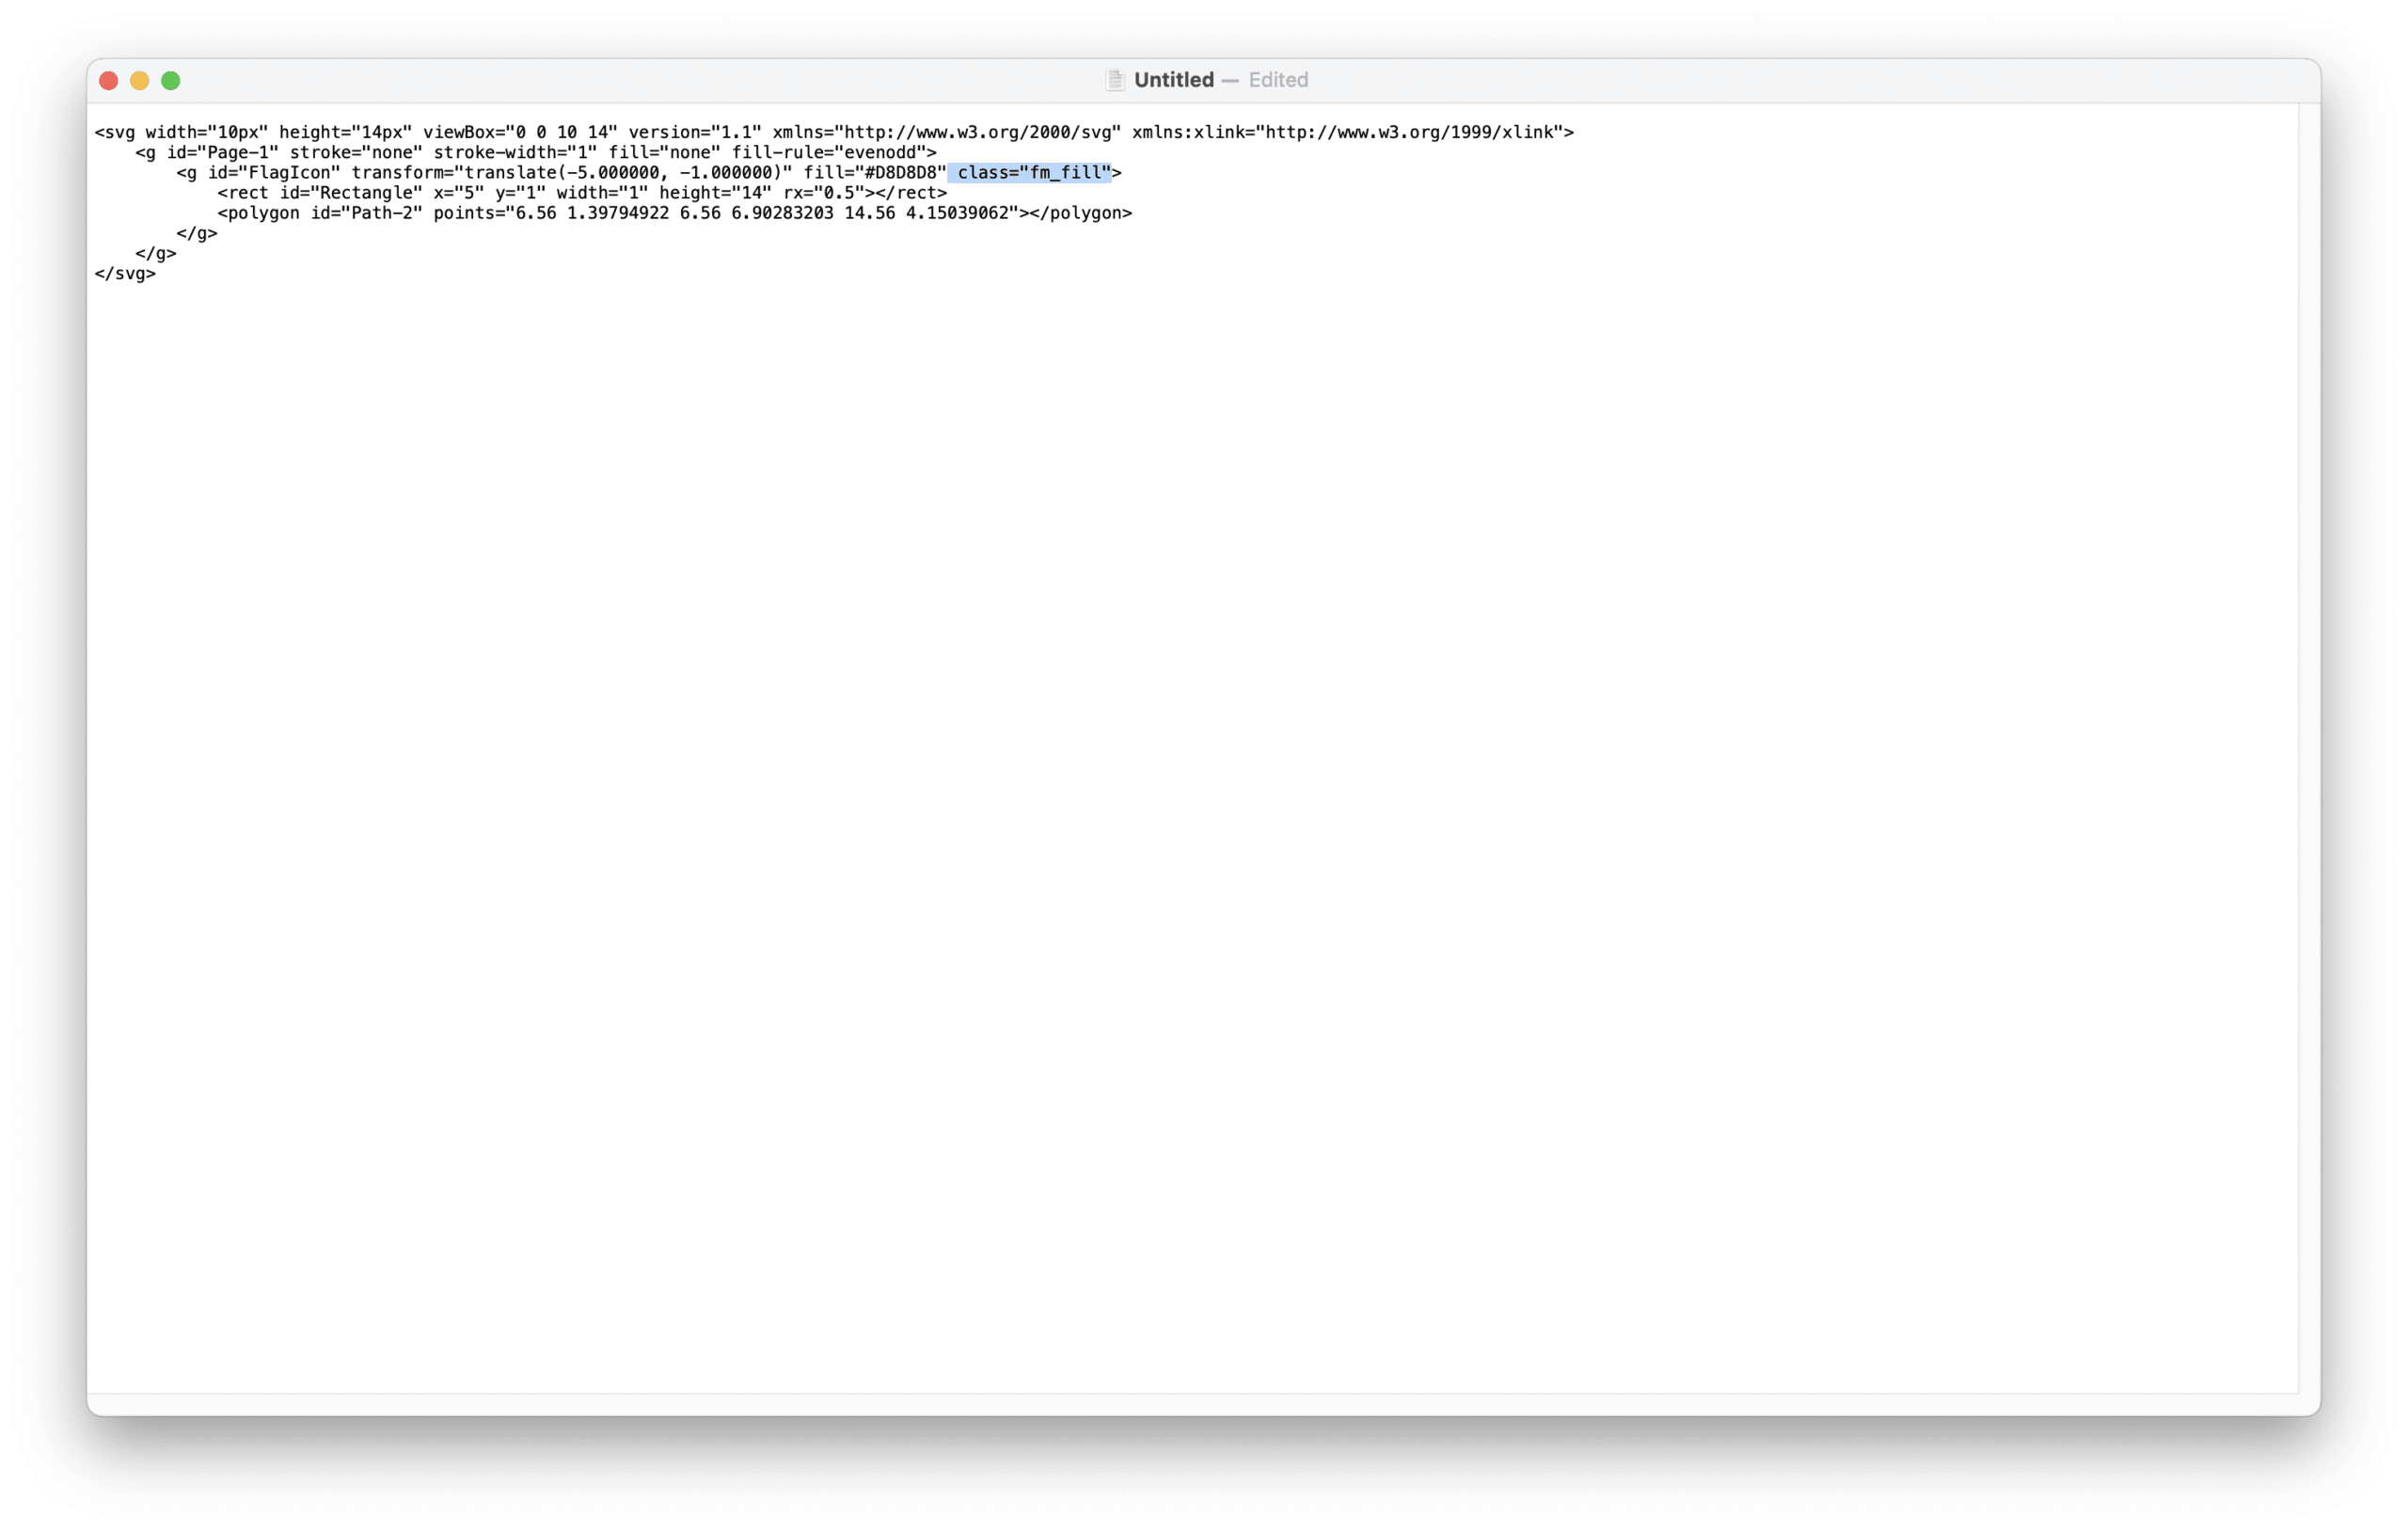
5. Save your file and make sure to use the “.svg” extension at the end of the filename. TextEdit will probably warn you about this, but go ahead and save it anyway. (Note that because of the “.svg” extension, if you want to open this file again later to edit it, you’ll have to either go to TextEdit and use “File > Open,” or right-click the file in the Finder, select “Open With…Other” and then locate the TextEdit app. If you simply double-click on the file in the Finder, it will open in Sketch.)
Note: If you don’t add the “class” attribute to the SVG code, you’ll still be able to save the icon as SVG format, and import it into FileMaker. However, you won’t be able to change the icon fill colour—it will retain whatever fill colour it originally had in your Sketch file. FileMaker likewise won’t be able to change the icon fill colour using Conditional Formatting.
4. Importing the icon into FileMaker
- In FileMaker, draw a button and double-click it to bring up the Button Setup panel. Select the icon setup you want and click to add a new icon.
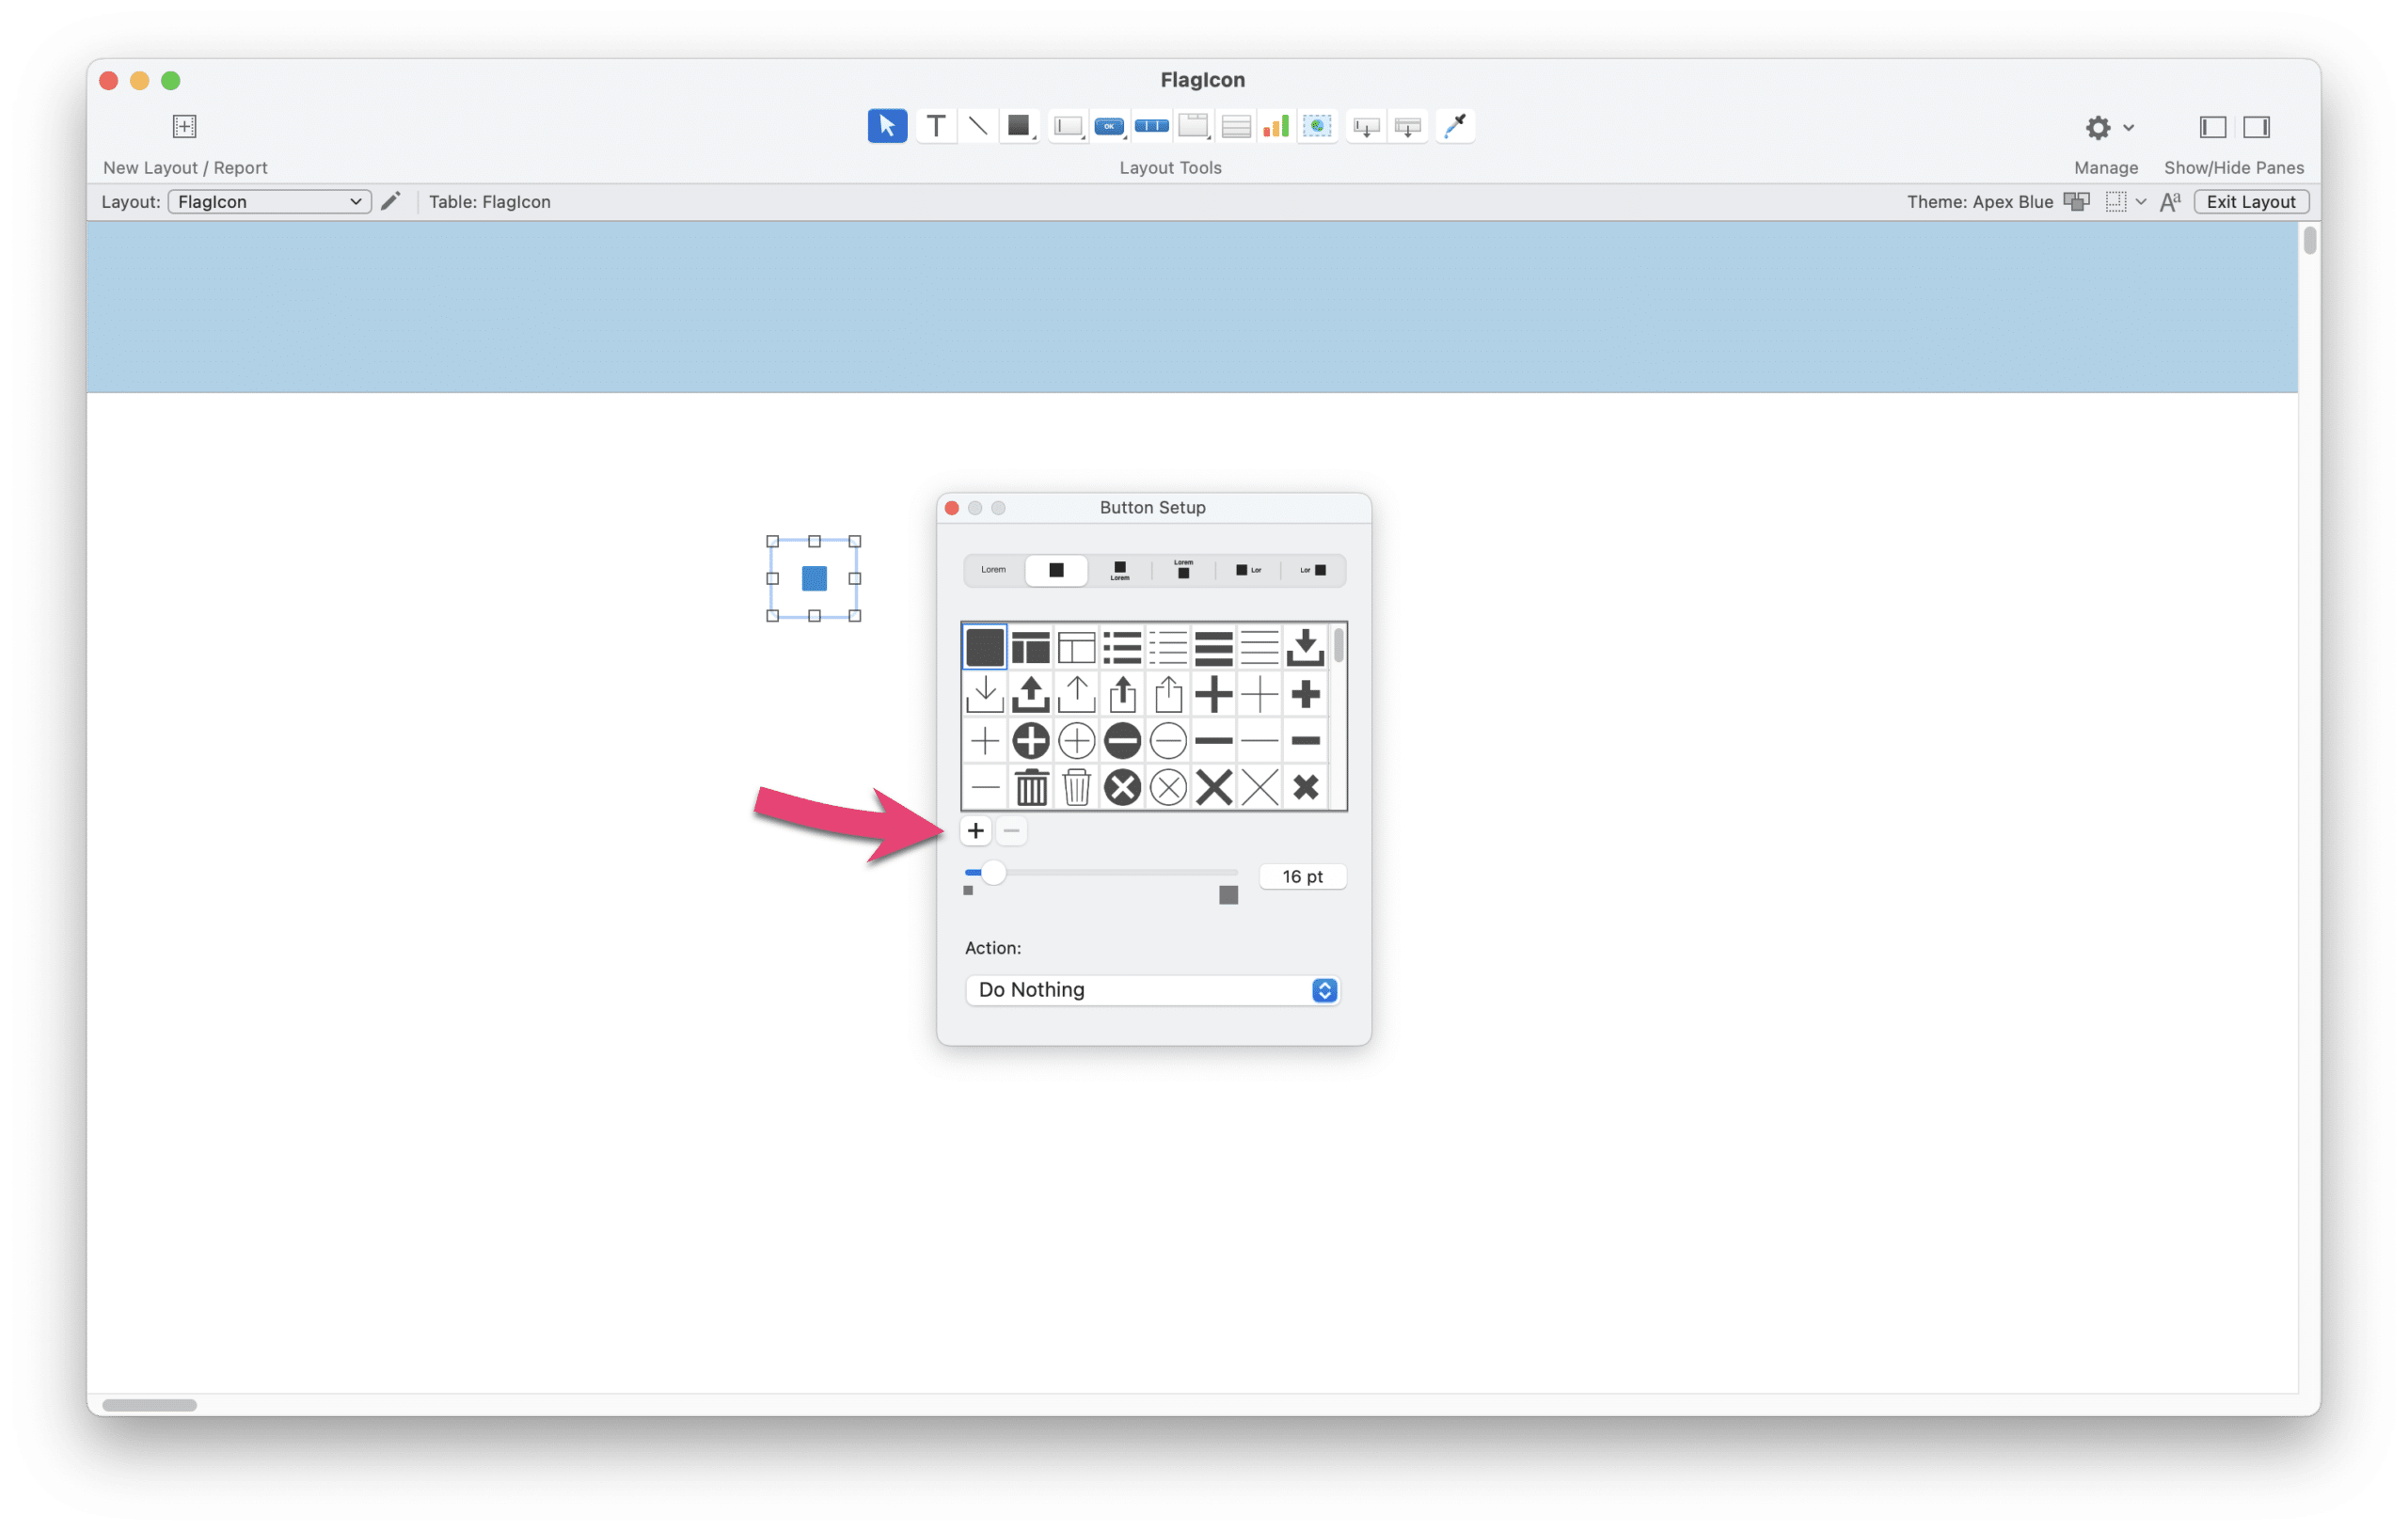
2. Select your SVG icon file from your computer, and the icon will automatically update. Change the icon size if you wish.
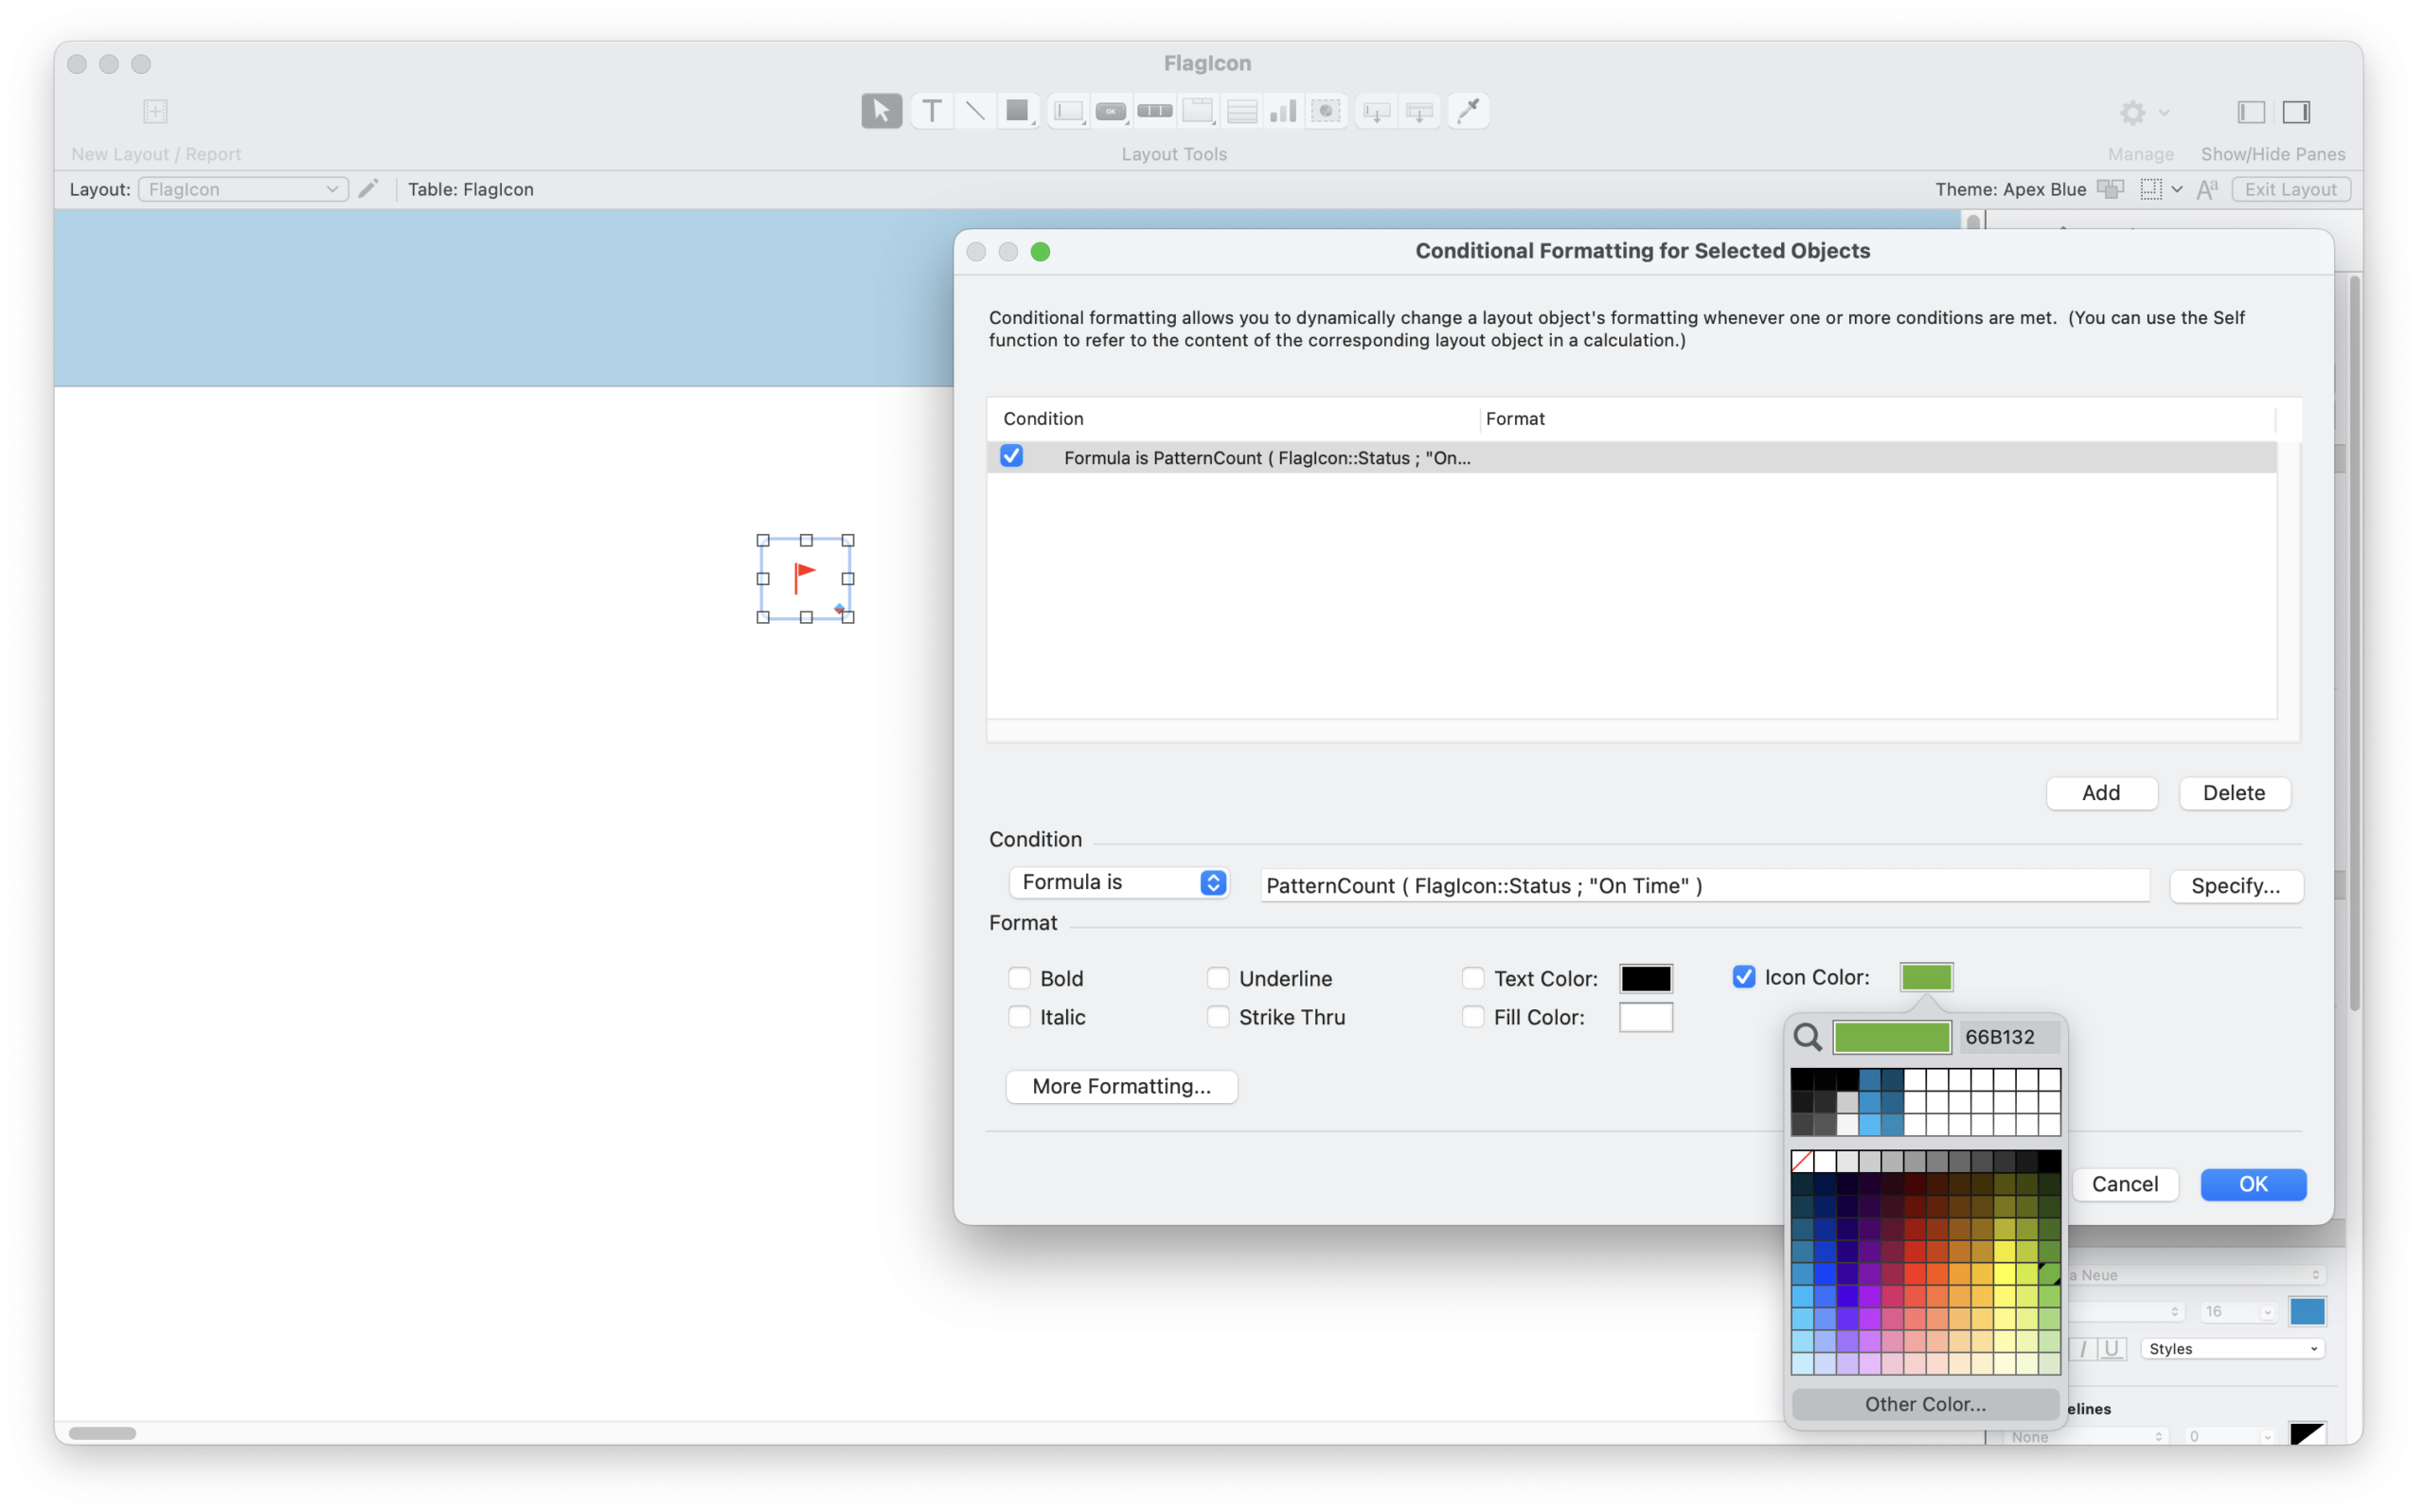
3. You can change the icon colour using the Inspector panel.
4. If you wish, you can enter a calculation in the conditional formatting dialog to change the colour of the icon under circumstances of your choice.
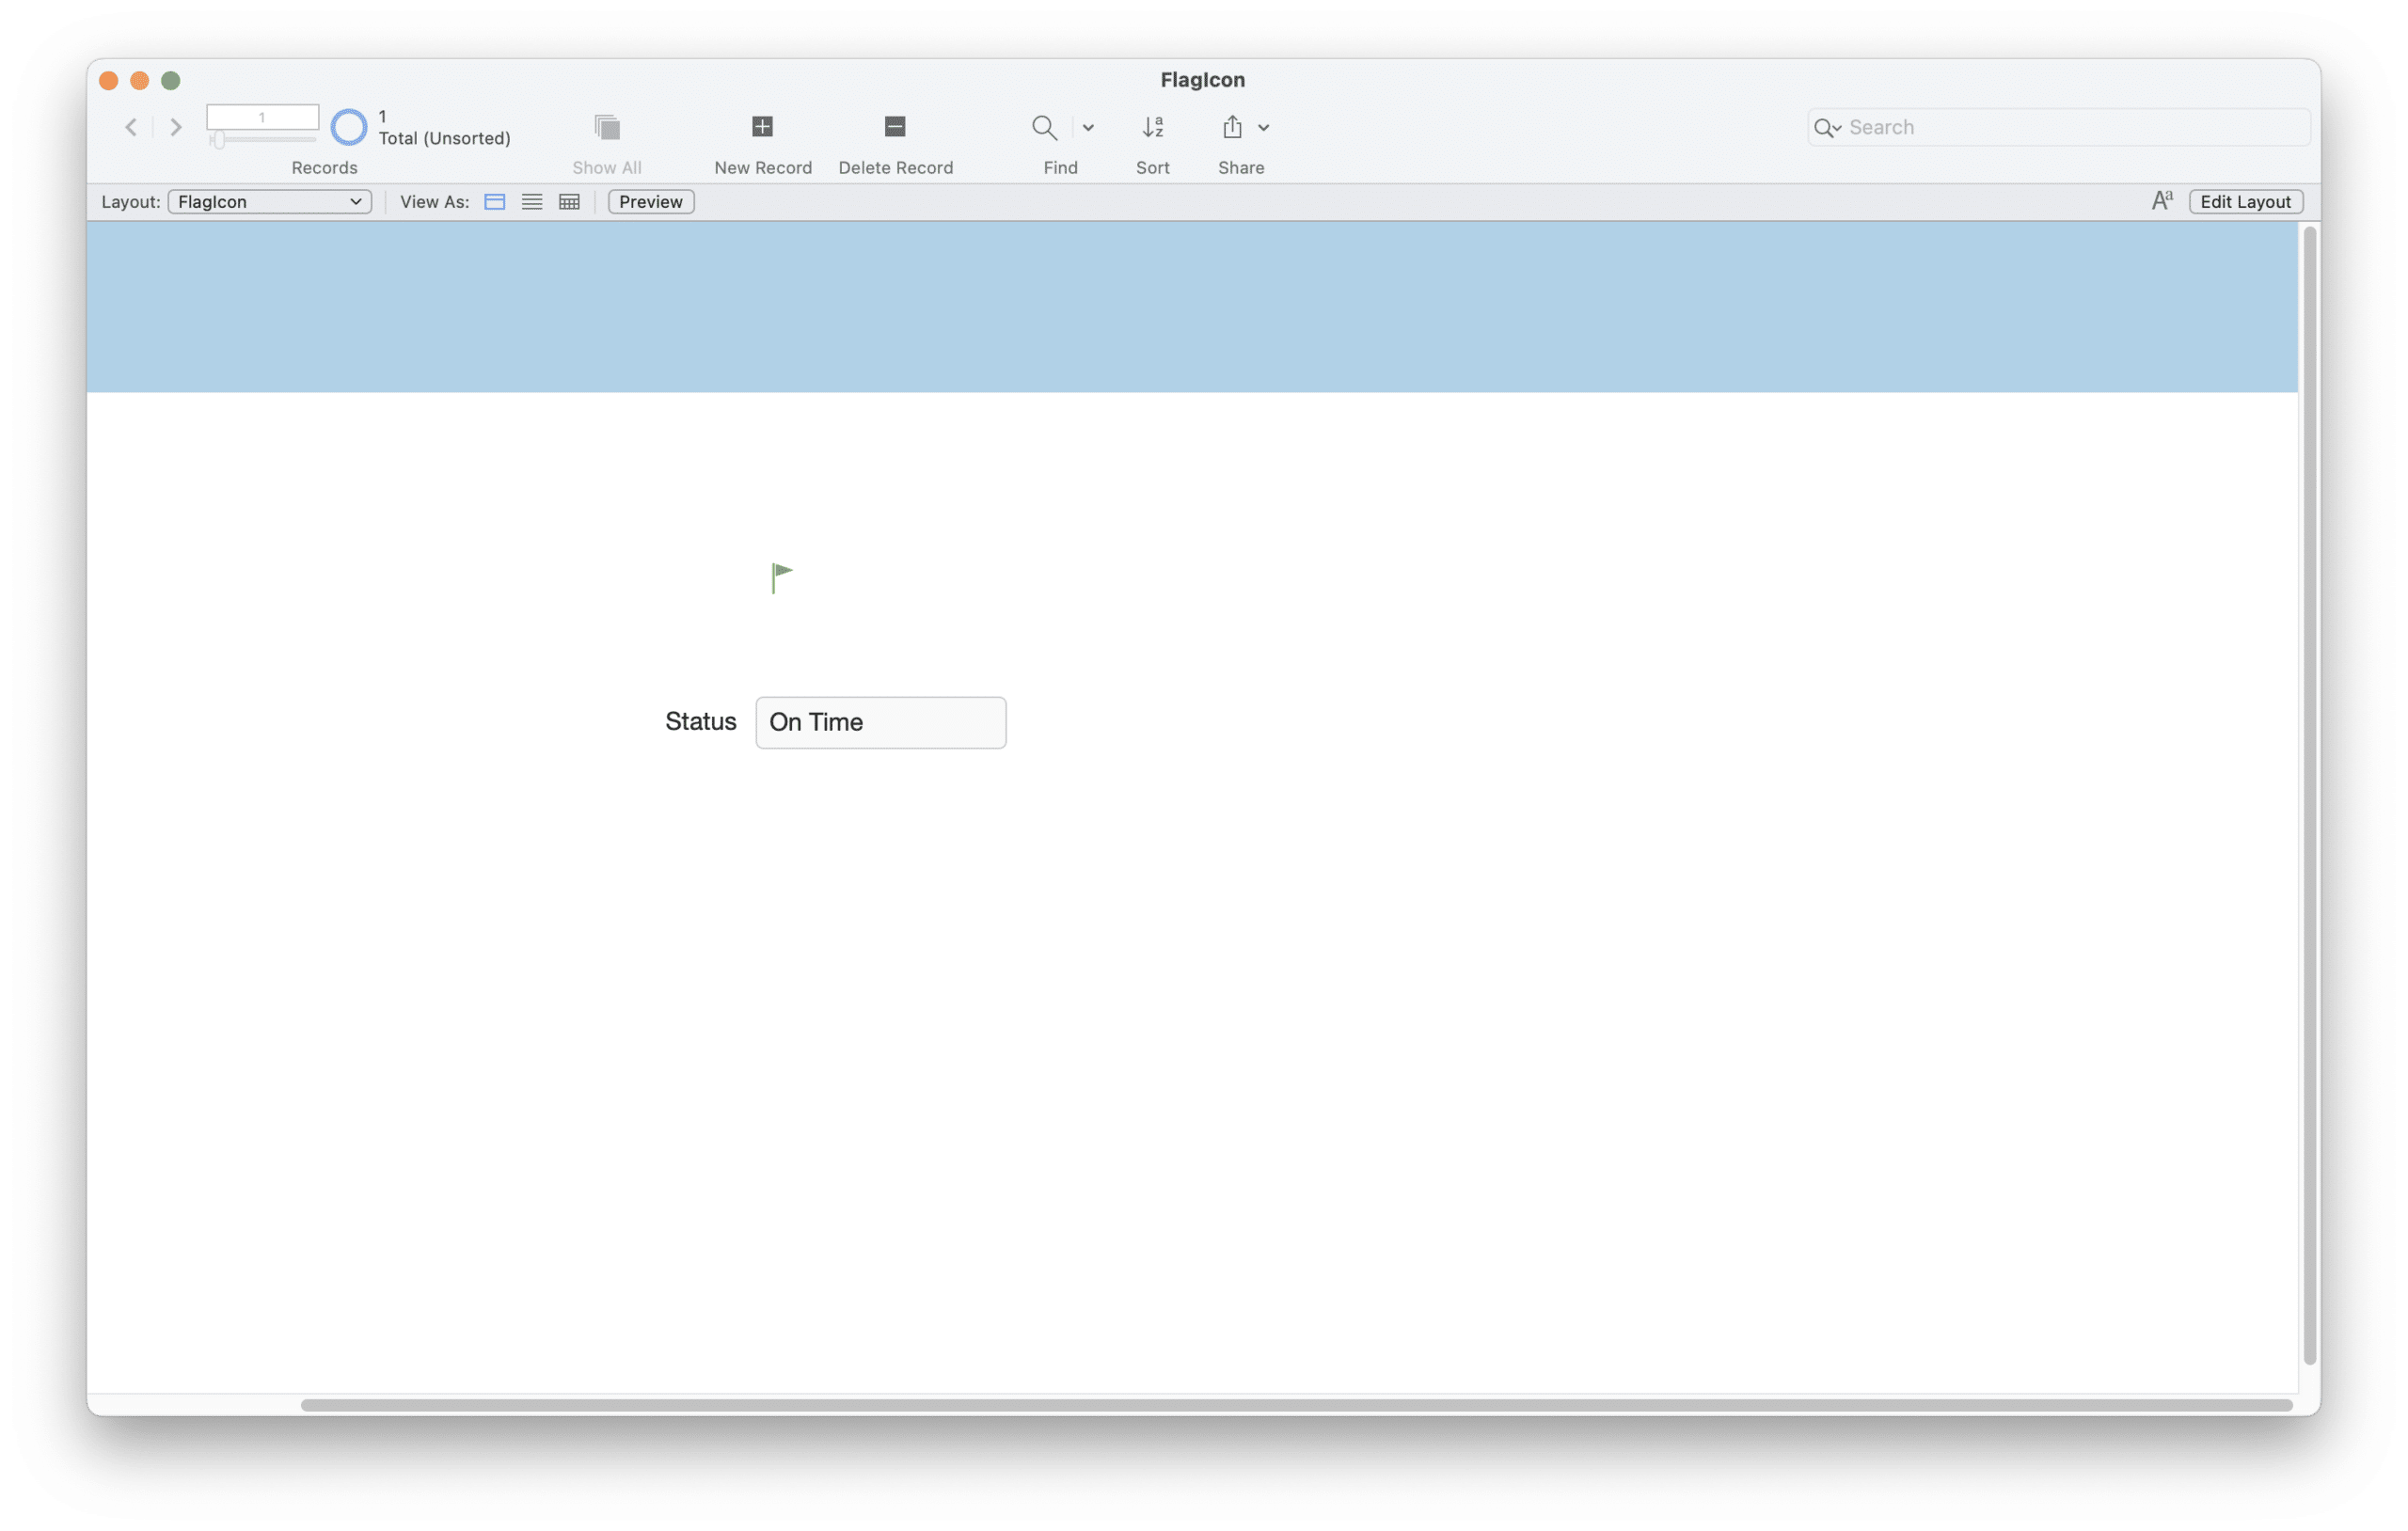
5. Here’s an example of how it looks when the condition is met.
That’s it. Phew! It might seem like a lot, but once you get the hang of it, it goes pretty quickly. Perhaps now you’ll be inspired to create your own!
Bonus
You can take a Material SVG icon (or pretty much any other ready-made SVG icon), and add the “class” attribute as above to make the fill responsive in FileMaker.
Troubleshooting
- Open the SVG in TextEdit and make sure that you’ve inserted the XML attribute correctly, including spelling, spaces and quote marks (make sure the quote marks are the straight kind, and not the curly “smart” kind).
- In older versions of Material icons, there was an invisible artifact present, such as a masking rectangle, which prevented the fill from being able to be changed in FileMaker. If you do run into any issues, open the SVG file in Sketch and open the layers palette. Select the mask and delete it if present.
Links
SVG Wikipedia page: https://en.wikipedia.org/wiki/Scalable_Vector_Graphics
W3 Schools SVG Tutorial: https://www.w3schools.com/graphics/svg_intro.asp
FileMaker SVG Grammar for Buttons: https://fmhelp.filemaker.com/docs/edition/en/svg/
About Sketch Artboards: https://www.sketchapp.com/docs/grouping/artboards/
SVG 2 Language Reference: https://svgwg.org/svg2-draft/Overview.html
Grouping the “g” element: https://svgwg.org/svg2-draft/struct.html#TermContainerElement

Thank you for sharing this, Alexis. I’ve downloaded and used a set of SVG icons from an I onset and it has most everything but I’m always missing something. I somehow thought it would take more effort to create one. As usual, we just think something is really complicated because we can’t see the entire procedure.
Hi Alexis,
Thank you for the article.
What if we want to change the line color of the icon and not the fill? How do we have to change the svg code in order to accomplish that?
Thanks for your help!
I don’t think dynamically changing the stroke (border) options is supported by FileMaker. You can set a border colour in Sketch, but only the fill colour is changeable by FileMaker; the border colour will stay at whatever it was set to in Sketch originally.
What you can do is to create two object on top of each other with one filled on the bottom and the other with only stroke on top. Then ‘expand’ the line and stroke so it effectively creates a filled object. If you only put the fm-fill class on the top one then FileMaker can change the apparent stroke or fill, depending which path you added the class to…
Is the size you specified (16 x 16) a requirement? If not, is there much wiggle room on how large the svg image can be?
Thanks,
Dave E
Since SVG is a vector format, in theory it looks the same at any size. However, icons are typically shown at small sizes and so can lose some clarity (because people have more trouble seeing small things, not because of any technical issue with rendering). The advantage to having small artboards is that while viewing your document at 100%, you’ll get a more realistic idea of what the icon will look like in most applications, and see if it looks good like that. If not, you may need to remove some detail and simplify the icon further.
I’m using affinity designer for custom SVG icons. I’m able to successfully import the icon and it will change colour appropriately according to the FM attributes, but the icon is positioning incorrectly. When set with the icon above the button label, all the other icons are centralised, but the imported one is positioned to the left of the button segment. When selecting just icon, others are centralised, while the imported one is positioned at the top left of the button segment. Any idea where to look for the error?
Hi Richard, I’m not familiar with that program, and I haven’t seen that specific error before. However, a lot of programs can open SVG files, so if this one is giving you problems, you could try a different software. OmniGraffle, Sketch, and AdobeXD all have the ability to save objects in SVG format. (I’m not sure in terms of free software what your options are. Inkscape used to be a good free option, if your OS is supported.)
With Affinity Designer, for custom svg icons to center and scale like ‘native’ svg icons:
Inside the svg, edit the width and height values to match your icon size in points. Make the data look like “512” or whatever your icon size is. I’ve seen ‘pt’ added to the end of the size (“512pt”) and also left off, so I don’t think it matters whether you specify a measurement system.
Next, edit the viewBox value to “0 0 512 512” (if your icon is 512×512). Save, import, and your icon will center and scale properly.