

Are you creating a FileMaker Pro subsummary report? A subsummary layout part is used to sort a set of records into groups based on the values contained in a break field. Typically, you can only create one subsummary part per field on a layout. But what if you need both a leading and trailing subsummary part for the same field on a single report? Well, you can do it, given a little creativity!
*****************
Use case
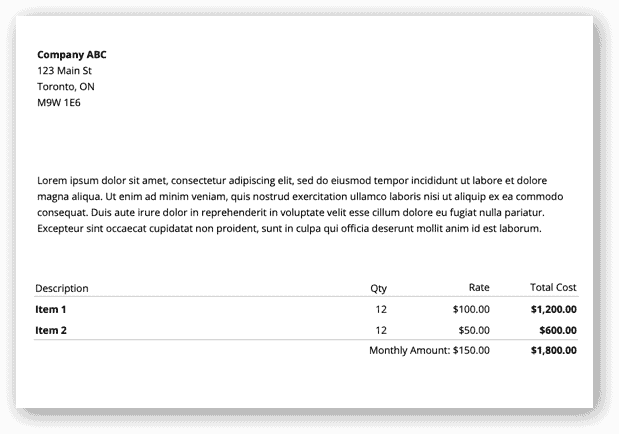
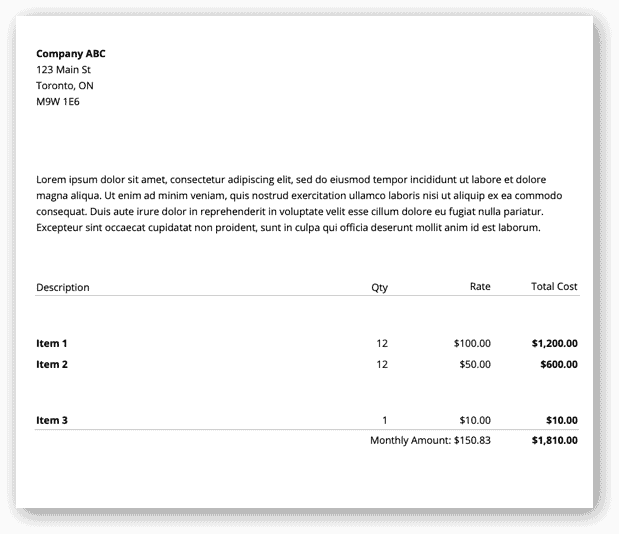
Let me explain the situation first. I was working on designing a report for a client for their FileMaker solution, formatted as a proposal. It had a very simple structure. There was a Proposal table to hold data such as the proposal name, customer name, and date, and a Proposal Line Items table related by ProposalID to hold the individual items added to the proposal.
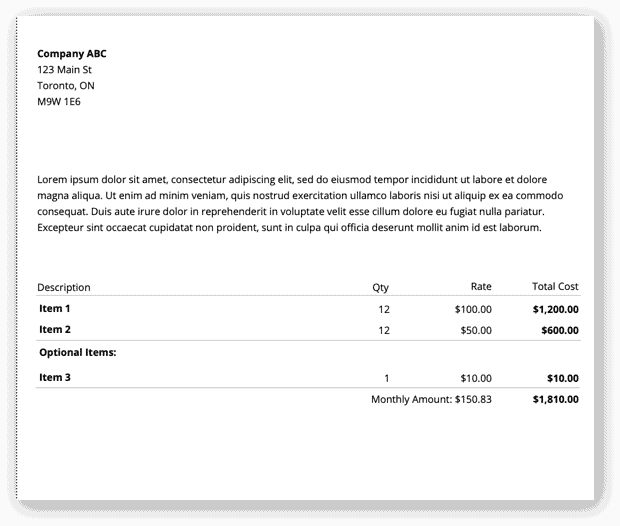
To produce the report, I had created a list view layout showing records from the context of the Proposal Line Items table, with merge fields placed in a Trailing Grand Summary part displayed at the bottom of the list to display the summary total and monthly amounts. So far, so good. Nothing too complicated here. In Preview mode, It looked something like this:
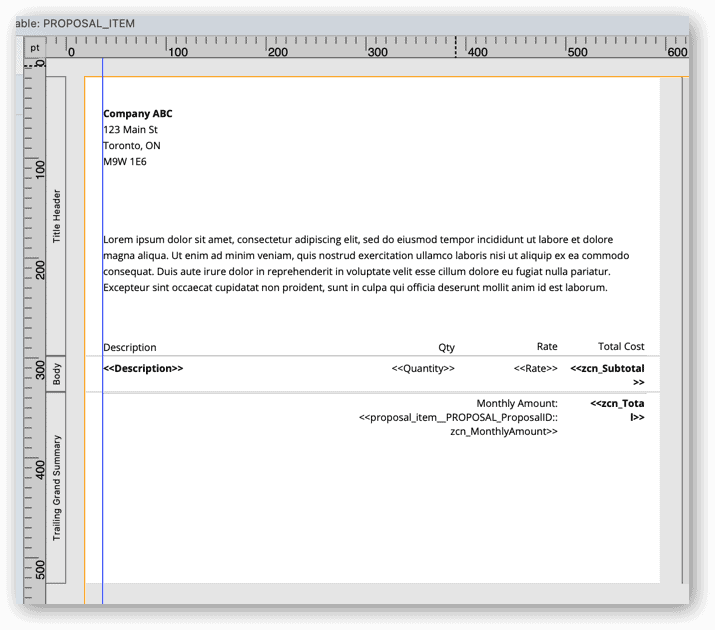
In Layout mode, it looked like this:
Adding some complexity
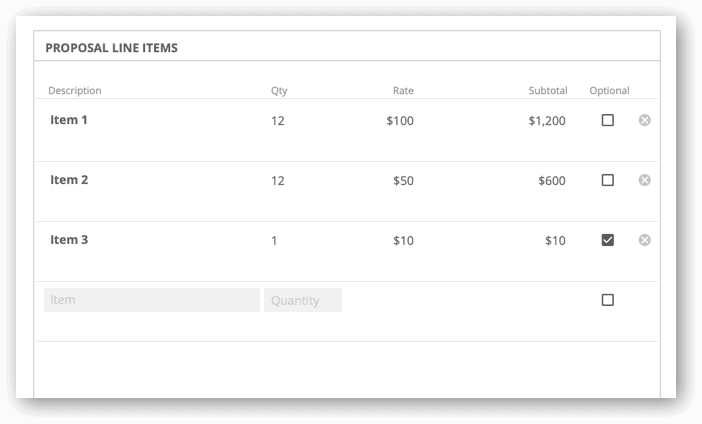
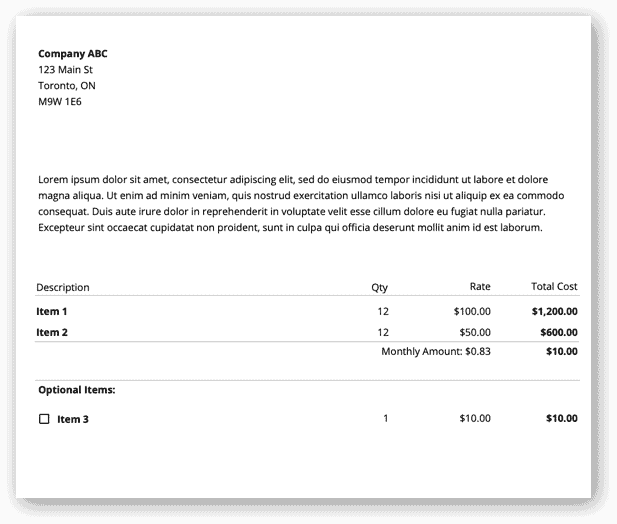
After I built this simple report, the client told me that they’d like to be able to add some “optional” items to the proposal as well. The catch was that they didn’t want the optional items to be included in the overall total. Instead, they wanted the regular items to show with a total below them, and then the optional items below that. They also wanted a checkbox next to each optional item, so that the proposal recipient could print out the proposal, manually mark which optional items they wanted, sign the proposal, and scan it back.
Here’s how they wanted it to look:

Ok…so now it‘s getting interesting. At this point, I didn’t know how I was going to do that yet. I knew that creating a total in the middle of the report was going to be challenging, because of the way FileMaker handles subsummary parts. But since I’m writing this blog post, you can imagine that I eventually found a way!
Simple subsummary part display
When faced with a difficult problem, I always remind myself, “Solve the simple case first!” So to start, I tackled the regular/optional issue, which was straightforward. I knew I’d be able to use a simple subsummary report to split the regular and optional items from each other.
I decided to add a simple checkbox to the entry portal for the line items, so the user could indicate that the item was optional. It was formatted as a number field, where Optional items would have a value of 1 (checkbox on), and regular items would be empty (checkbox off). Note: this is the FileMaker version of a boolean field, where 0 is off/false, and 1 is on/true. The only difference is that in FileMaker, we typically use the values “empty” and “1”. This avoids the extra step of having to fill in a value of 0 in a field when we could just leave it empty and still test for a 1 in cases that are on/true.
Going back to my layout, I modified it and added a subsummary part, then chose the “Optional” field as the break field.
Then I adjusted the Preview proposal script, to automatically sort the records by the “Optional” field, so that the subsummary part would show when viewed in Preview mode.
This successfully split the regular and optional items into two groups. FileMaker subsummary parts sort, group, and display records that have no value first. This is followed by records that do have a value, in numeric order (assuming the break field is formatted as a number field).
In this case, we have only two groups: regular items, which have no value in the Optional field; and Optional items, where the Optional field is set to 1. (If we did have records with 0 value, they would be separated, and come after the group of blank records. So a value of “0” in a field is not the same as an “empty” value for sorting purposes.)
This is how it looked in Preview after adding the subsummary part:
The two groups were now separated. However, it was obvious that simply adding a subsummary part wasn’t enough. I still needed a heading above the optional items so the user can tell the difference between the two groups. But I only wanted the heading to show above the optional items, and not the regular ones.
Conditional headings using a hide condition
So now I have somewhat veered off the original goal of creating a total in the middle of the report. That part is coming…but first I want to show you how I solved the issue of the heading, because it showcases some other interesting FileMaker features.
To sum up the goal here: I wanted to have a heading called “Optional Items” that shows above the optional items, but not the regular ones.
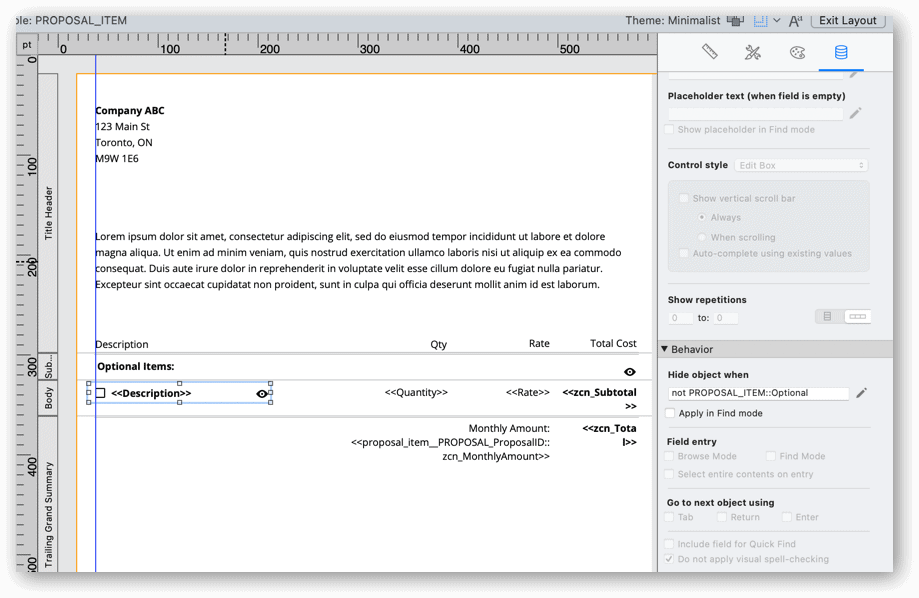
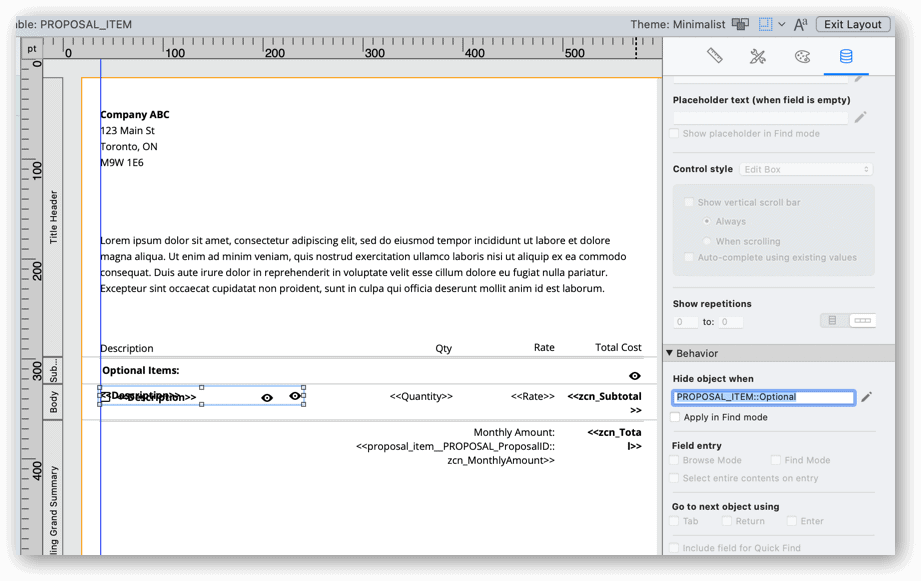
I chose to use the feature “Hide object when”, found in the Data/Behavior section of the Inspector palette, to control the visibility of objects. Since the context of the layout is Proposal Line Items, I could test whether the Optional field was “on” or “off” (empty or 1). I used the test not PROPOSAL_ITEM::Optional.
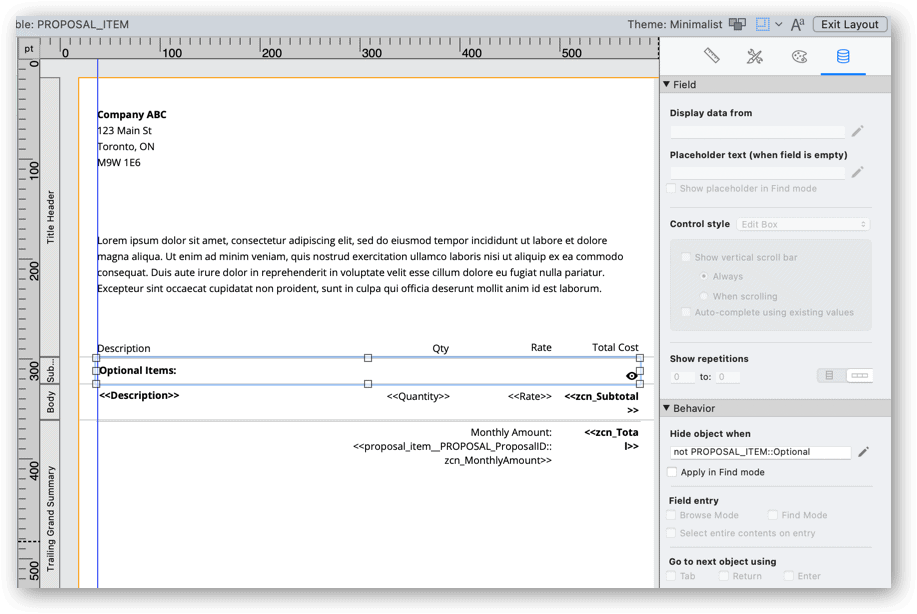
In other words, if the item is not marked as optional (i.e. is a regular item), hide the “Optional Items” heading object.
Here’s how that looked in Preview mode:

Great! Now we have a heading, which only appears above the optional items. But what about that empty space above the regular items? I wanted to get rid of it if possible, since it looks weird.
“Resize enclosing part” to the rescue
With the heading object selected, I chose “Sliding up based on:” and “All objects above” in the Sliding & Visibility area of the Inspector palette. I also checked the option “Also resize enclosing part”.
This feature allows you to dynamically adjust the size of a layout part to accommodate different lengths of text in a field when printing from Preview mode. On the layout, set the field to the maximum height you think will accommodate the field’s longest contents. Then use the “Also resize enclosing part” option to shrink the part down when previewing. This avoids large amounts of wasted space on printed reports, in cases where the user didn’t actually enter a lot of text.
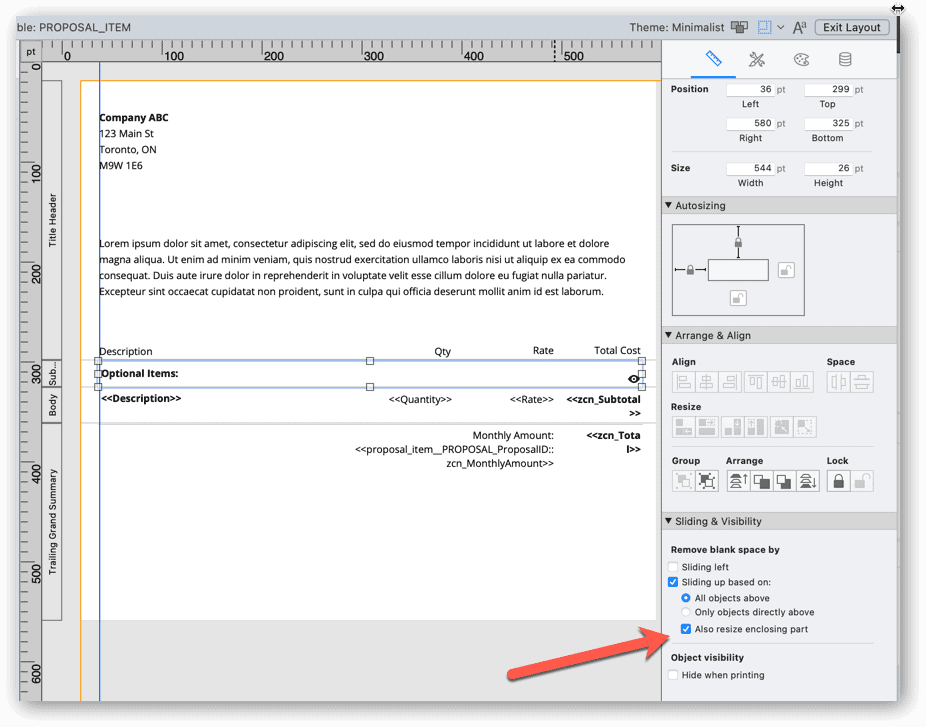
Here we only have a small amount of text, but we’re going to use the “resizing part” feature to get rid of the extra space caused by the subsummary part. The hide condition will cause the heading to not appear at all when the layout is viewed in Preview mode. The subsummary part (which contains the heading object) will then be resized to the remaining available space, which in our case is only 1 point.
This works well—as long as the heading object’s size almost completely fills the available space inside the subsummary part. As mentioned, remaining empty space above or below the object will still be displayed.
Troubleshooting layout parts
To demonstrate what I mean, I’ll show you a small trick I use when I’m trying to troubleshoot layout parts. It can be hard to tell one layout part from another in Preview mode. So sometimes I select the part and fill it with a colour to make it obvious which part is being displayed.

This makes it really easy to see your subsummary part in Preview mode.

As you can see above, there is a bit of yellow showing just above the regular items. That’s because I added some extra space below the heading object, just to demonstrate what happens.
Below, I’ve fixed it, and made the subsummary part just one point larger than the “Optional Items” heading object. It makes the part almost completely disappear above the regular items.
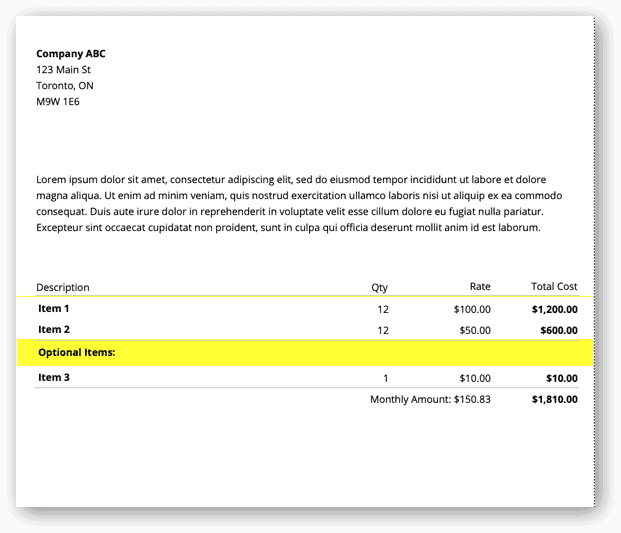
I played with making the parts exactly the same size as the objects, and got unpredictable results. I think there can be display issues if the boundaries of an object have the exact same coordinates as its enclosing part (i.e. the object exactly overlaps the top and/or bottom edges of the part). For my purposes, I can live with a 1 pt space above the regular items. This is how it looks without the highlighting:
More conditional hiding
The last issue I wanted to resolve before diving into the totals, is how to show a checkbox next to the optional items. Once again, I used the “Hide object when” condition. The checkbox doesn’t need to be functional, since the end user will be printing this out on paper.
I created a copy of the existing Description merge field, and added a button beside it, with an icon of a checkbox attached. After grouping these two objects, I set the hide condition to: not PROPOSAL_ITEM::Optional, the same as the “Optional Items” header. That way, the checkbox will hide on the records displaying regular items (and show on the optional ones).
I put the opposite hide condition, Hide object when: PROPOSAL_ITEM::Optional on the original Description merge field (the one we want to show on regular items). This way, either one or the other Description label will show on the corresponding record. Here’s how it looks with both fields visible in layout mode:
And here’s how the report looks in Preview, after all these changes:

So, we’ve got a report with a subsummary part sorting on the Optional field. We’ve got our optional items showing below our regular items. We’ve got an “Optional Items” heading to differentiate them. We got rid of the blank space above the regular items. And we are showing a checkbox next to the optional items. Yay!
By this point, you’re probably wondering when we’re going to get back to the totals. All righty then! Let’s do that now!
Showing the totals
The last remaining problem is to figure out how to show the totals below the regular items, then followed by the optional items. (The total field is formatted as a Summary field summarizing the Subtotal calculation from each record. The Monthly Amount field is a calculation with the formula GetSummary ( zcn_Total ; Optional ) / 12.)
At first, I thought of simply using the subsummary part I had already created, and just expanding it. So I added the trailing total line above the Optional header. I also changed the totals to reference the subsummary fields from the local table, like this:
Here’s what it looked like in Preview mode:
While the labels are in the right place, the totals are not correct. Since the subsummary part is technically a leading subsummary for the Optional items below it, it shows the totals for the Optional group of records, which is not what we want.
I thought about getting the totals from the parent Proposal instead, but that figure includes the Optional items, which we actually want to exclude. I suppose theoretically you might be able to reference a calculation on the Proposal that excludes the optional items through a relationship or something like that, but I didn’t end up trying it.
Two subsummaries for the same field
As I was considering this problem, it occurred to me that what I really wanted was to have two different subsummary parts for the same break field: a leading subsummary part for the heading, and a trailing subsummary part for the totals for the same group of records. Except that FileMaker only lets you create one subsummary part per field on a given layout…hmmm…
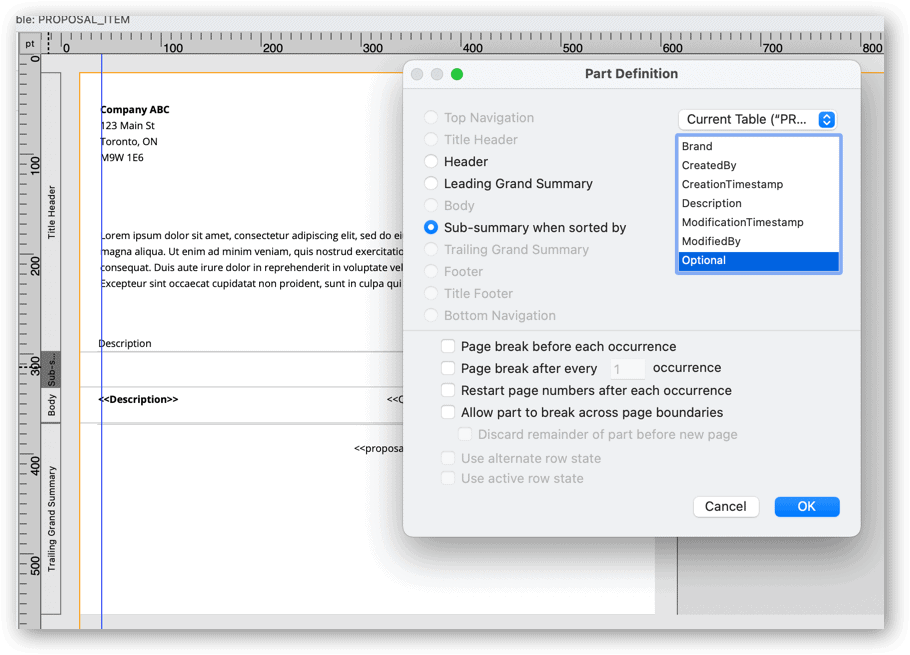
This got me thinking about how I could possibly get around this limitation. I suddenly thought, I wonder if you could create a calculated version of the Optional field, and create a second subsummary part, but with the calculated field as the break field? This would effectively give you two subsummary layout parts for the same field.
It turns out that you can! (Probably I’m not the first person to think of this…but it was new to me when I made the connection.)
So I did just that. I created an unstored calculation field that simply referenced the Optional field:
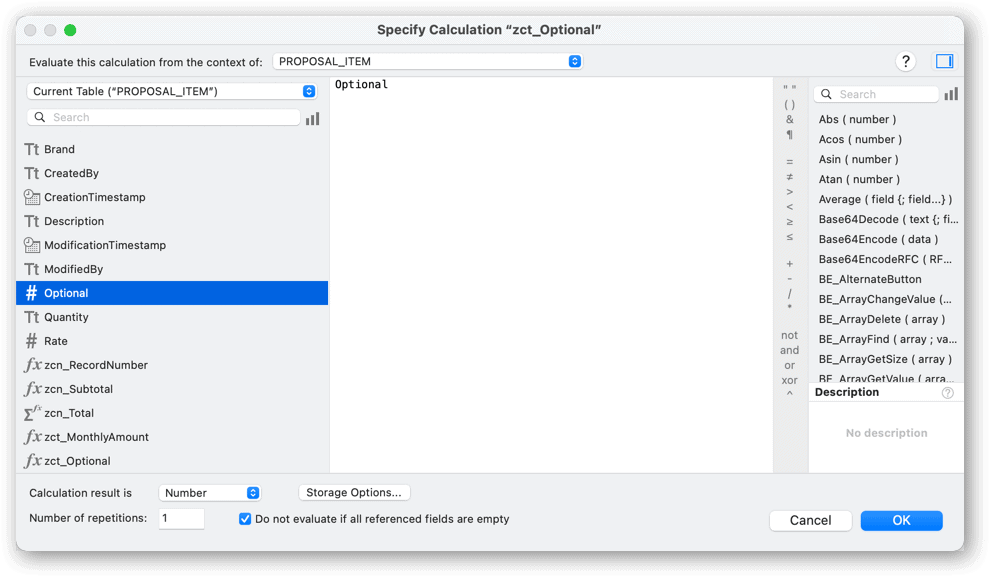
This way, the value of the Optional text field and the Optional calculation field will always be the same.
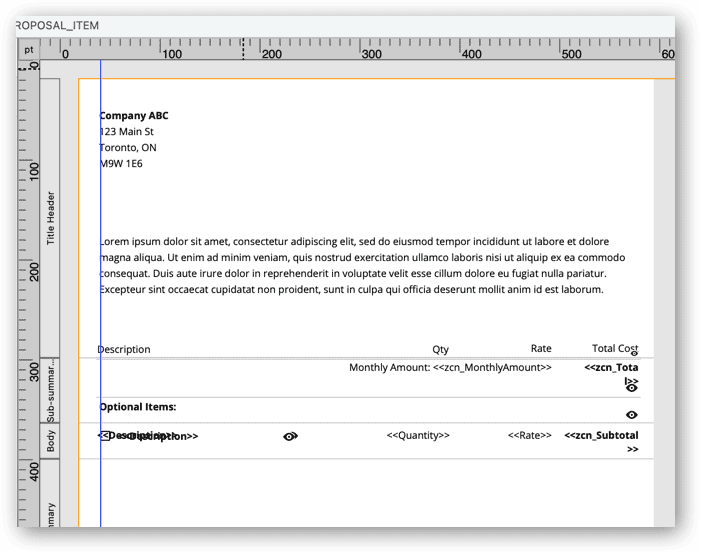
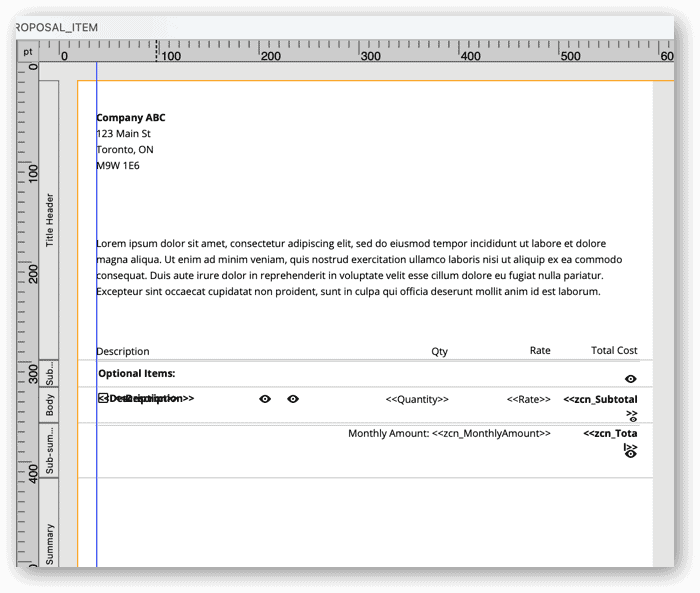
Then, I created a subsummary part below the body part, with the new calculation field as the break field:
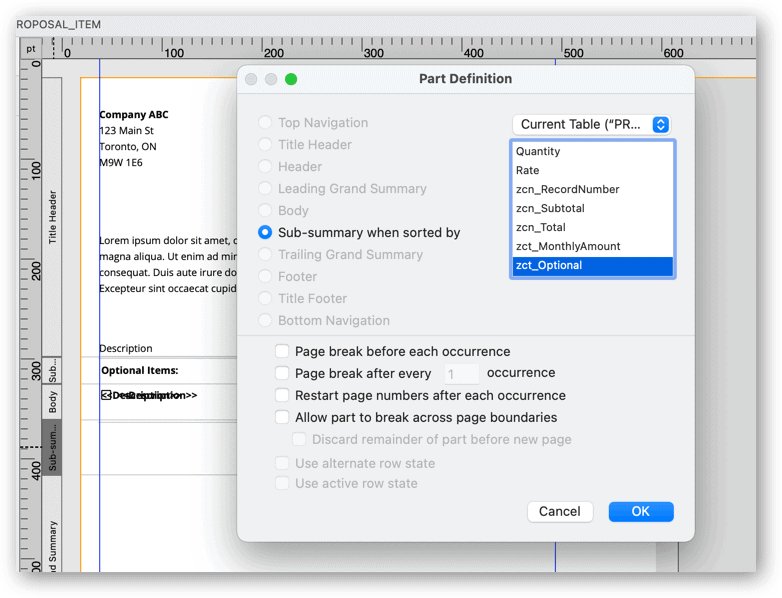
…and placed the subsummary fields into it. Now, it looked like this in layout mode:
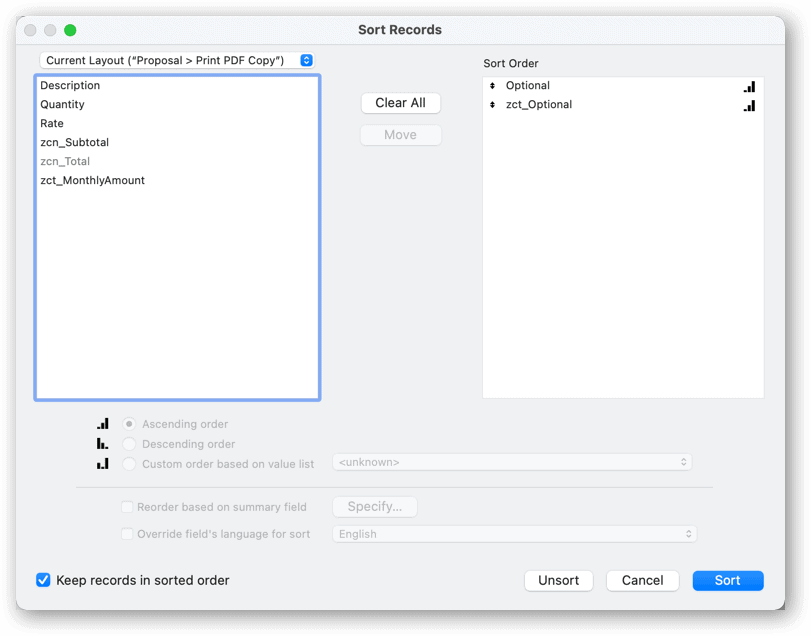
The last step was to add the new field to the sort order, so that the second subsummary part would show up when the layout was previewed:
And finally…voilà! We have our finished report, with everything in the right place!
Conclusion
In the end, I was able to provide what the client requested: a nicely formatted report of regular items, followed by a total for just those items, followed by the “Optional Items” heading, and finally the optional items themselves with a checkbox beside them.
Sometimes it takes a bit of experimentation to get the results we want. A lot of the time, the solution is not at all clear at the beginning, and we don’t even know if we’ll find a way to do it. I always have to remind myself to work through the problems one at a time. And not to worry too much about whether it will work or not yet, but just keep trying different things along the way. Our creativity kicks in when we’re able to connect two or more pieces of seemingly unrelated knowledge together. But it can involve a lot of trial and error, so if you’re working on something, don’t give up!
This solution is also an example of how combining different FileMaker features together helps us get our desired final result. In this case, we used subsummary fields and parts, together with “Hide object when” and the “Also resize layout part” feature to achieve our goals.
Hopefully this will help someone in future who’s struggling with their subsummary reports in FileMaker!
Hey Alexis, this is a great tip and one I will very likely use in the near future…
However, it is possible to use 2 sub-summary parts with the same break field – AS LONG AS they are separated buy another “part”, which can be the body part or another sub-summary part
• the one on top is a “leading” sub-summary and the bottom one is a “trailing” sub-summary … (FMP automatically adds the “leading” and “trailing” to the part names).
• if you control+click on the little tab that has the name of the part then the tabs slide out to display the full name of each part … I wanted to send you a couple of screen grabs but can’t do it in this comment box … I will email them to you.
Love your work. Cheers, Michael
Right you are! I always got the error message “A Sub-summary part for this field already exists” and took it at face value…Thanks for the tip!